Employees are the people who receive training in TrainGrid. Every assignment, certificate and compliance number is tied to an employee record. This section covers how to find people, add them one at a time, import your whole roster from a spreadsheet, and keep records tidy as people join and leave.
Note: Adding, editing, importing and archiving employees is available to Administrators and Managers. If you're a supervisor or viewer, you'll see employee records but not the buttons to change them. Supervisors only see the people at their assigned locations.
The employees list
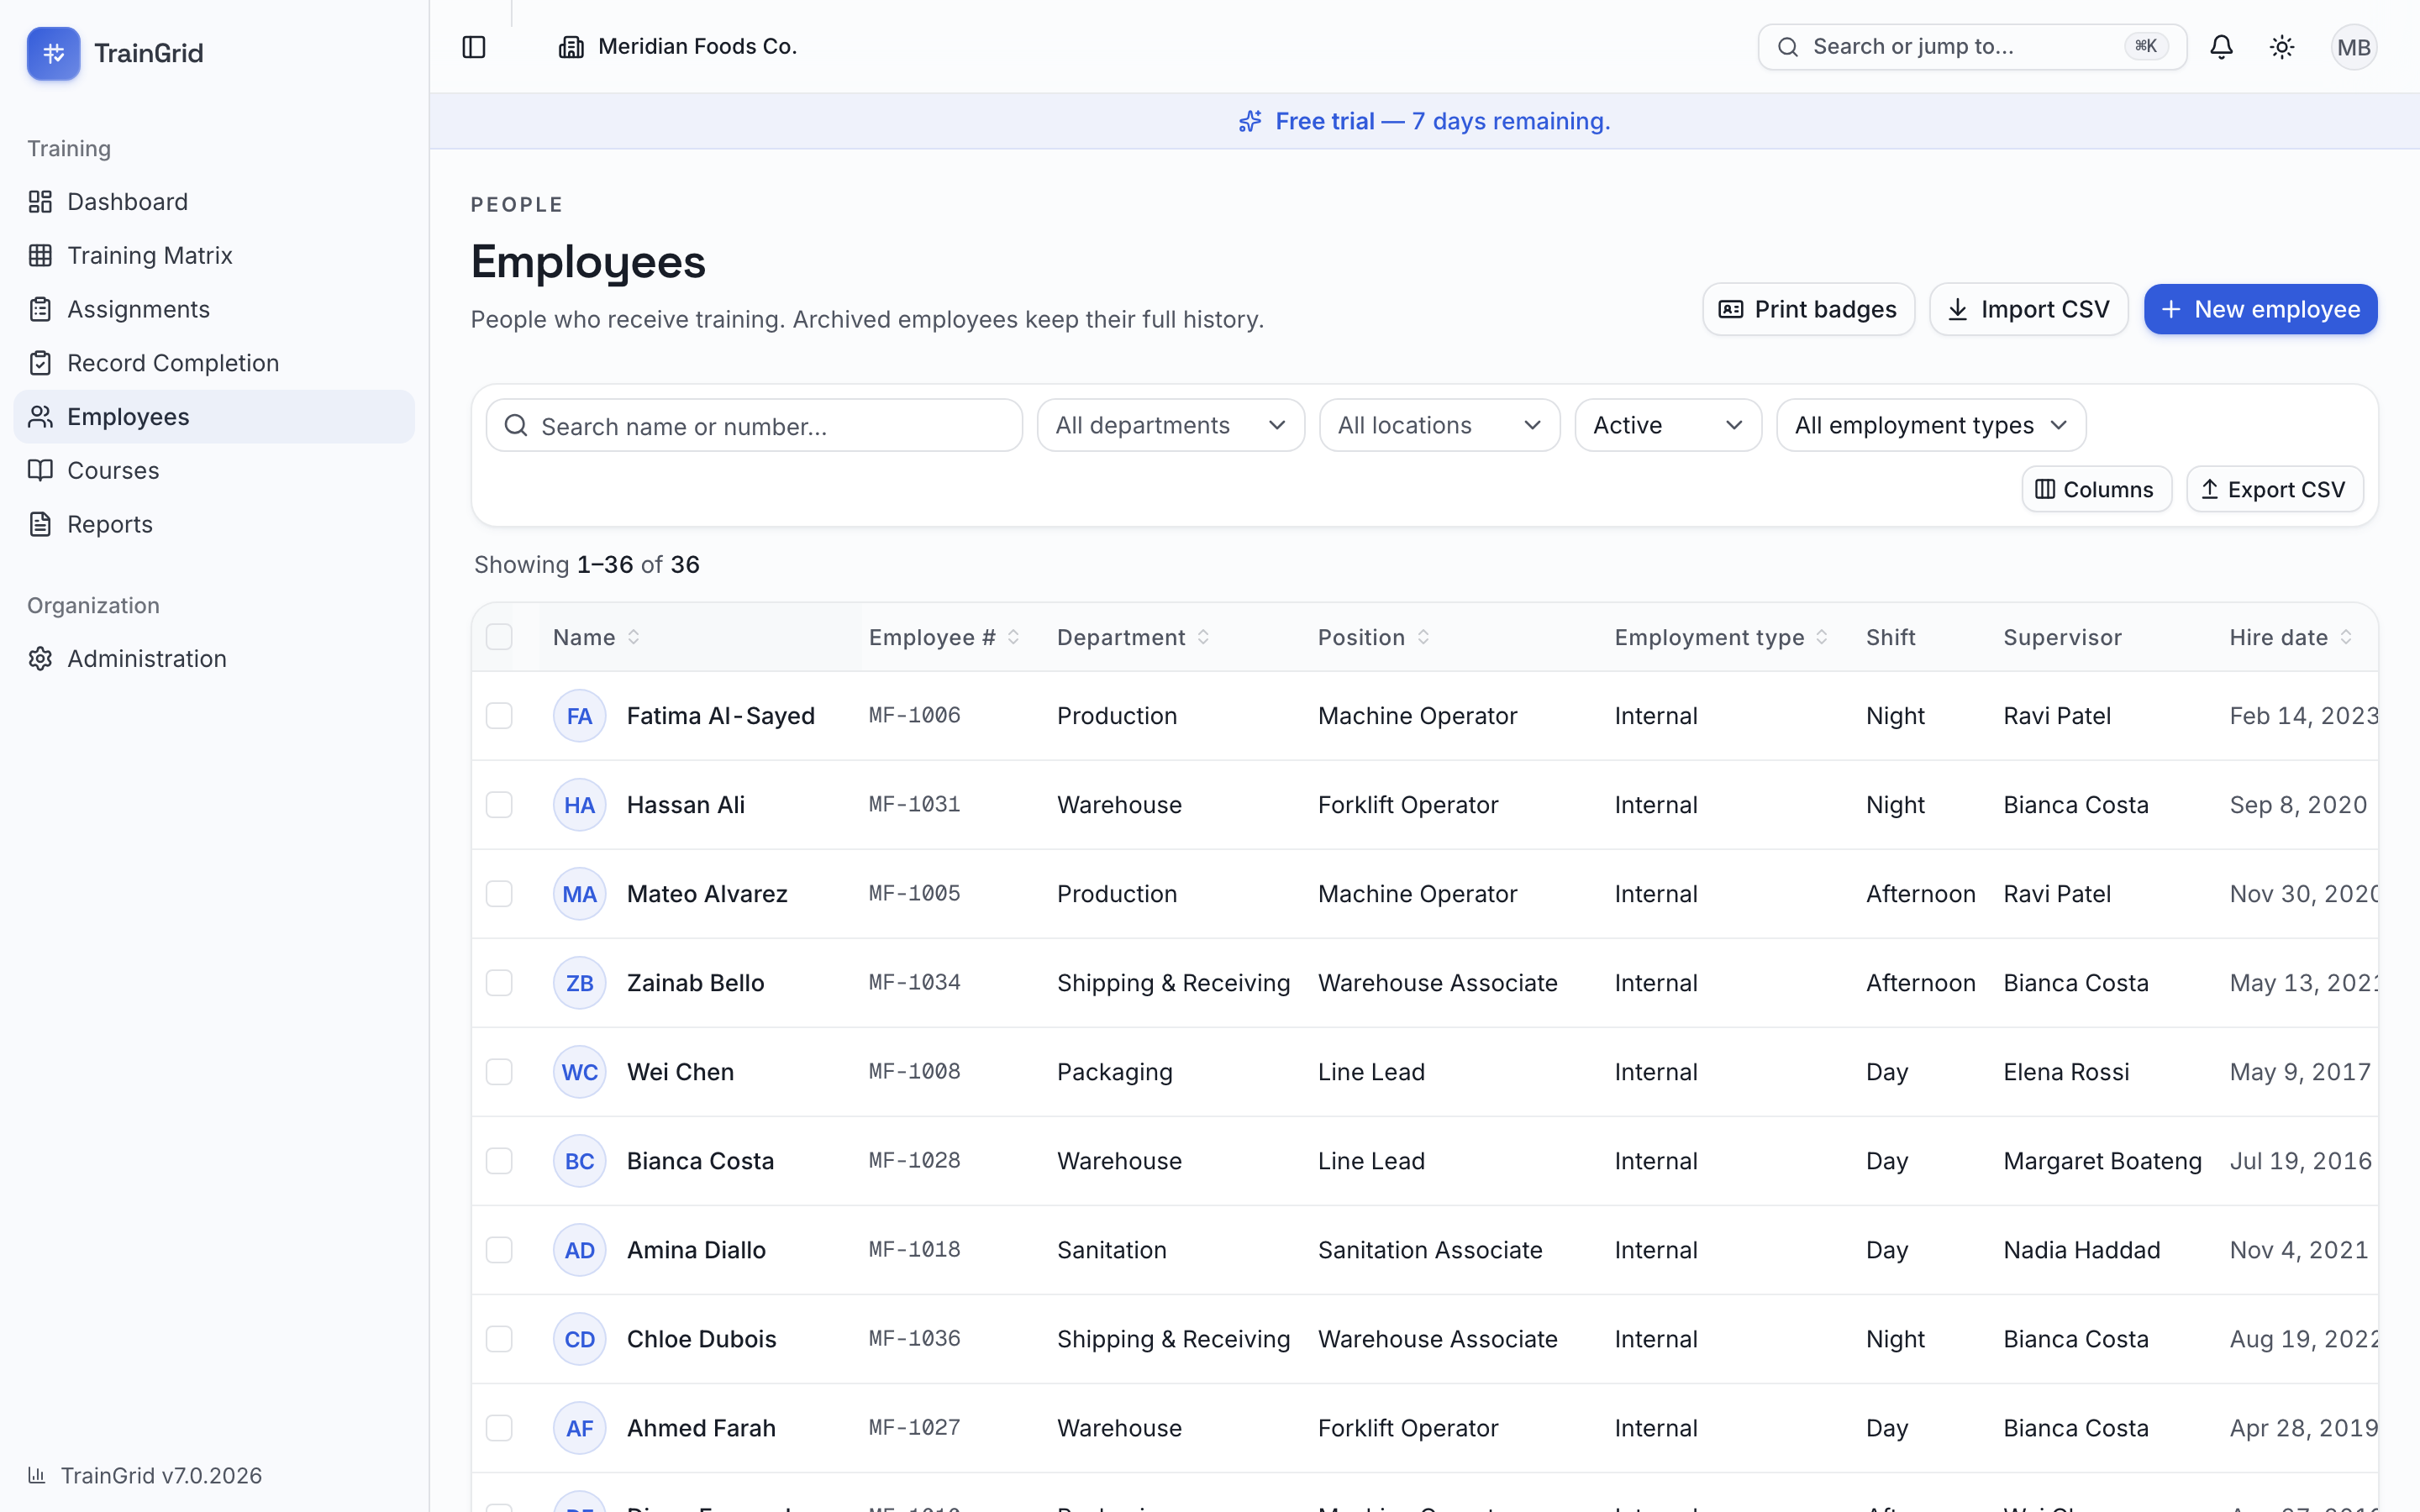
Open Employees from the sidebar to see everyone in your organization. Each row shows the person's name, their email (if you have one on file), and columns for Employee #, Department, Position, Shift, Supervisor, Hire date and Status. Click any row to open that person's profile.
At the top of the list is a toolbar for narrowing things down:
- Search name or number — start typing a name or employee number and the list filters as you type.
- All departments — show only one department.
- All locations — filter by site. (This filter only appears when your organization has more than one location.)
- Status — choose Active, Archived, or All statuses. The list shows Active people by default.
Ticking the checkbox on one or more rows opens a selection bar that counts them (N selected) and offers Archive N or Unarchive N; an Administrator also sees a red Delete N button there, which permanently deletes everyone selected after a password check (see "Delete an employee (Administrator only)" in the Function Reference). The header checkbox selects the rows on the current page only.
Two more controls sit on the right:
- Columns — show or hide any of the optional columns. Your choices are remembered on this device.
- Export CSV — download the people currently shown (matching your filters) as a spreadsheet.
At the bottom, the list tells you how many people you're viewing (for example, "Showing 1–50 of 132") and gives you Previous and Next buttons to page through larger rosters. Fifty employees appear per page.
Tip: To act on several people at once, tick the checkbox at the start of each row. A bar appears with Archive and Unarchive options for the selected people.
Adding one employee
Use this when you're onboarding a single new hire.
- On the Employees page, click New employee.
- Fill in First name and Last name. These are the only required fields (marked with a red asterisk).
- Optionally add any of the rest: Employee number (if any of your divisions has a short form, a Division prefix for the employee number picker sits beside it: leave it on "No prefix" to store the number as typed, or choose a division and the number is stored with its short form in front, shown live as "Stored as MLT10245"; a number that already starts with that short form is left as it is), Email, Department, Position, Location, Shift, Employment type (one of the types your organization maintains under Administration → Employment types — every workspace starts with Internal, the default, and External (agency / contract), and administrators can add their own such as Hourly or Salary), Supervisor, Hire date, and Notes.
- If your organization has set up Custom fields, they appear in their own section on the form — fill in any that apply.
- Click Create employee.
TrainGrid saves the record and opens the new person's profile, where you can start assigning training.
Tip: Onboarding a whole team or plant at once? Skip the one-at-a-time form and use Import CSV instead — it's far faster.
Importing employees from a spreadsheet
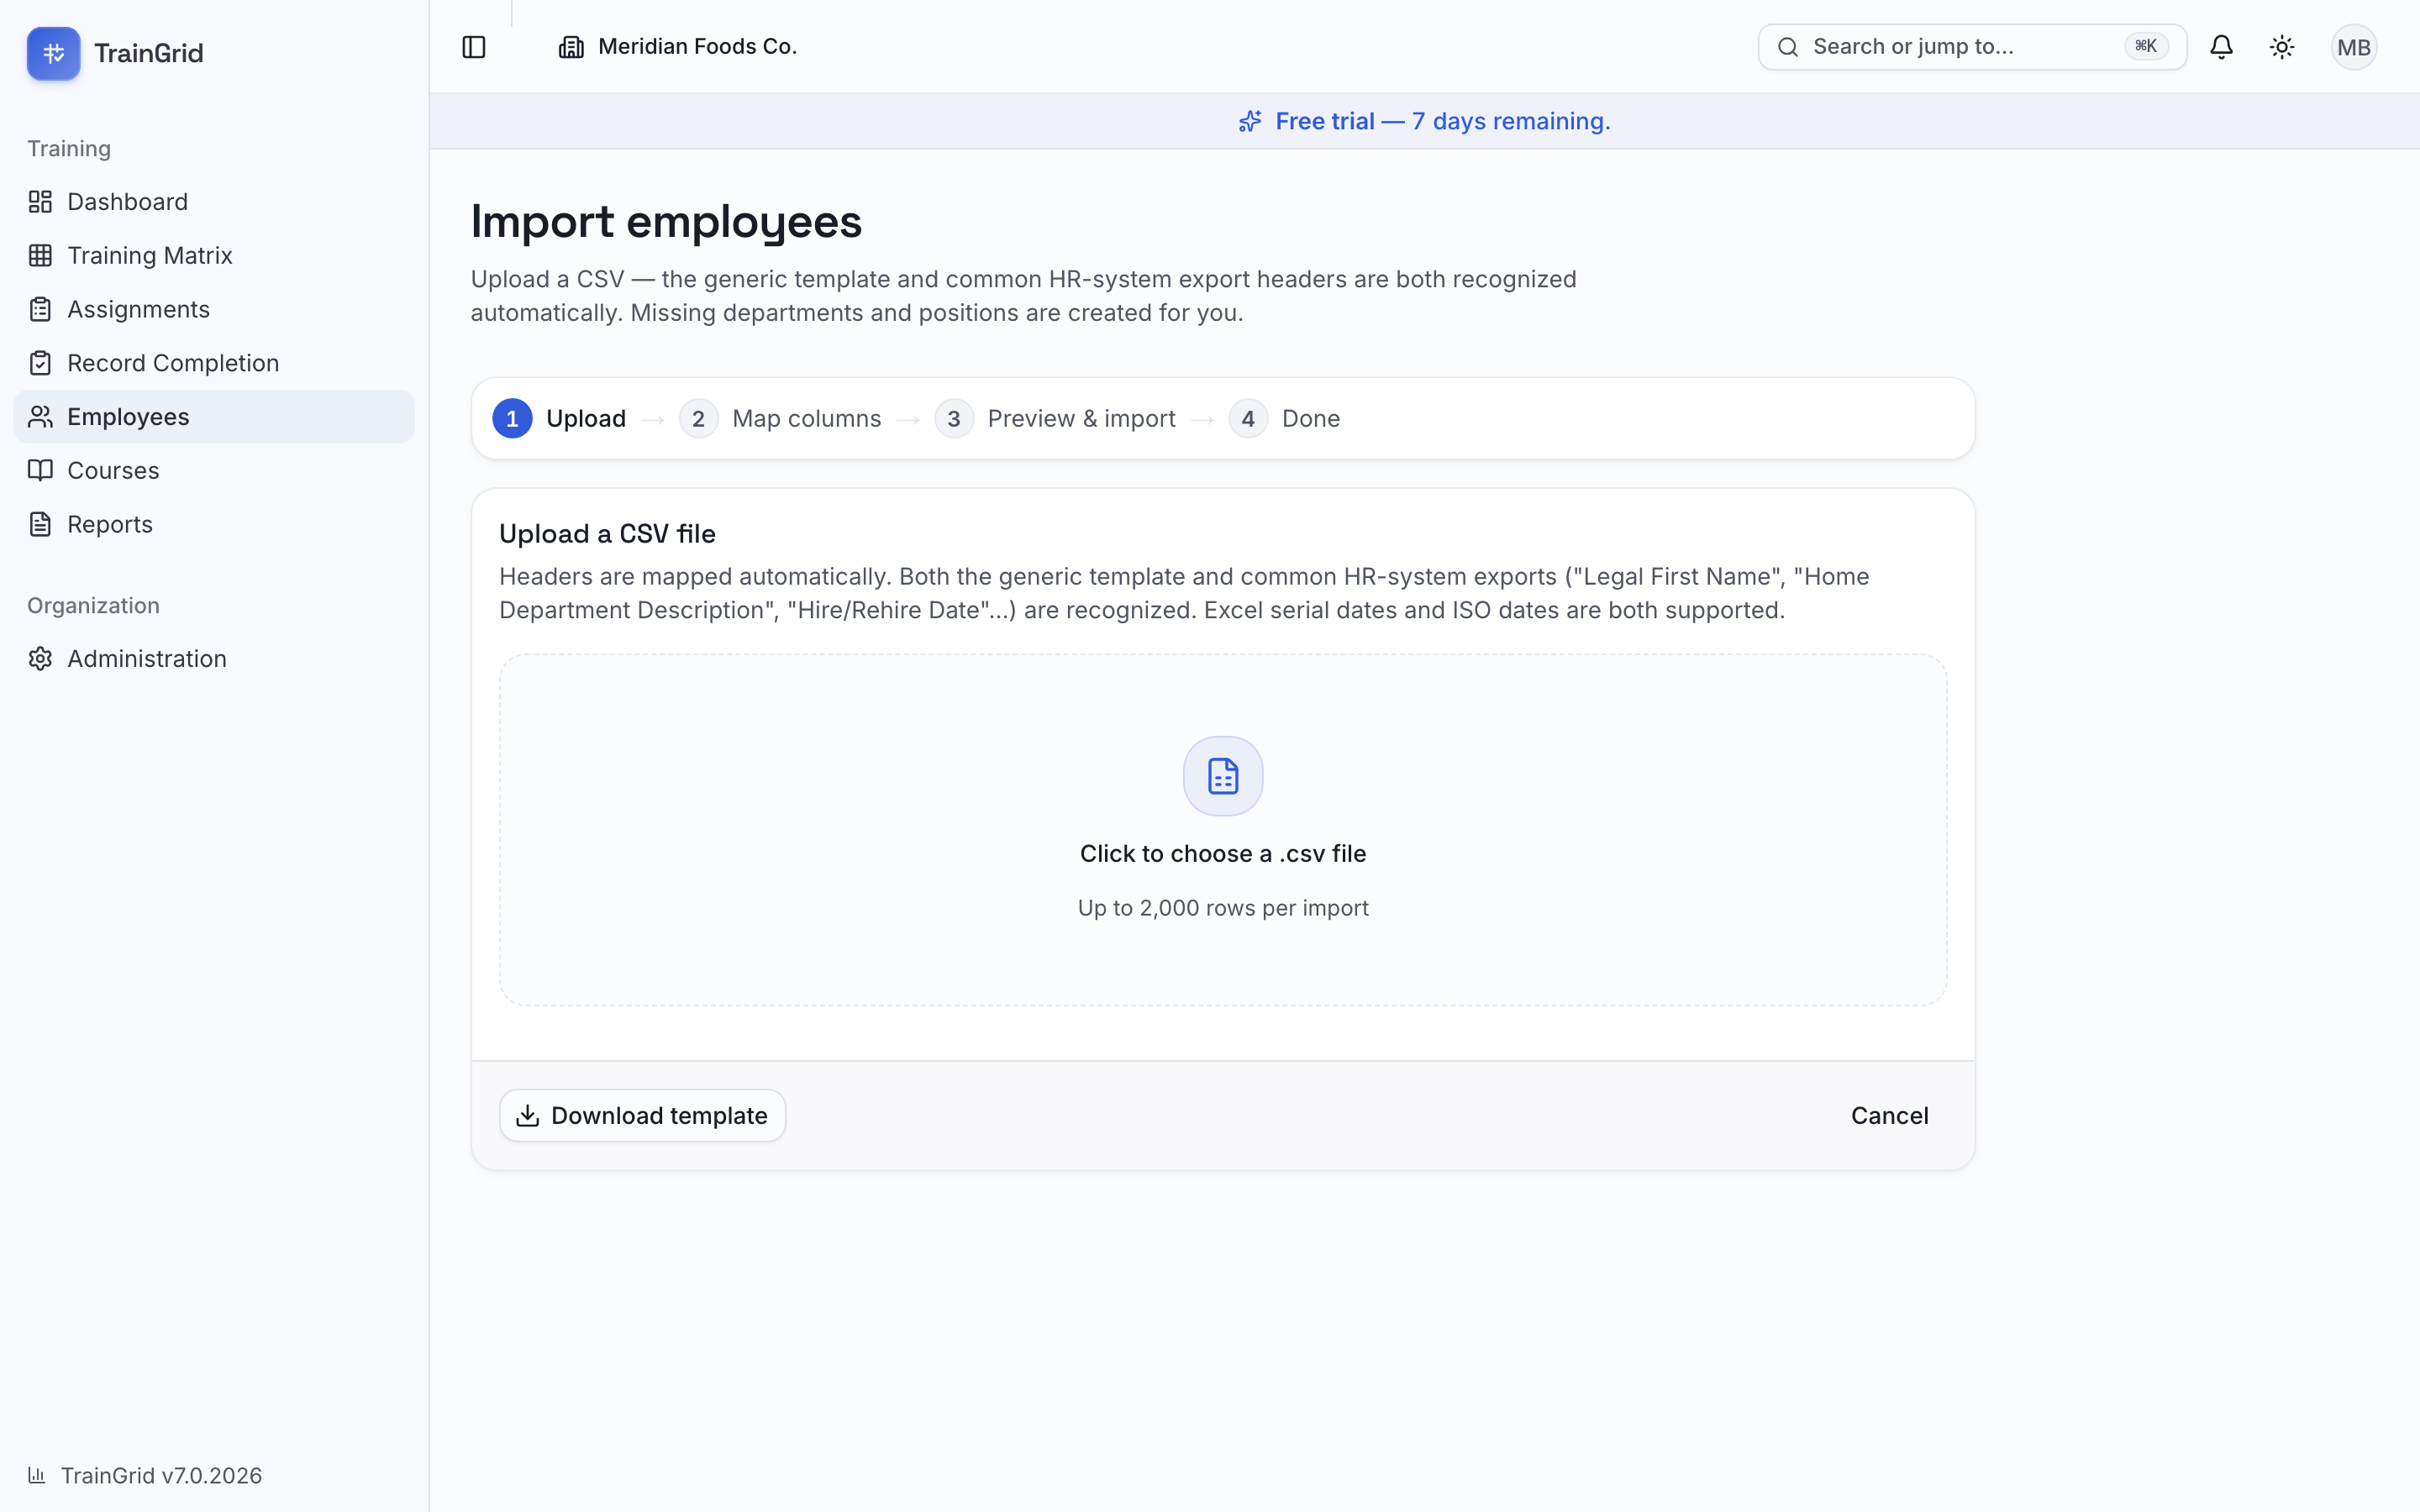
The import wizard brings your entire roster in from a CSV file (the format every spreadsheet app and HR system can export). TrainGrid recognizes both its own template and the column names common HR exports use — like "Legal First Name," "Home Department Description" and "Hire/Rehire Date" — so in most cases you can upload your existing export as-is.
- On the Employees page, click Import CSV. The wizard opens with a four-step guide across the top: Upload → Map columns → Preview & import → Done.
- Upload. Click Click to choose a .csv file and pick your file (up to 2,000 rows per import). If you don't have a file yet, click Download template for a correctly formatted starting point, fill it in, and upload it.
- Map columns. TrainGrid reads your header row and matches each column to the right field automatically. Review the matches; every field shows the column it's pulling from. Change any that look wrong using the dropdowns, or set one to Not mapped to skip it. Only First name and Last name are required. Click Continue.
- Preview & import. You'll see your rows with a green badge counting how many are ready to import and, if any rows have problems (a missing name or an invalid email), a red badge for the ones that will be skipped. Any row's specific issue is listed in the Issues column so you can fix it in your file and re-upload.
- New departments and positions found in your file are created for you automatically. New locations are created too when you are an Administrator or Manager and your plan has room for them (Starter and Professional include one location; Enterprise is unlimited); any other role must use location names that already exist under Administration → Locations (or leave the cell blank), and a location-scoped member can only import people into their own locations. The preview lists the locations your file would create, or the rows it would refuse, before you click Import, and the Import button stays disabled while a location cannot be created.
- If your organization has more than one location, you can choose a Default location to apply to any row whose Location cell is blank.
- Click Import (number) employees to finish. The Done screen summarizes how many were Created, Skipped (duplicates) and Skipped (errors), and notes any new locations that were created. The whole import is recorded in your audit log.
Note: Re-importing is safe — it won't create duplicates. TrainGrid matches incoming rows against people you already have (by employee number or email, and for rows that have neither, by name plus department). Anyone who already exists is skipped rather than duplicated, so you can re-run the same file to pick up new hires without worrying. People are never merged on name alone, so two different people with the same name are both kept.
There's one optional power feature on the preview step for organizations that already have employees: a checkbox to Archive active employees who aren't in this file. Tick it only when the file you're uploading is your complete current roster — anyone active today but missing from the file is treated as having left and is archived (their history is kept, and they can be restored on rehire). Leave it unticked to simply add and update people.
The employee profile
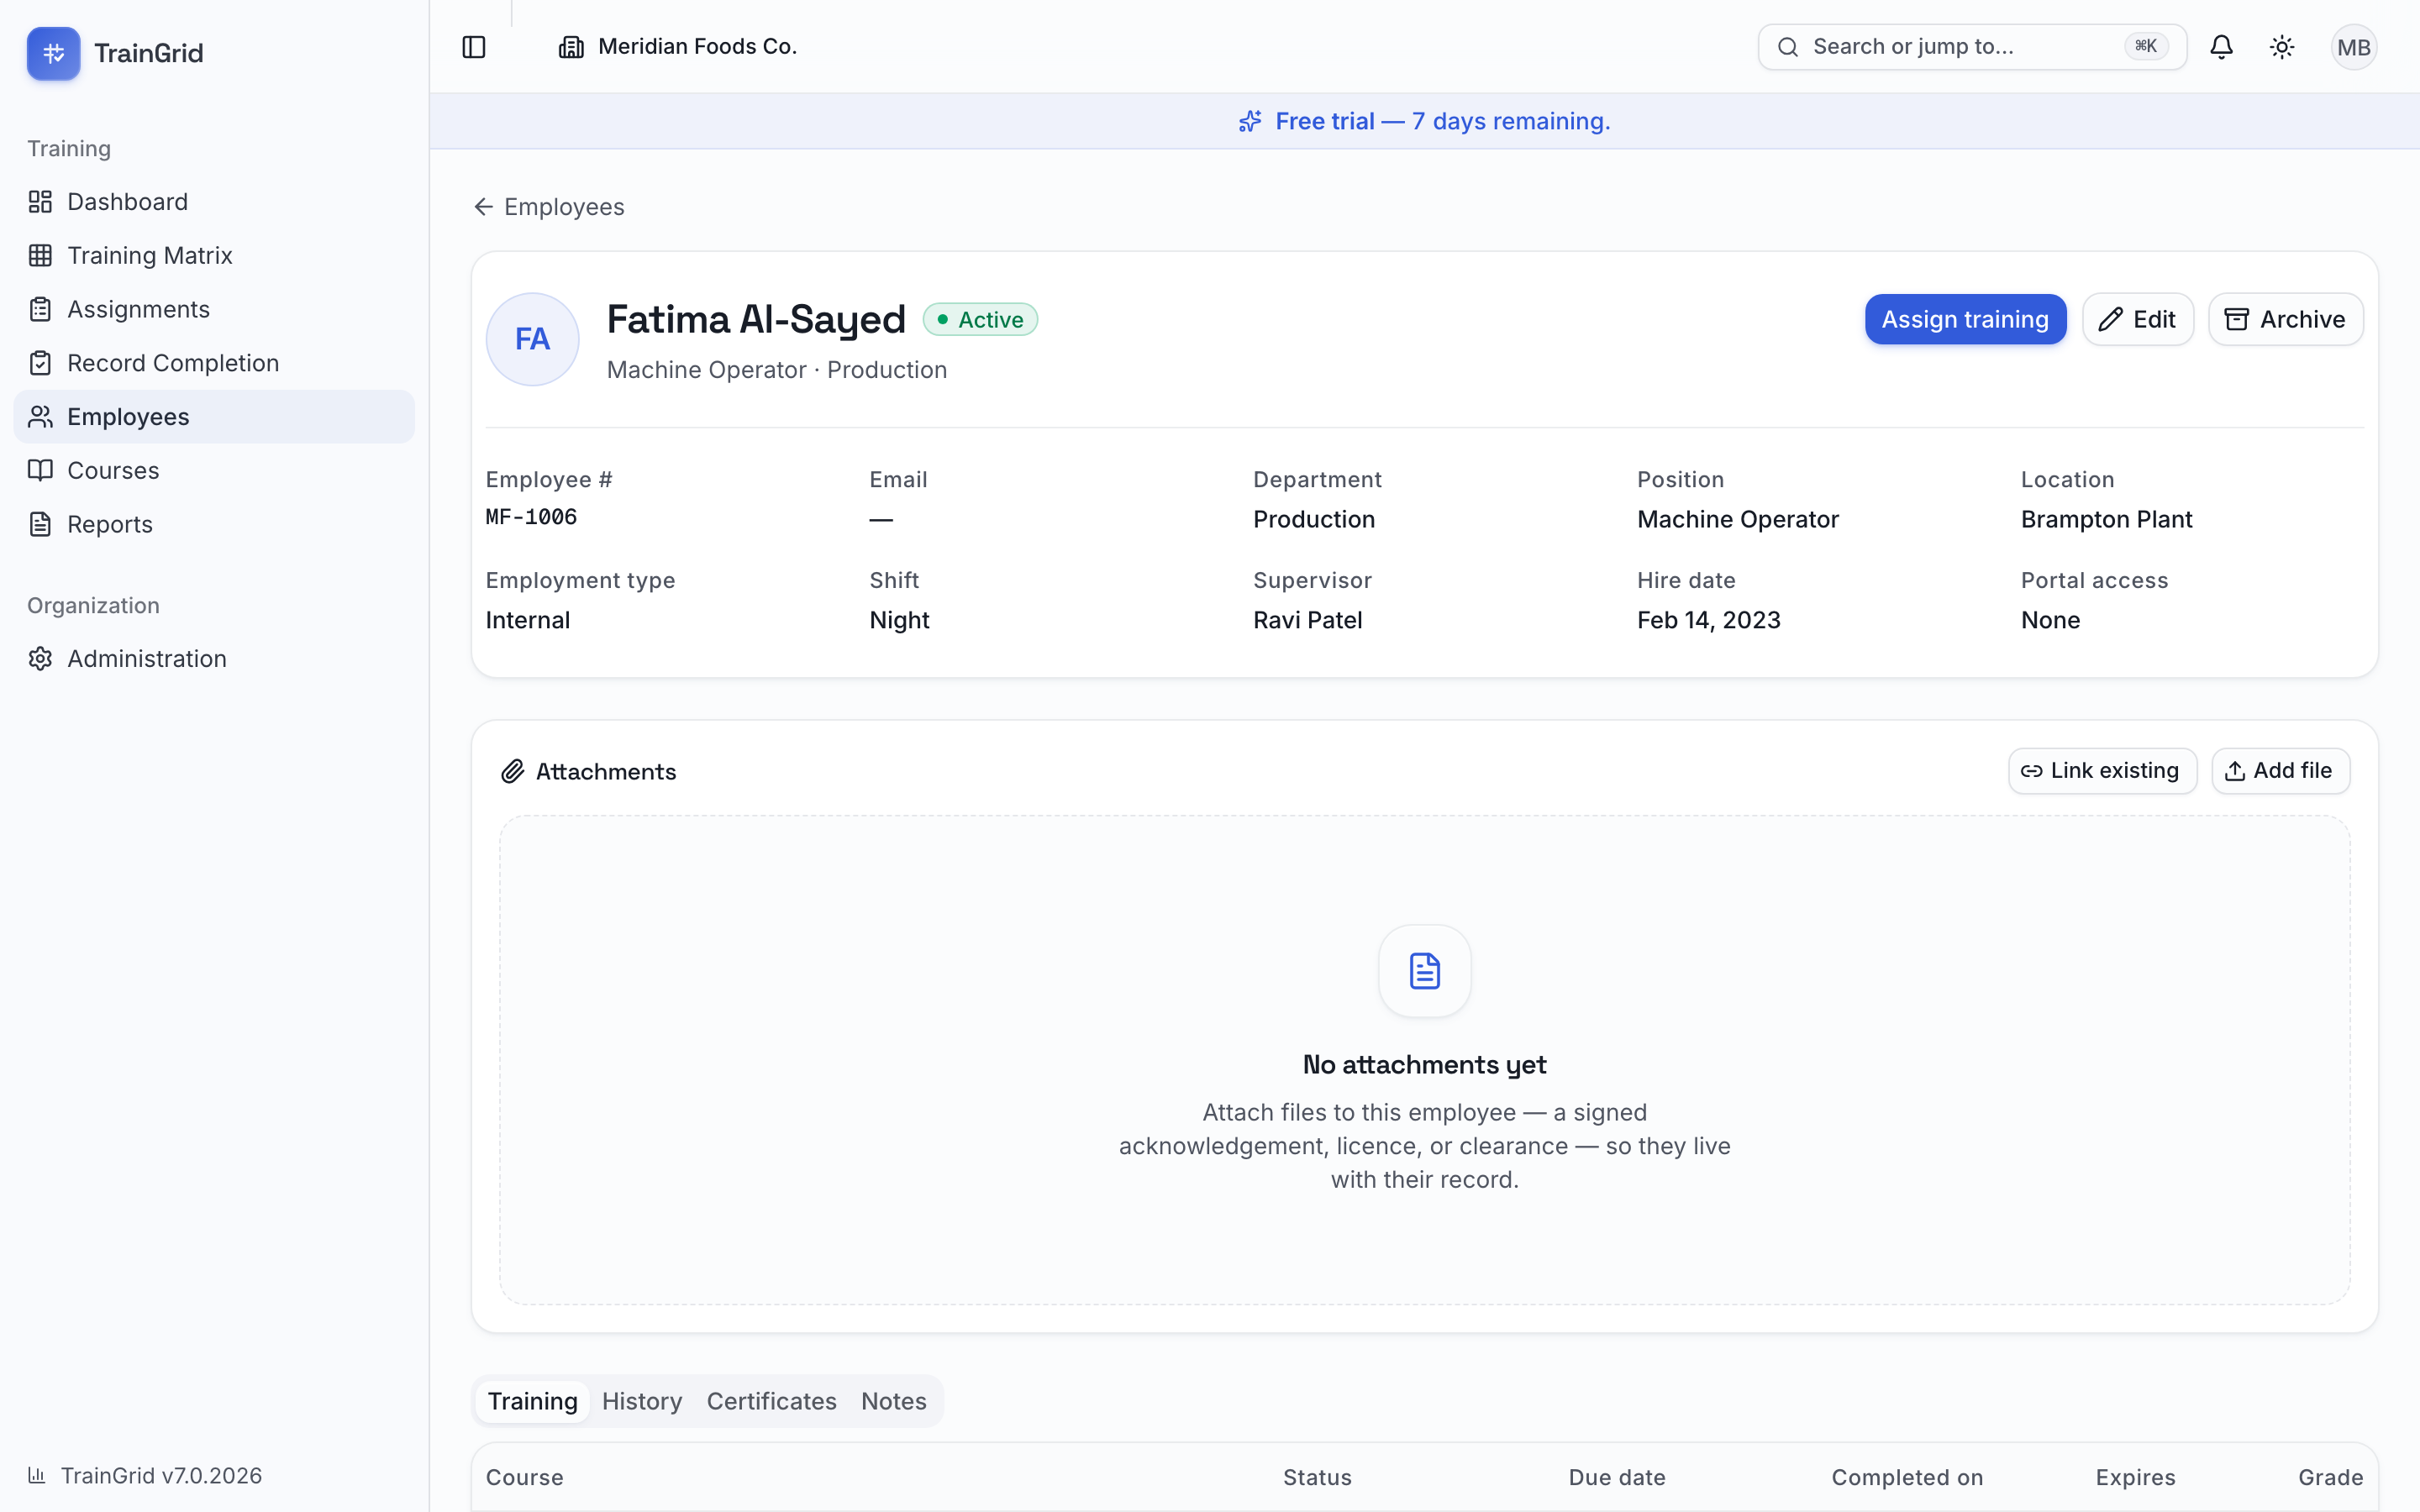
Clicking a person opens their profile. The top card shows their name, status, and details — Employee #, Email, Department, Position, Location, Shift, Supervisor and Hire date — plus any Custom fields that have a value. From here you can Assign training (for active employees), Edit the record, or Archive them. An Administrator also sees a Delete button — but only while the person has no training records at all (someone added by mistake, say). The moment any training is assigned, permanent deletion is off the table and Archive is the way to remove them, so history is never lost.
Below the card are four tabs:
- Training — the person's current status for each course they're assigned: due date, when they completed it, certificate expiry and grade. This is the "where do they stand right now" view.
- History — every assignment they've ever had, newest first: completed, waived or pending. This is the audit-ready record. Click any row to see the full detail. A Version column names the revision of the course each record was earned against — v1.0 · Superseded sitting beside v2.0 · Current — so the history still reads correctly after a course has been revised.
- Certificates — completed courses that carry a certificate, each shown as a card with its completion date, expiry date and a colored chip telling you how many days are left (or how long ago it expired). Any attached certificate files are linked here.
- Notes — free-text notes about the employee. If you can edit, type and save here; TrainGrid records who last edited the notes and when.
Editing an employee
- Open the person's profile and click Edit (or Edit from the row).
- Change any details, including custom fields and notes.
- Click Save changes.
Archiving and unarchiving
Archiving is how you handle people who leave — it keeps their full training history for audits but removes them from active lists and from your compliance numbers, so departed staff never drag your percentage down.
To archive someone:
- Open their profile and click Archive (or select one or more people in the list and click Archive in the selection bar).
- Optionally enter a Reason (for example, "Left the company").
- Confirm by clicking Archive.
To bring someone back (for example, on rehire), find them by switching the list's status filter to Archived or All statuses, open their profile, and click Unarchive — or select them in the list and click Unarchive. They return to active status and rejoin your compliance calculations, with all of their history intact.
Tip: After unarchiving a rehire, glance at their Training tab. Old due dates may now be overdue; you can reschedule those from each record.
Custom fields
If your organization tracks something TrainGrid doesn't have a built-in field for — a badge color, a union code, a contractor flag — an Administrator or Manager can define it under Admin → Custom fields as text, number, date or dropdown. Once defined, custom fields appear in a Custom fields section on the employee form, show on the profile (when they have a value), and are included in the employees Export CSV.