Part 1 Getting Started
Welcome to TrainGrid
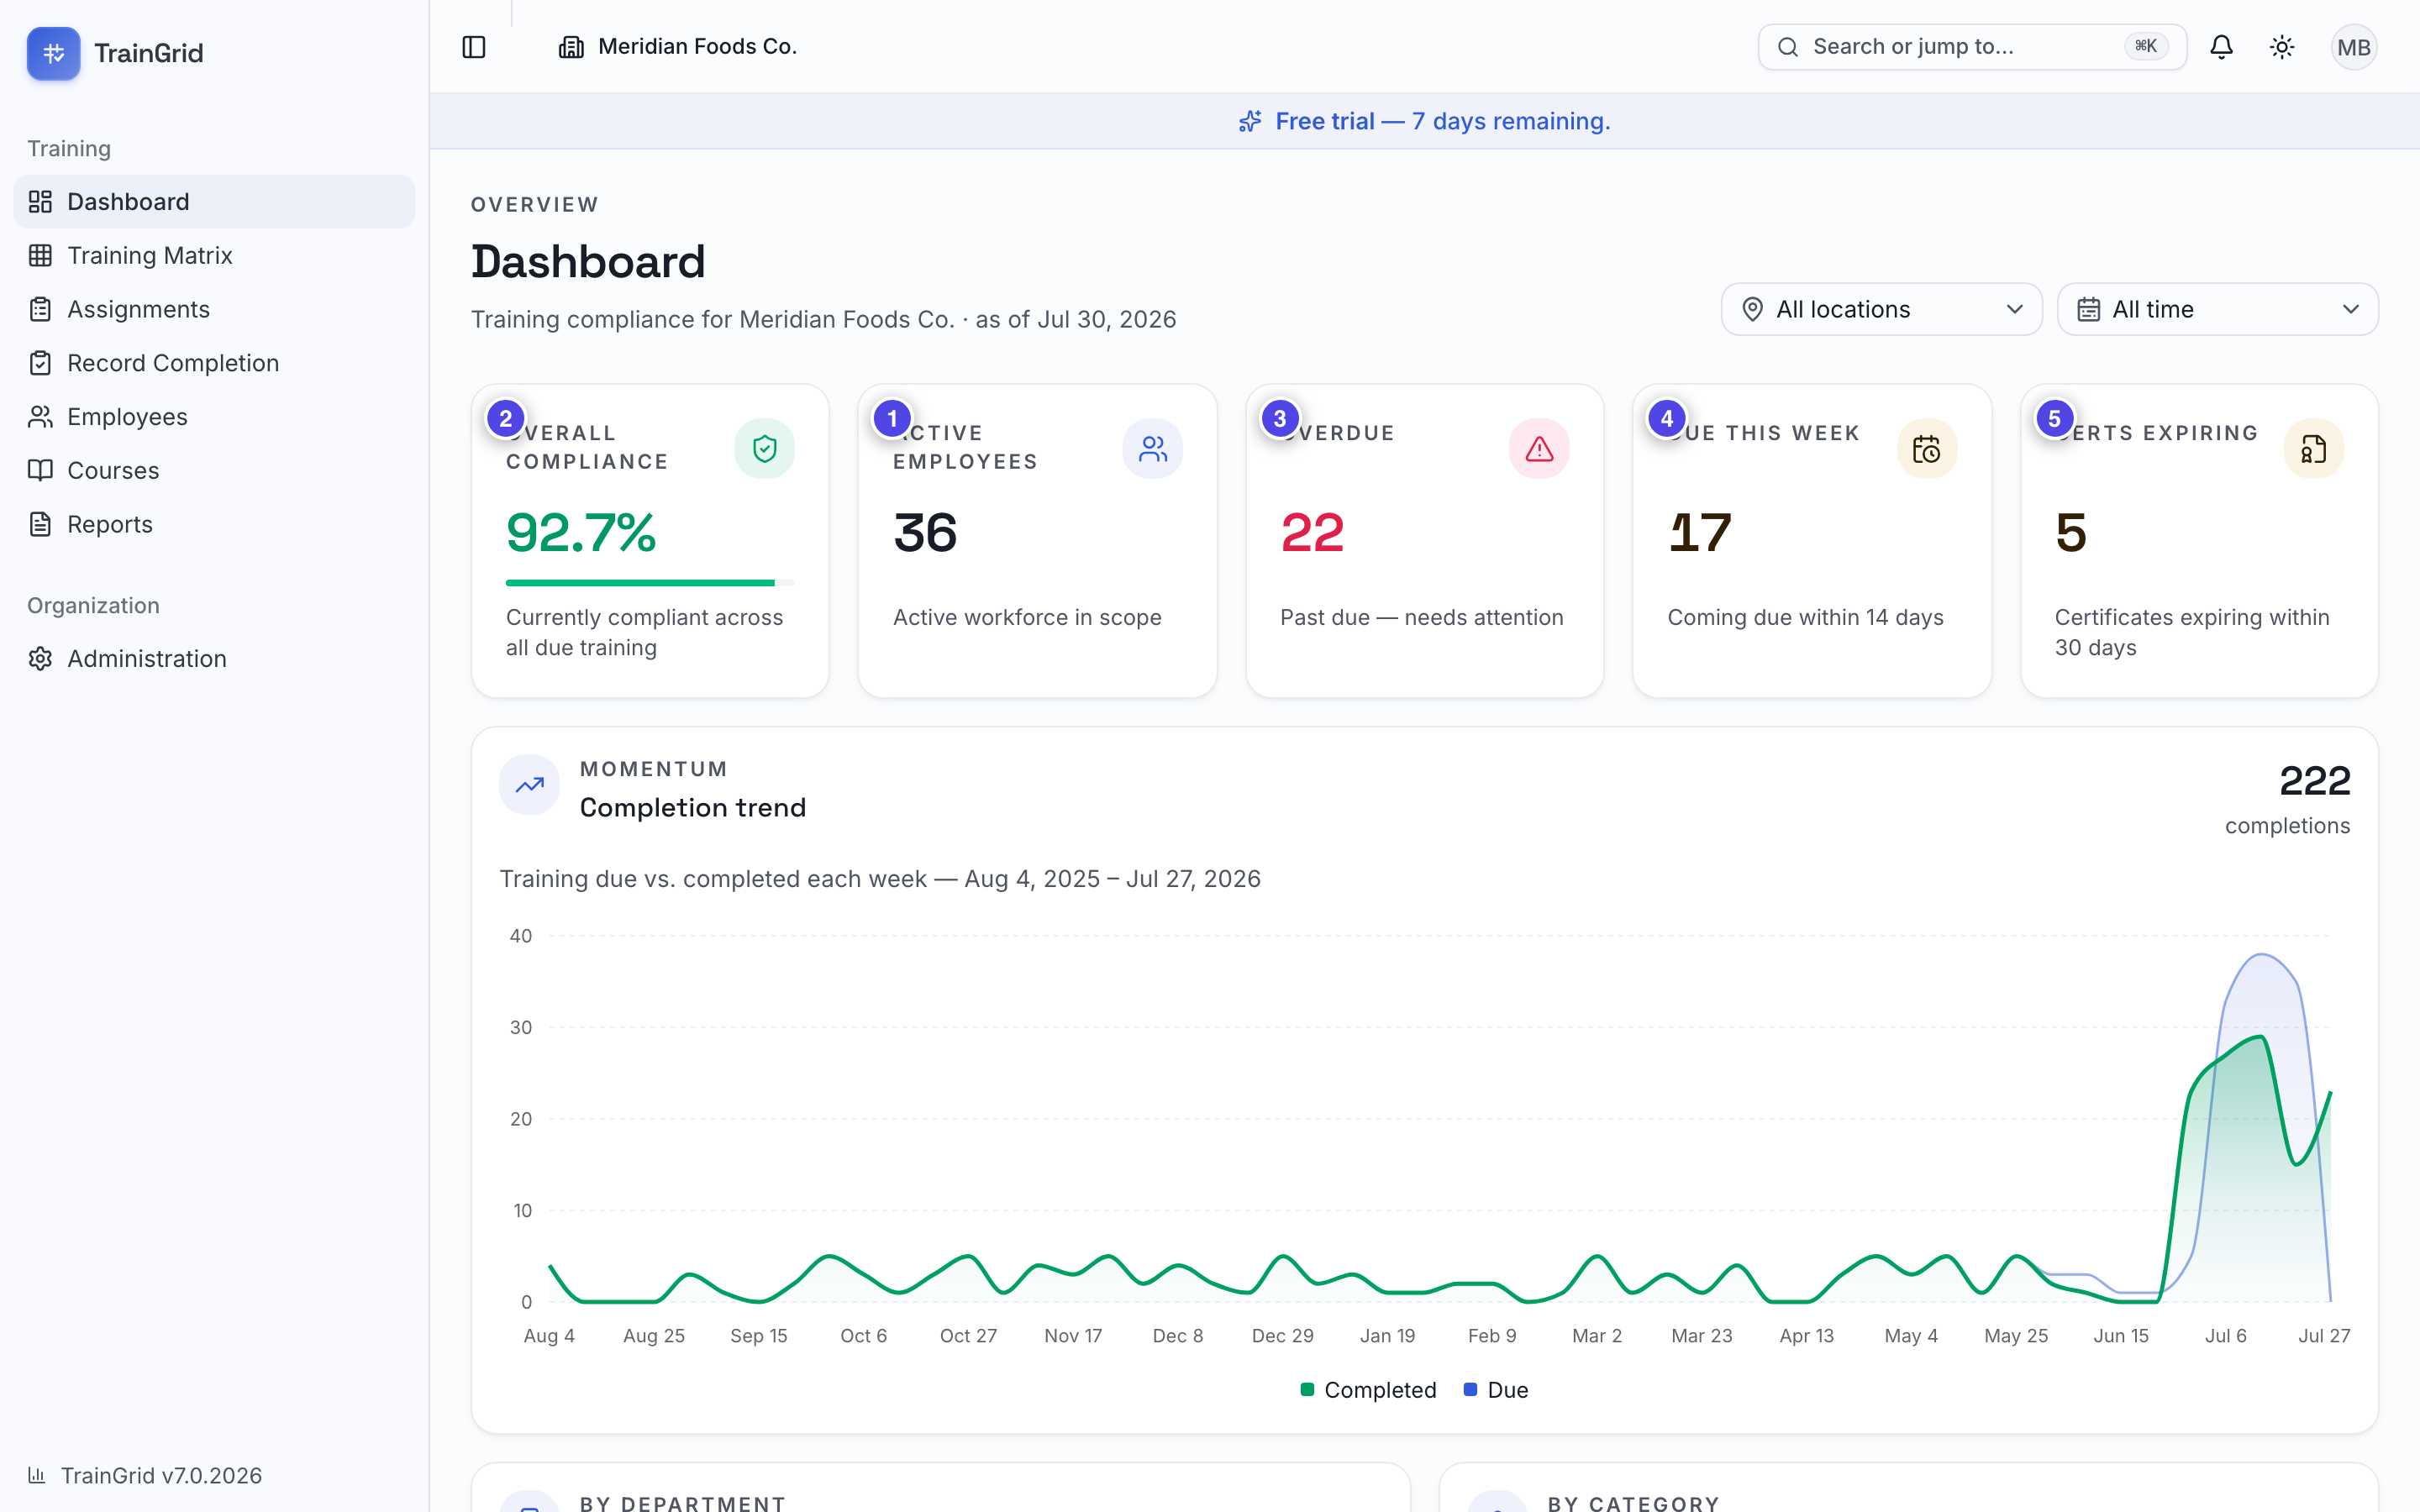
TrainGrid is your single source of truth for workplace training and compliance. It tracks who has been trained, who is coming due, and who is overdue; it watches certificate expiry dates so nothing lapses unnoticed; and it turns all of that into audit-ready proof you can print or export the moment an inspector or auditor asks. Because it is built for organizations that run more than one site, every location, department, and employee lives in one place — so you always know, at a glance, exactly where your compliance stands across the whole operation.
The five roles at a glance
Everyone in TrainGrid has a role that sets what they can see and do. There are five:
- Administrator — Full control of the workspace, including billing and organization settings. Usually the person who created the account.
- Manager — Everything an Administrator can do, except billing. Your day-to-day managers.
- Training Coordinator — Runs the training program: manages employees, courses, assignments, completions, and reports.
- Supervisor — Views and records training completions for the location(s) they're responsible for — nothing outside their sites.
- Viewer (auditor) — Read-only access for audits and inspections. Can see and export, but never change anything.
Note: The full breakdown of exactly what each role can do is in Roles & Permissions at a glance. For now, this is just to help you find where you fit.
Signing in
Sign in to your workspace
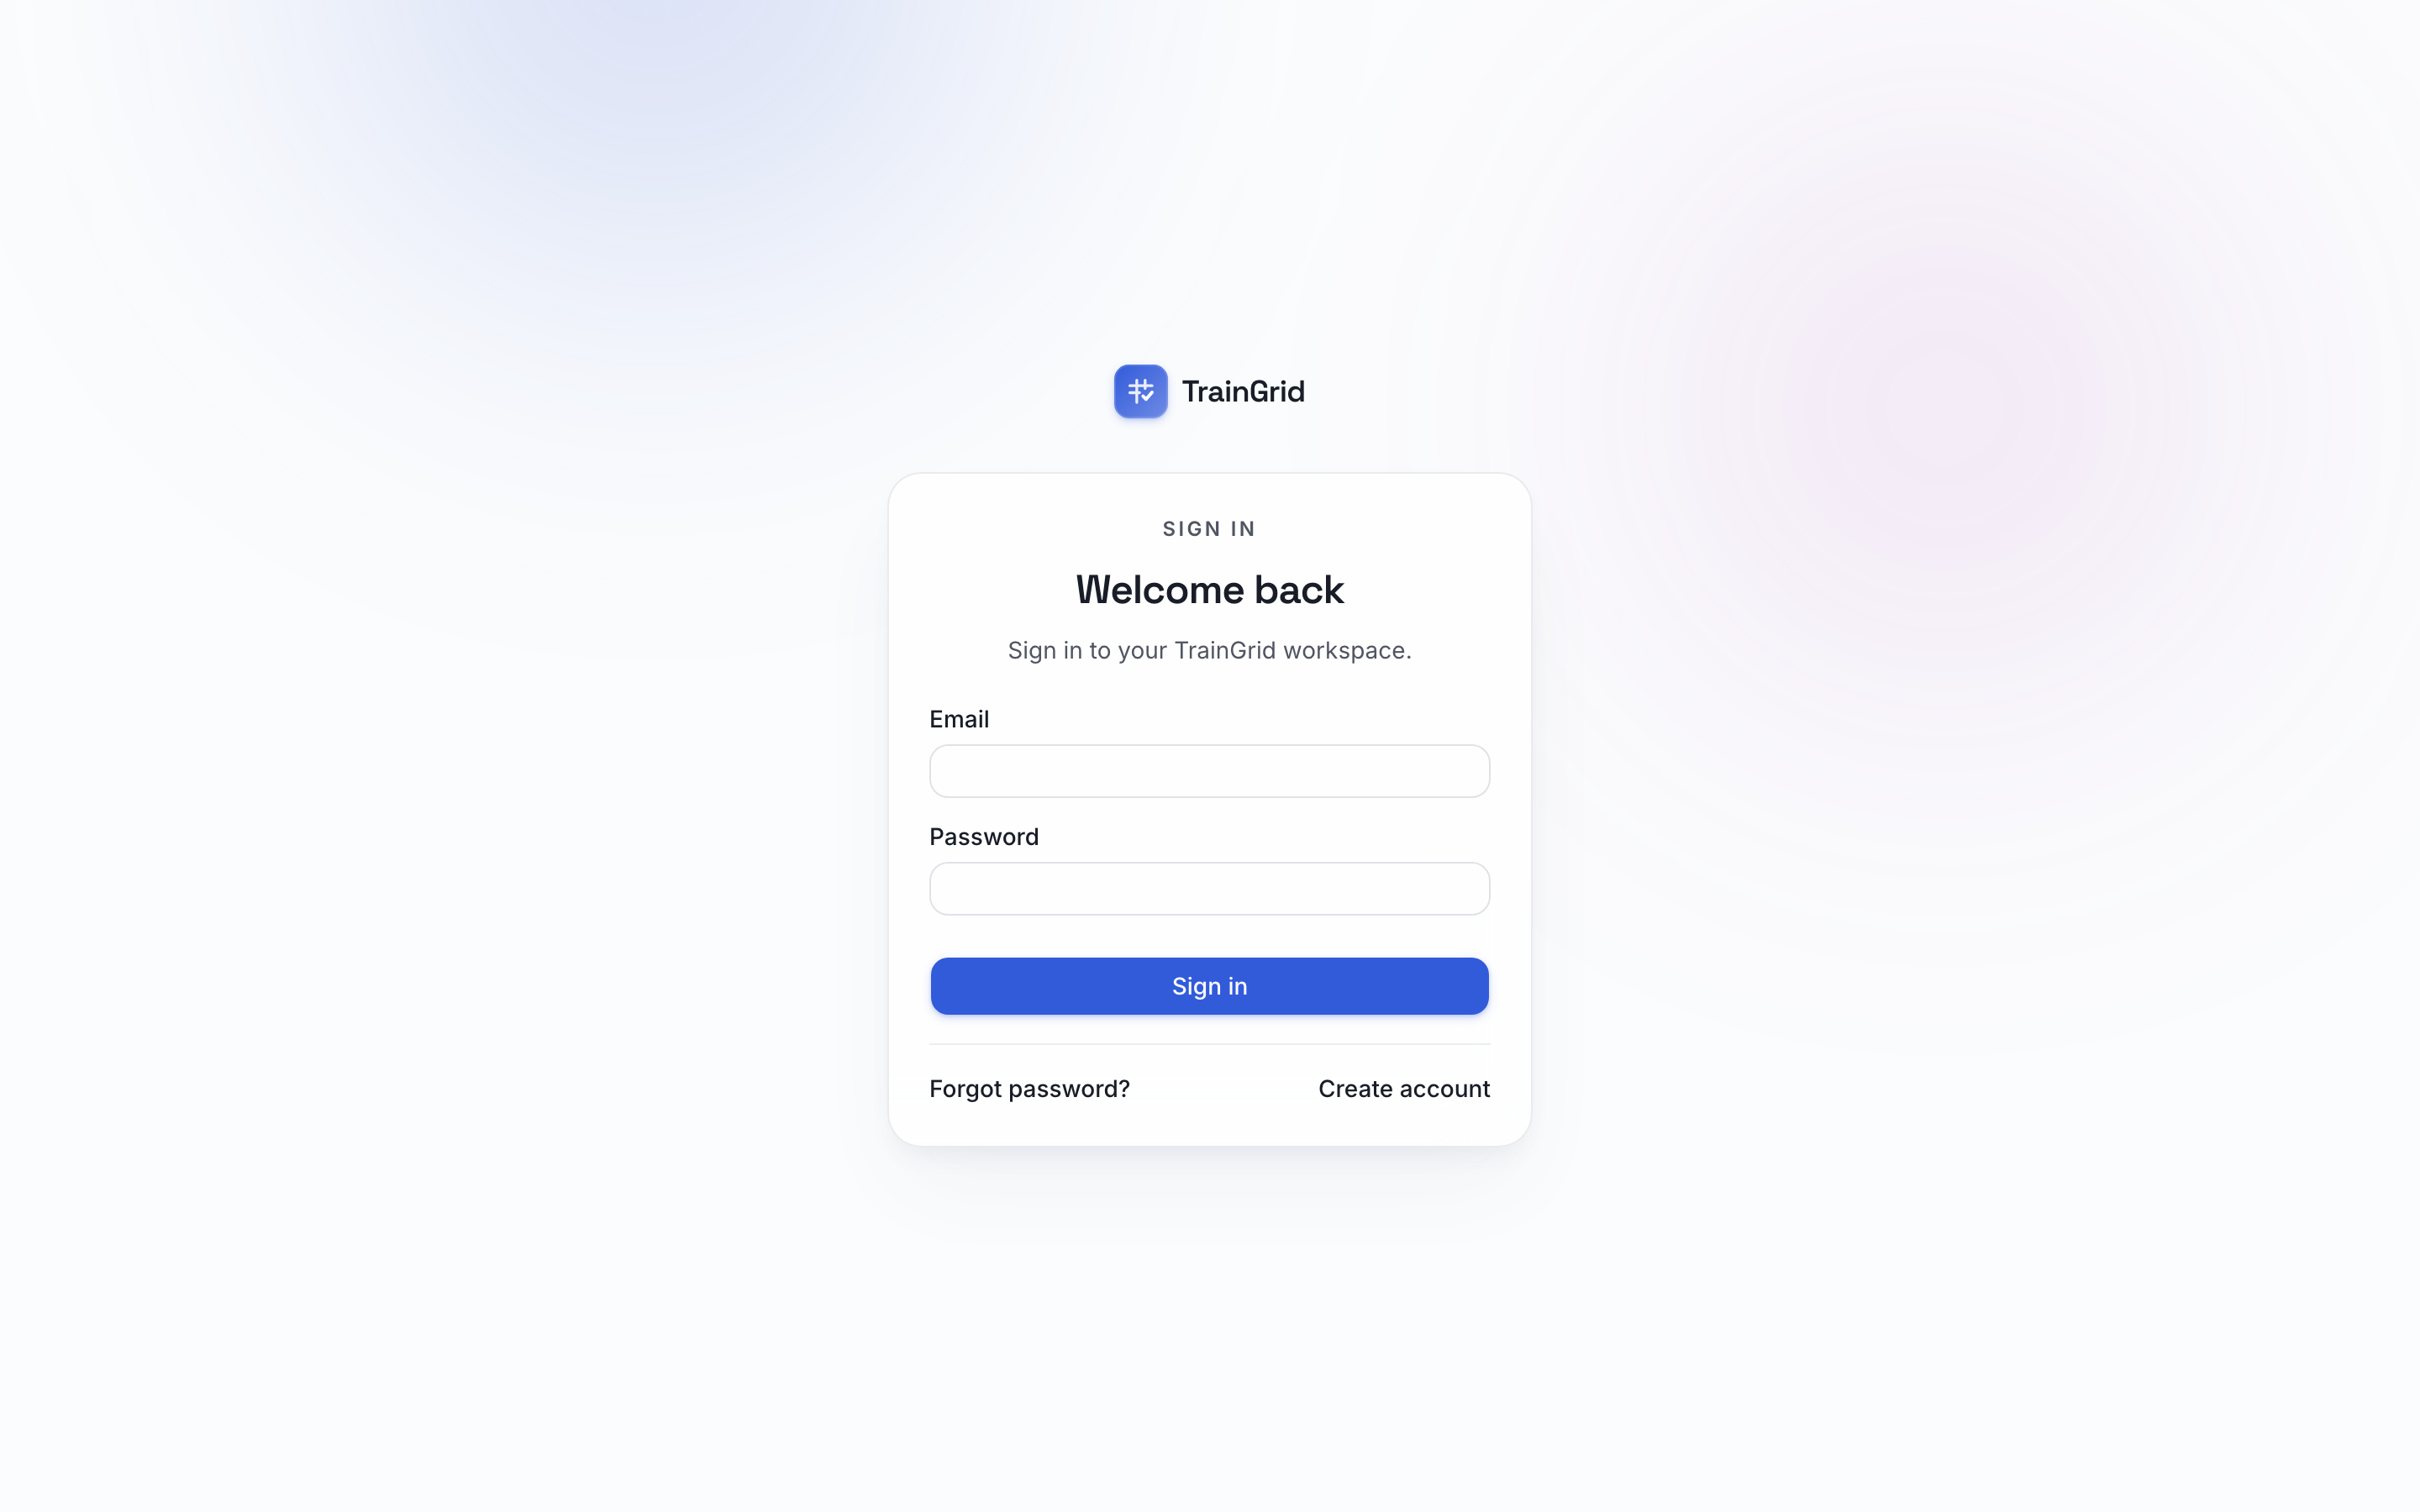
- Go to https://traingrid.app in your web browser.
- On the Welcome back screen, enter your Email and Password.
- Select Sign in. You'll land on your Dashboard.
Tip: Bookmark https://traingrid.app so you can get back in one click.
Sign in with Microsoft
Where Microsoft sign-in has been switched on for your TrainGrid environment, the Welcome back screen shows a Continue with Microsoft button above the email and password fields, with an or continue with email rule between them. The same button appears on invitation links, both staff invitations and employee portal invitations, above Create account and Sign in, with an or use email rule.
- Select Continue with Microsoft. Microsoft always shows its account picker; choose the work account whose email address matches your TrainGrid invitation or account.
- Sign in to Microsoft as you normally would. You return to TrainGrid signed in: from an invitation link you land back on that invitation to accept it; from the sign-in page you land at the page you were heading to.
Note: Microsoft sign-in is a way to sign in, not a way to be added. You must already hold a TrainGrid invitation (or an activated account) for the same email address; TrainGrid does not create accounts from your directory, copy users from it, or keep anything in step with it. If you have not been invited, the sign-in page says so: "This Microsoft account hasn't been invited to a TrainGrid workspace yet. Ask your administrator for an invitation to this email address, then use Continue with Microsoft from the invitation link." If the sign-in did not finish, it says "Microsoft sign-in didn't complete. Try again, or sign in with your email and password."
Reset a forgotten password
- On the sign-in screen, select Forgot password?
- On the Reset your password screen, enter your Email and select Send reset link.
- Check your inbox for the secure link and open it.
- On the Choose a new password screen, enter a new password (at least 8 characters) and select Update password. You'll be signed straight in.
Note: For your security, TrainGrid always says a link is "on its way" whether or not the email is registered, so the message doesn't reveal who has an account. If the link ever says it's invalid or expired, just request a new one from Forgot password?
Creating your organization (first-time setup)
The very first time you sign up, TrainGrid walks you through a single setup step to create your organization. (If you were invited by a colleague, you'll join their organization instead and skip this.)
Set up your organization
On the Set up your organization screen you'll provide three things:
- Organization name — your company's name (for example, Acme Manufacturing). This is required.
- Primary location (optional) — the first site where training happens (for example, Main Plant). You can add more locations later, so it's fine to start with one.
- Timezone — TrainGrid detects your browser's timezone automatically. Change it if your site is somewhere else. This matters: it's what TrainGrid uses to calculate due dates and decide what counts as overdue.
Then select Create organization.
That's it — there's only one step. You'll be taken straight to your Dashboard, ready to add your team, your employees, and your courses next.
Finding your way around
Once you're in, TrainGrid has three ways to move around: the left sidebar for the main areas, the top header for workspace-level controls, and the command palette for jumping anywhere instantly.
The left sidebar
The sidebar down the left is your main menu, grouped under Training:
- Dashboard — your at-a-glance compliance overview: overall compliance, what's overdue, and what's expiring.
- Training Matrix — a grid of every employee against every course, colour-coded by status. Your live "who's trained on what" spreadsheet.
- Assignments — where you hand training out: the assign wizard.
- Record Completion — the full training list: every record of who was assigned what, when it’s due, and whether it’s done. This is where you record completions, waive requirements, reschedule, attach certificates, and export or print.
- Calendar: the training calendar. Instructor-led sessions with a date, a place and a roster; employees book a seat from their portal, and one Record attendance step writes the completion records afterwards. Anyone who can view reports sees it; scheduling and recording attendance use their own permissions.
- Employees — your people: profiles, training history, and their transcript.
- Courses — your course catalog: what training exists and how it recurs.
- Reports — printable, exportable reports for audits and reviews.
If your role allows it, you'll also see an Organization group with:
- Administration — settings for the whole workspace (members, permissions, locations, departments, and more). Administrators and Managers see this; auditors see it too if they have audit-log access.
Tip: Selecting the TrainGrid logo at the top of the sidebar always brings you back to the Dashboard.
The top header
Running along the top of every screen:
- Organization switcher — the button showing your organization's name (with a building icon) on the left. If you belong to more than one organization, open it to switch between your Workspaces; a checkmark shows which one you're in.
- Search or jump to… — the search box; select it (or press the shortcut) to open the command palette.
- Notifications bell — alerts for things that need attention, such as training coming due. A count appears when you have unread items.
- Theme toggle — the sun/moon button switches between light and dark mode.
- Your account menu — the circle with your initials on the far right. It shows your name, email, and role, plus Keyboard shortcuts, Help — user guide (this document), Contact Support, Reset password (emails you a reset link), a Settings section linking About, Terms of Service, Security, Data protection and the Privacy Policy, and Sign out.
The command palette
The command palette is the fastest way to get anywhere.
- Press Ctrl+K (on Windows) or Cmd+K (on Mac) — or select Search or jump to… in the header.
- Start typing. It searches your employees, your courses, and every page, and offers quick Actions like Assign training…, New course…, or Import employees from CSV… (you'll only see the actions your role permits).
- Use the arrow keys and press Enter to jump straight there.
Keyboard shortcuts
Press ? (the question-mark key) anywhere to open the Keyboard shortcuts dialog. The core shortcuts are:
- Cmd/Ctrl+K — Open the command palette
- Cmd/Ctrl+B — Toggle (collapse or expand) the sidebar
- ? — Show the shortcuts dialog
Tip: Collapsing the sidebar with Cmd/Ctrl+B gives you more room for wide screens like the Training Matrix. When collapsed, hover any icon to see its label.
Light and dark mode
Select the sun/moon button in the header any time to switch between light and dark mode. TrainGrid remembers your choice.
Core concepts you'll see everywhere
A few ideas run through the whole product. Once these click, everything else makes sense.
Organizations and locations
Your organization is your whole company in TrainGrid. Within it, locations are your physical sites — plants, warehouses, branches. Every employee belongs to a location, and Supervisors are scoped to specific locations so they only see and manage their own site. You set up your first location during onboarding and can add more under Administration → Locations.
Departments and positions
Inside your organization you organize people two ways:
- Departments — the teams or areas people work in (for example, Production, Sanitation, Shipping).
- Positions — job titles (for example, Line Operator, Forklift Driver).
Both help you filter the matrix and reports, and target training to the right groups. You manage them under Administration → Departments and Administration → Positions.
Employees
Employees are the people whose training you track — active staff at your sites. Each has a profile with their department, position, location, and a full transcript of everything they've been trained on. You can add employees one at a time, or import many at once from a spreadsheet using Import employees from CSV.
Courses and course types
Courses are the individual trainings you deliver — WHMIS, Forklift Operator Certification, HACCP Awareness, and so on. Your Courses catalog is the master list. Each course has a type that describes how it's delivered:
- In-person — classroom or hands-on sessions
- Online — self-paced online modules
- Video — watch-a-video training
- External — training run by an outside provider
- Practical — hands-on skills assessments
Courses can also be marked mandatory, carry a passing grade, and require a certificate.
Assignments (assign → due → complete)
An assignment is one course given to one employee. It's the heart of TrainGrid, and it moves through a simple lifecycle:
- You assign a course to an employee (or many employees at once) and set a due date.
- Time passes; TrainGrid tracks whether it's still on time, coming due, or late.
- You record the completion — with the date, and a grade or certificate if the course needs one.
You do this from Assignments, or straight from the Training Matrix by selecting a cell.
A scheduled session on the Calendar is a date, time and place for a course. Booking a seat does not create an assignment or change anyone's due date; the training becomes a record when a coordinator records attendance after the session (each attendee's existing due assignment is completed, or a completed record is created for them).
Compliance statuses (calculated, never typed)
Every assignment shows a status. This is the single most important thing to understand: TrainGrid works out the status for you automatically from the dates — you never set it by hand. That's what makes your compliance numbers trustworthy at audit time. The statuses are:
- Completed — done and current.
- Due soon — coming due within your organization's warning window.
- Overdue — past its due date and not yet completed.
- Expired — was completed, but its certificate has passed its expiry date.
- Failed — was completed, but with a grade below the course's passing grade. The record is kept, and it does not count as compliant.
- N/A (waived) — deliberately marked as not applicable to this person.
- Pending — assigned, but not yet started (its due date is still in the future).
Because these are calculated from real dates, they update themselves as time passes — no one can "mark it green" to hide a gap.
Recurrence
Many trainings must be repeated on a cycle — annually, every three years, and so on. When a course is set to recur, completing it automatically schedules the next one for you, on the right date. You never have to remember to re-assign recurring training; TrainGrid keeps the cycle going on its own.
Certificates and expiry
Some courses grant a certificate that's valid for a set period (for example, a forklift certification valid for three years). When you record the completion, you capture the certificate and TrainGrid tracks its expiry date. As that date approaches, the training shows as Due soon, and once it passes, it flips to Expired — so lapsed certifications surface on your Dashboard and in the Expiring certificates report long before they become a problem.
Part 2 Employees & Courses
Managing Employees
Employees are the people who receive training in TrainGrid. Every assignment, certificate and compliance number is tied to an employee record. This section covers how to find people, add them one at a time, import your whole roster from a spreadsheet, and keep records tidy as people join and leave.
Note: Adding, editing, importing and archiving employees is available to Administrators and Managers. If you're a supervisor or viewer, you'll see employee records but not the buttons to change them. Supervisors only see the people at their assigned locations.
The employees list
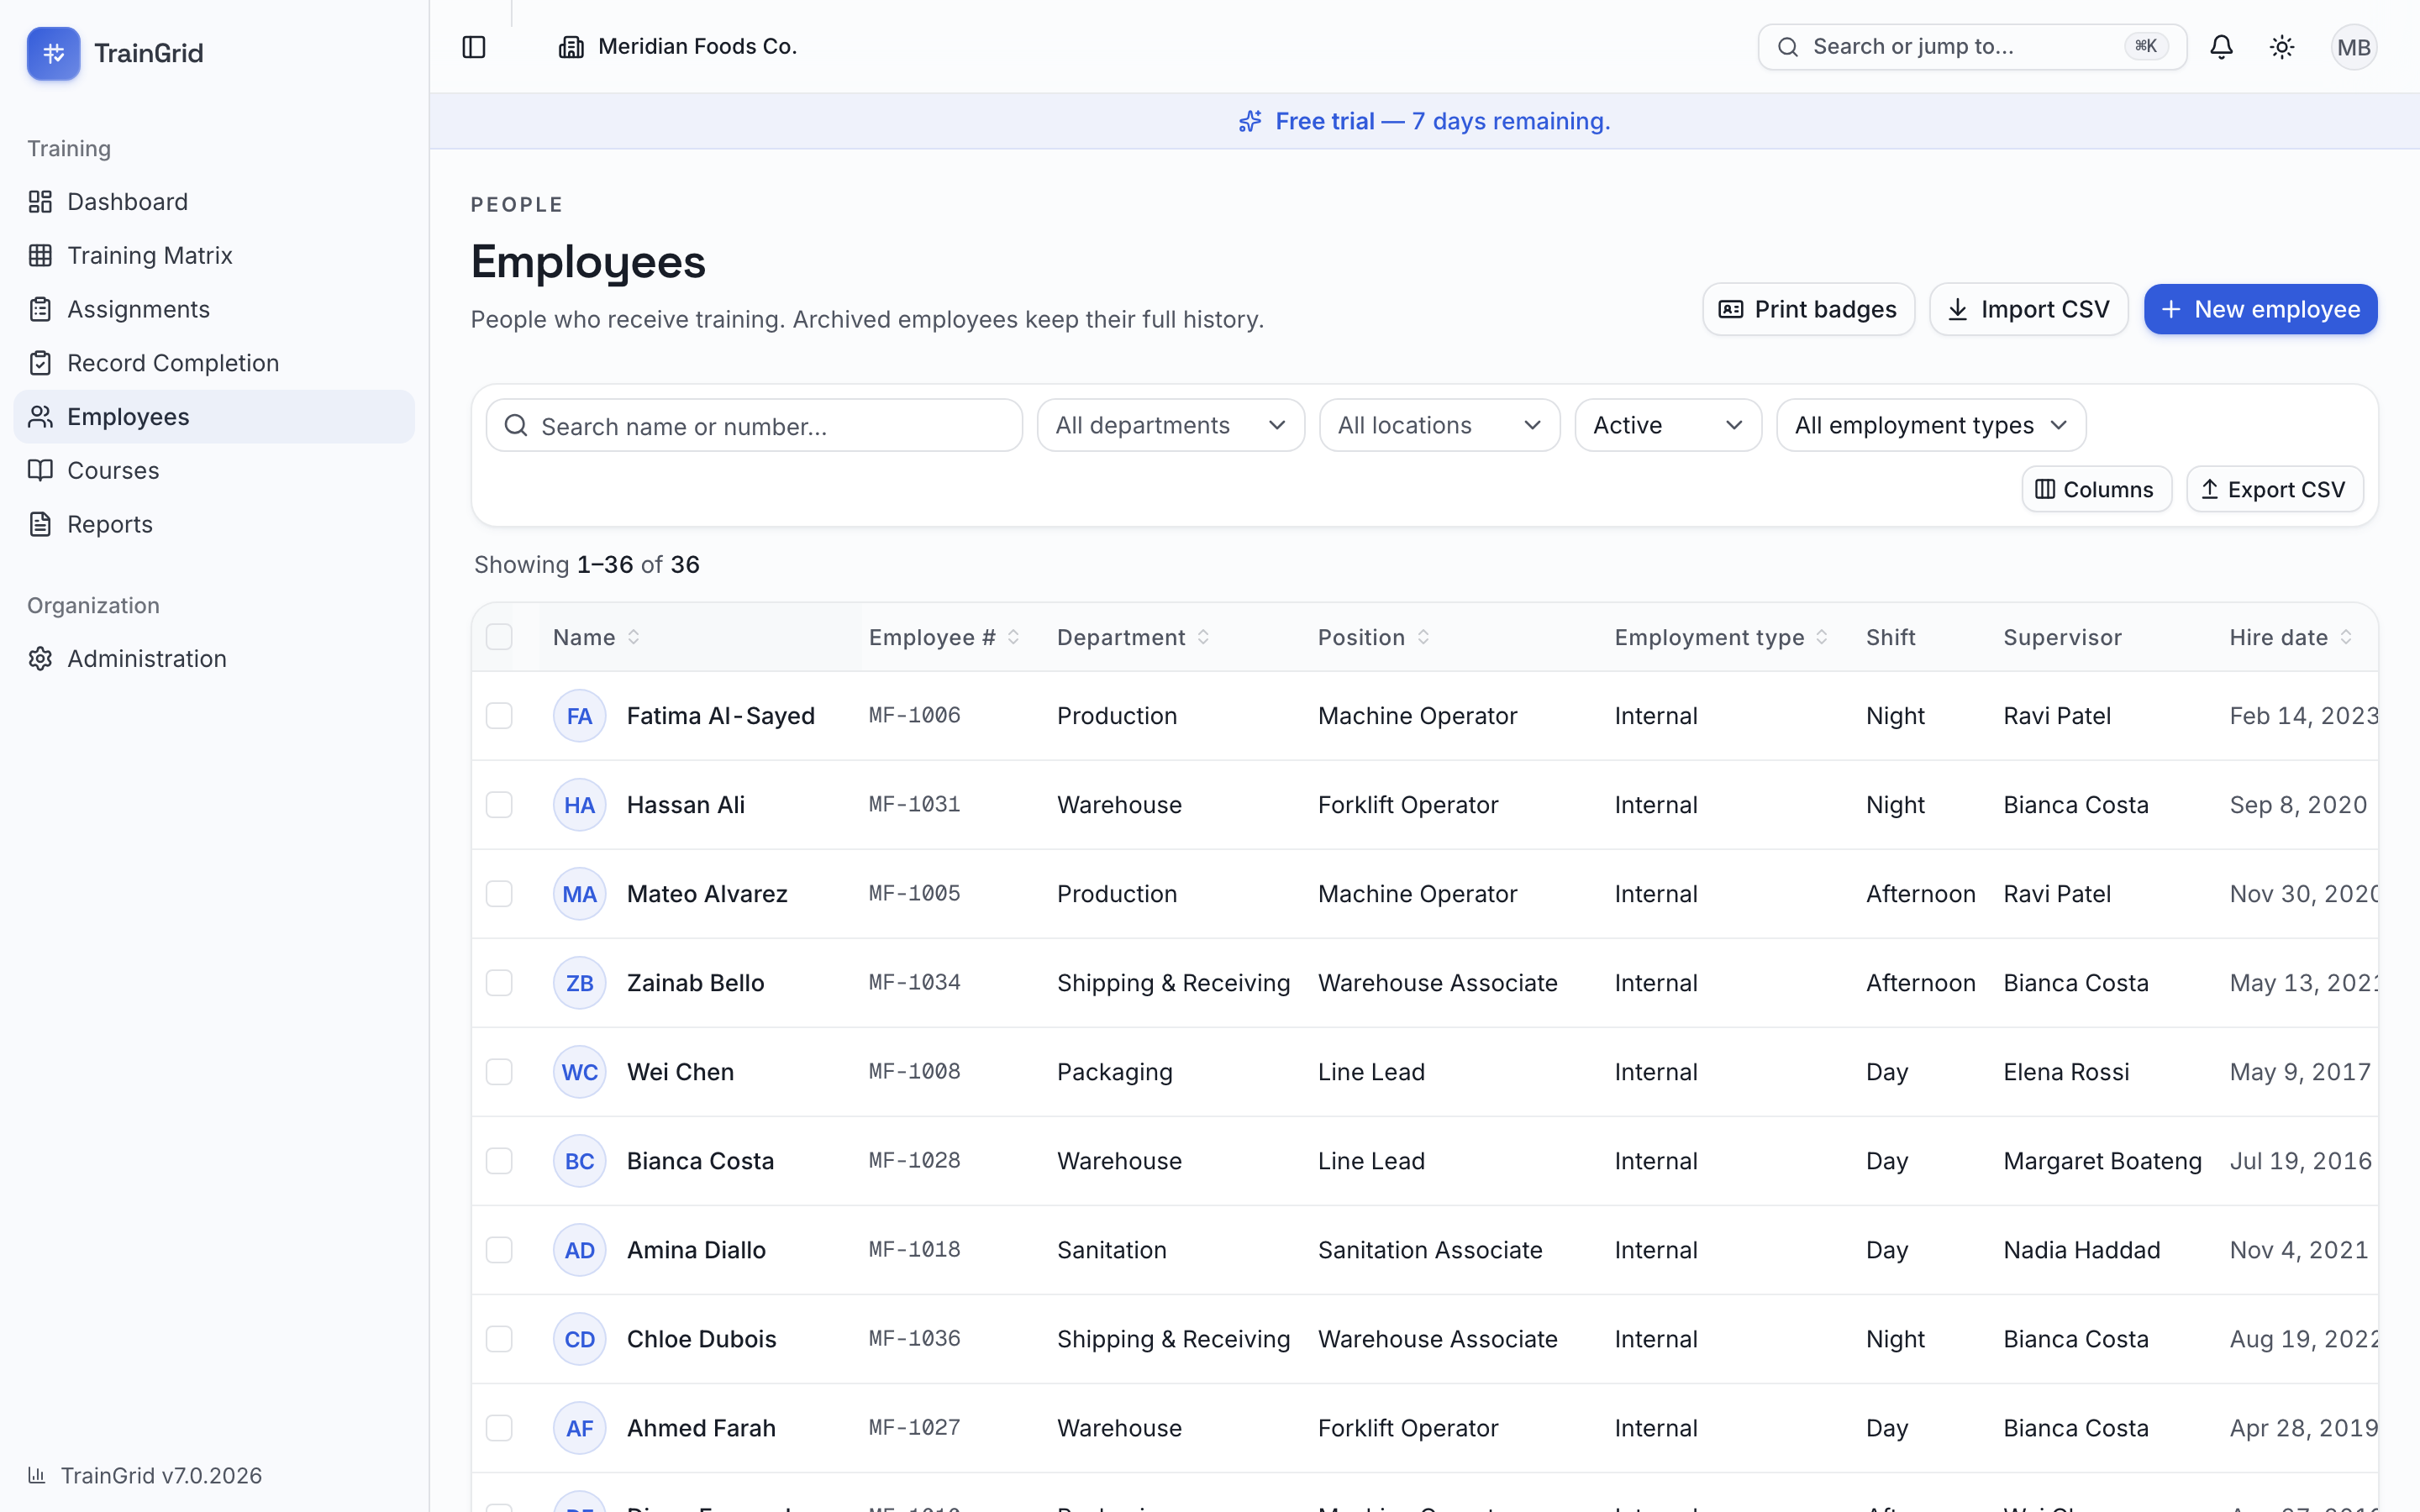
Open Employees from the sidebar to see everyone in your organization. Each row shows the person's name, their email (if you have one on file), and columns for Employee #, Department, Position, Shift, Supervisor, Hire date and Status. Click any row to open that person's profile.
At the top of the list is a toolbar for narrowing things down:
- Search name or number — start typing a name or employee number and the list filters as you type.
- All departments — show only one department.
- All locations — filter by site. (This filter only appears when your organization has more than one location.)
- Status — choose Active, Archived, or All statuses. The list shows Active people by default.
Ticking the checkbox on one or more rows opens a selection bar that counts them (N selected) and offers Archive N or Unarchive N; an Administrator also sees a red Delete N button there, which permanently deletes everyone selected after a password check (see "Delete an employee (Administrator only)" in the Function Reference). The header checkbox selects the rows on the current page only.
Two more controls sit on the right:
- Columns — show or hide any of the optional columns. Your choices are remembered on this device.
- Export CSV — download the people currently shown (matching your filters) as a spreadsheet.
At the bottom, the list tells you how many people you're viewing (for example, "Showing 1–50 of 132") and gives you Previous and Next buttons to page through larger rosters. Fifty employees appear per page.
Tip: To act on several people at once, tick the checkbox at the start of each row. A bar appears with Archive and Unarchive options for the selected people.
Adding one employee
Use this when you're onboarding a single new hire.
- On the Employees page, click New employee.
- Fill in First name and Last name. These are the only required fields (marked with a red asterisk).
- Optionally add any of the rest: Employee number (if any of your divisions has a short form, a Division prefix for the employee number picker sits beside it: leave it on "No prefix" to store the number as typed, or choose a division and the number is stored with its short form in front, shown live as "Stored as MLT10245"; a number that already starts with that short form is left as it is), Email, Department, Position, Location, Shift, Employment type (one of the types your organization maintains under Administration → Employment types — every workspace starts with Internal, the default, and External (agency / contract), and administrators can add their own such as Hourly or Salary), Supervisor, Hire date, and Notes.
- If your organization has set up Custom fields, they appear in their own section on the form — fill in any that apply.
- Click Create employee.
TrainGrid saves the record and opens the new person's profile, where you can start assigning training.
Tip: Onboarding a whole team or plant at once? Skip the one-at-a-time form and use Import CSV instead — it's far faster.
Importing employees from a spreadsheet
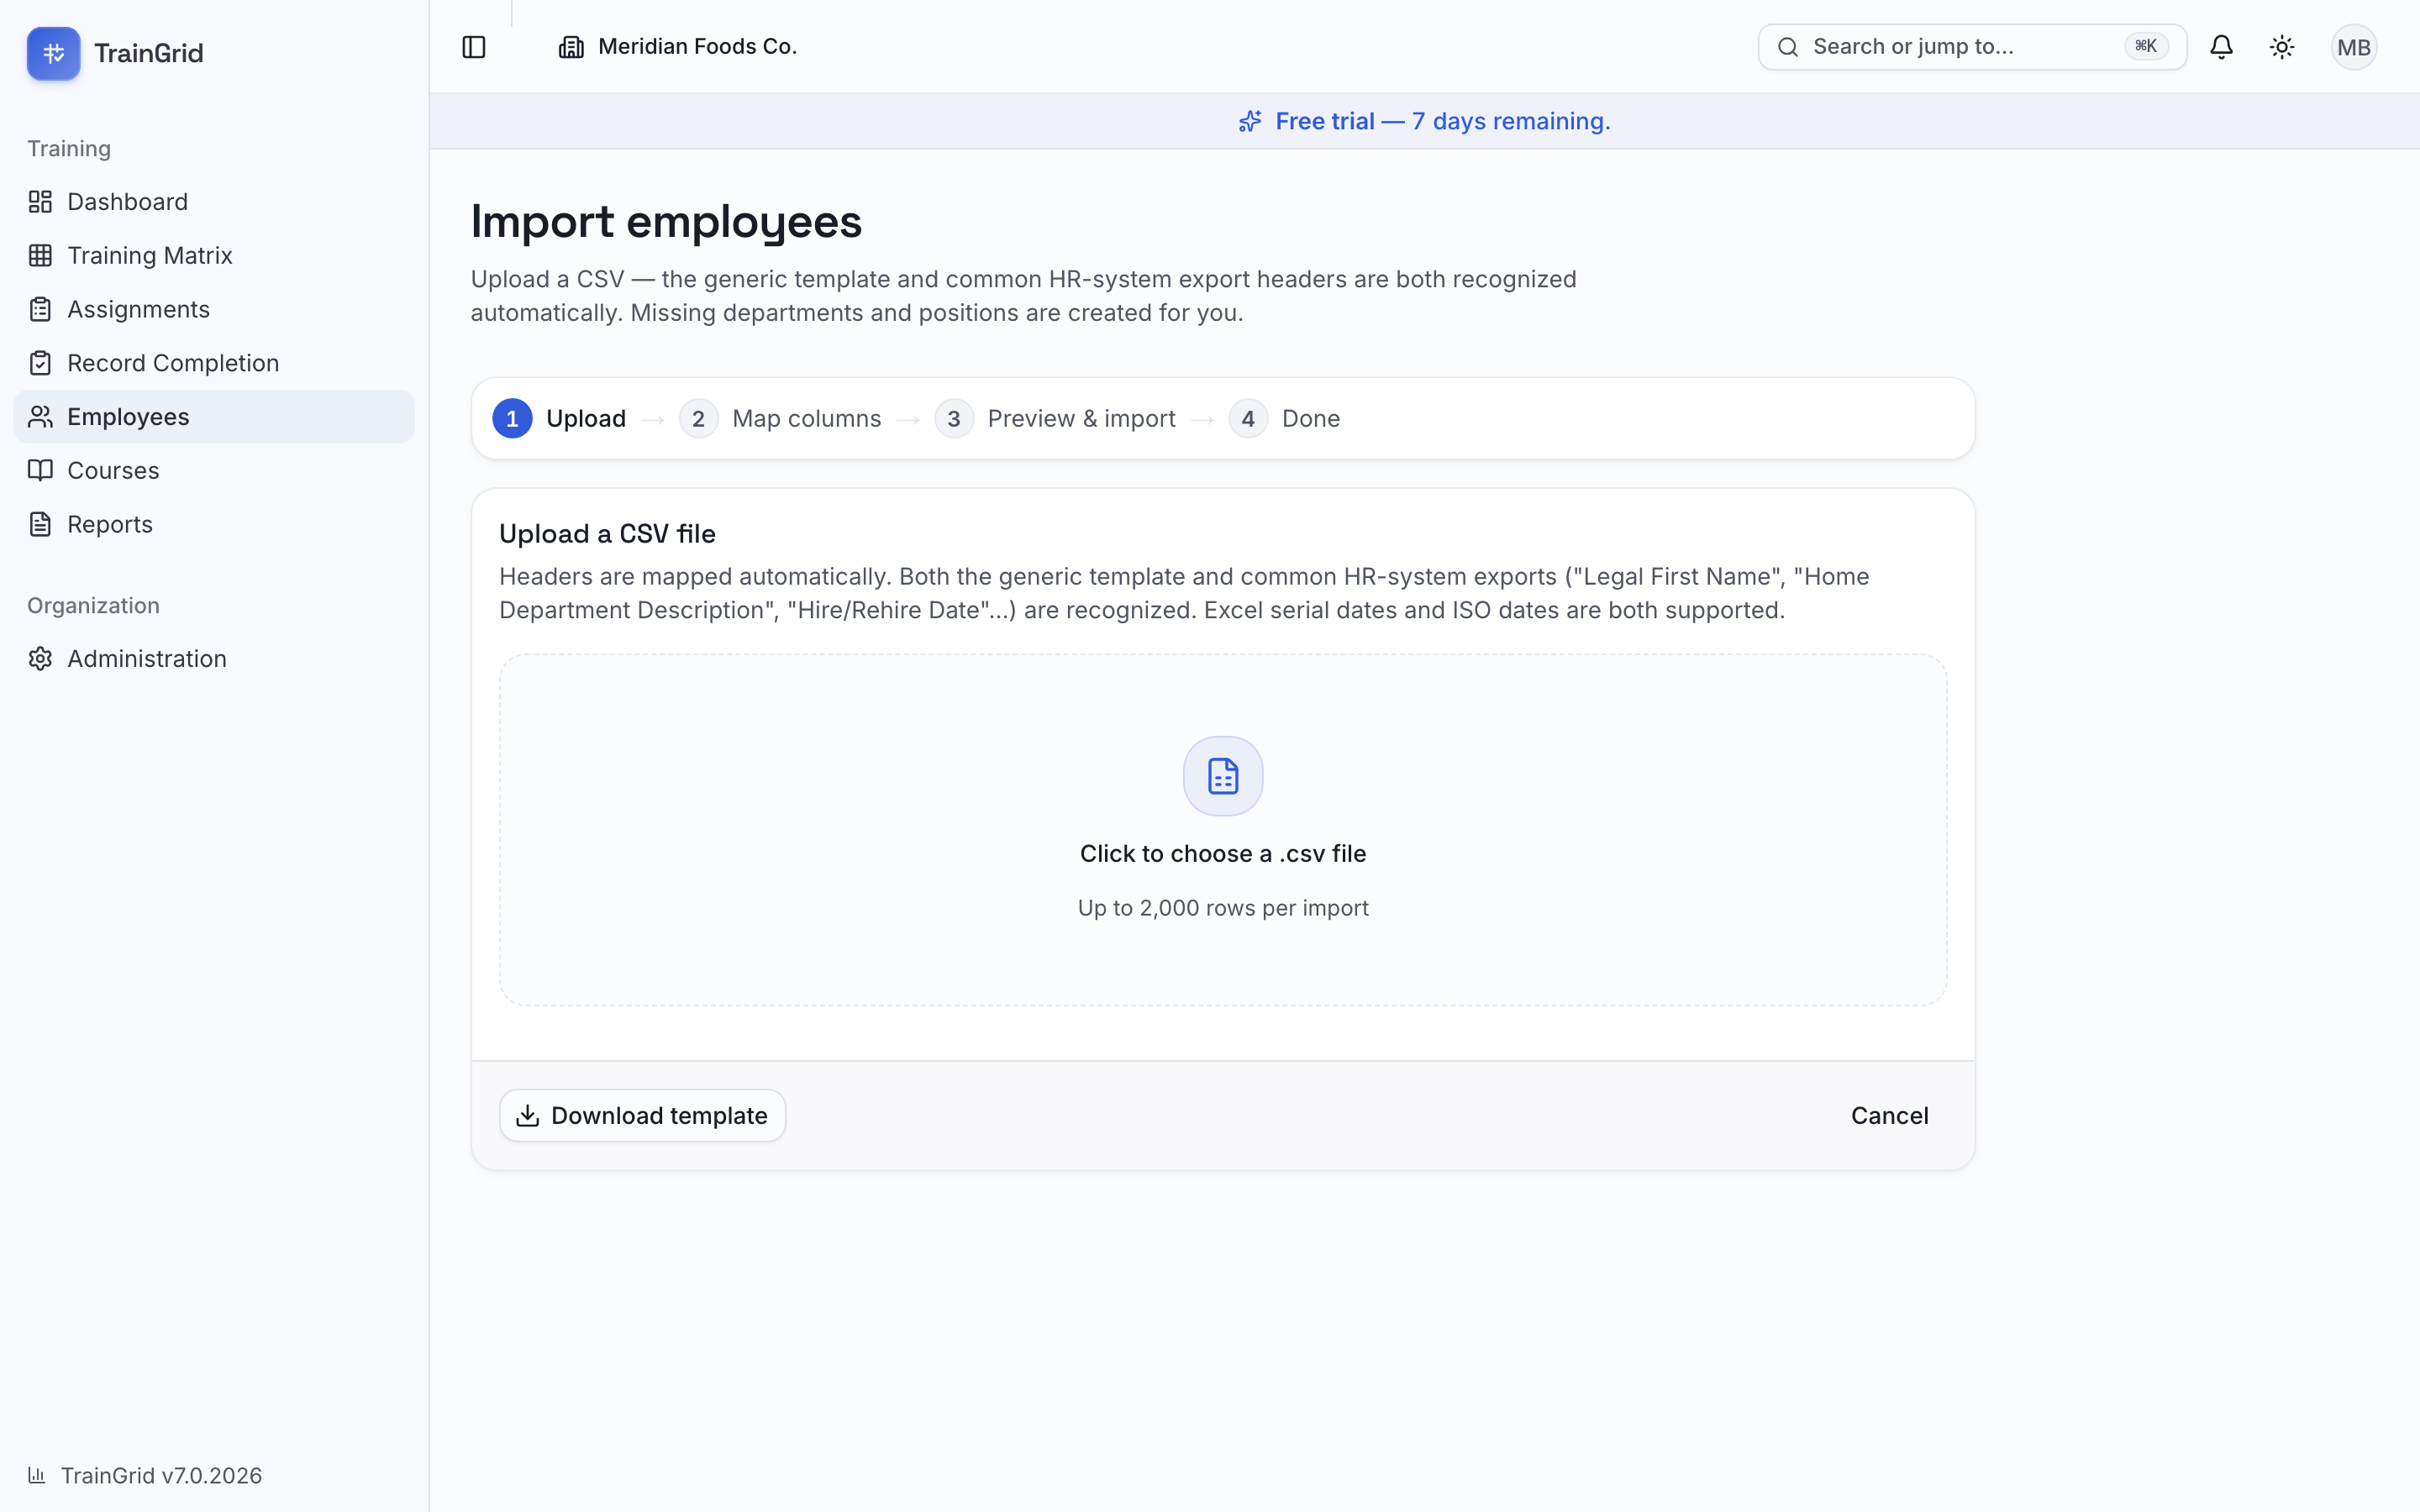
The import wizard brings your entire roster in from a CSV file (the format every spreadsheet app and HR system can export). TrainGrid recognizes both its own template and the column names common HR exports use — like "Legal First Name," "Home Department Description" and "Hire/Rehire Date" — so in most cases you can upload your existing export as-is.
- On the Employees page, click Import CSV. The wizard opens with a four-step guide across the top: Upload → Map columns → Preview & import → Done.
- Upload. Click Click to choose a .csv file and pick your file (up to 2,000 rows per import). If you don't have a file yet, click Download template for a correctly formatted starting point, fill it in, and upload it.
- Map columns. TrainGrid reads your header row and matches each column to the right field automatically. Review the matches; every field shows the column it's pulling from. Change any that look wrong using the dropdowns, or set one to Not mapped to skip it. Only First name and Last name are required. Click Continue.
- Preview & import. You'll see your rows with a green badge counting how many are ready to import and, if any rows have problems (a missing name or an invalid email), a red badge for the ones that will be skipped. Any row's specific issue is listed in the Issues column so you can fix it in your file and re-upload.
- New departments and positions found in your file are created for you automatically. New locations are created too when you are an Administrator or Manager and your plan has room for them (Starter and Professional include one location; Enterprise is unlimited); any other role must use location names that already exist under Administration → Locations (or leave the cell blank), and a location-scoped member can only import people into their own locations. The preview lists the locations your file would create, or the rows it would refuse, before you click Import, and the Import button stays disabled while a location cannot be created.
- If your organization has more than one location, you can choose a Default location to apply to any row whose Location cell is blank.
- Click Import (number) employees to finish. The Done screen summarizes how many were Created, Skipped (duplicates) and Skipped (errors), and notes any new locations that were created. The whole import is recorded in your audit log.
Note: Re-importing is safe — it won't create duplicates. TrainGrid matches incoming rows against people you already have (by employee number or email, and for rows that have neither, by name plus department). Anyone who already exists is skipped rather than duplicated, so you can re-run the same file to pick up new hires without worrying. People are never merged on name alone, so two different people with the same name are both kept.
There's one optional power feature on the preview step for organizations that already have employees: a checkbox to Archive active employees who aren't in this file. Tick it only when the file you're uploading is your complete current roster — anyone active today but missing from the file is treated as having left and is archived (their history is kept, and they can be restored on rehire). Leave it unticked to simply add and update people.
The employee profile
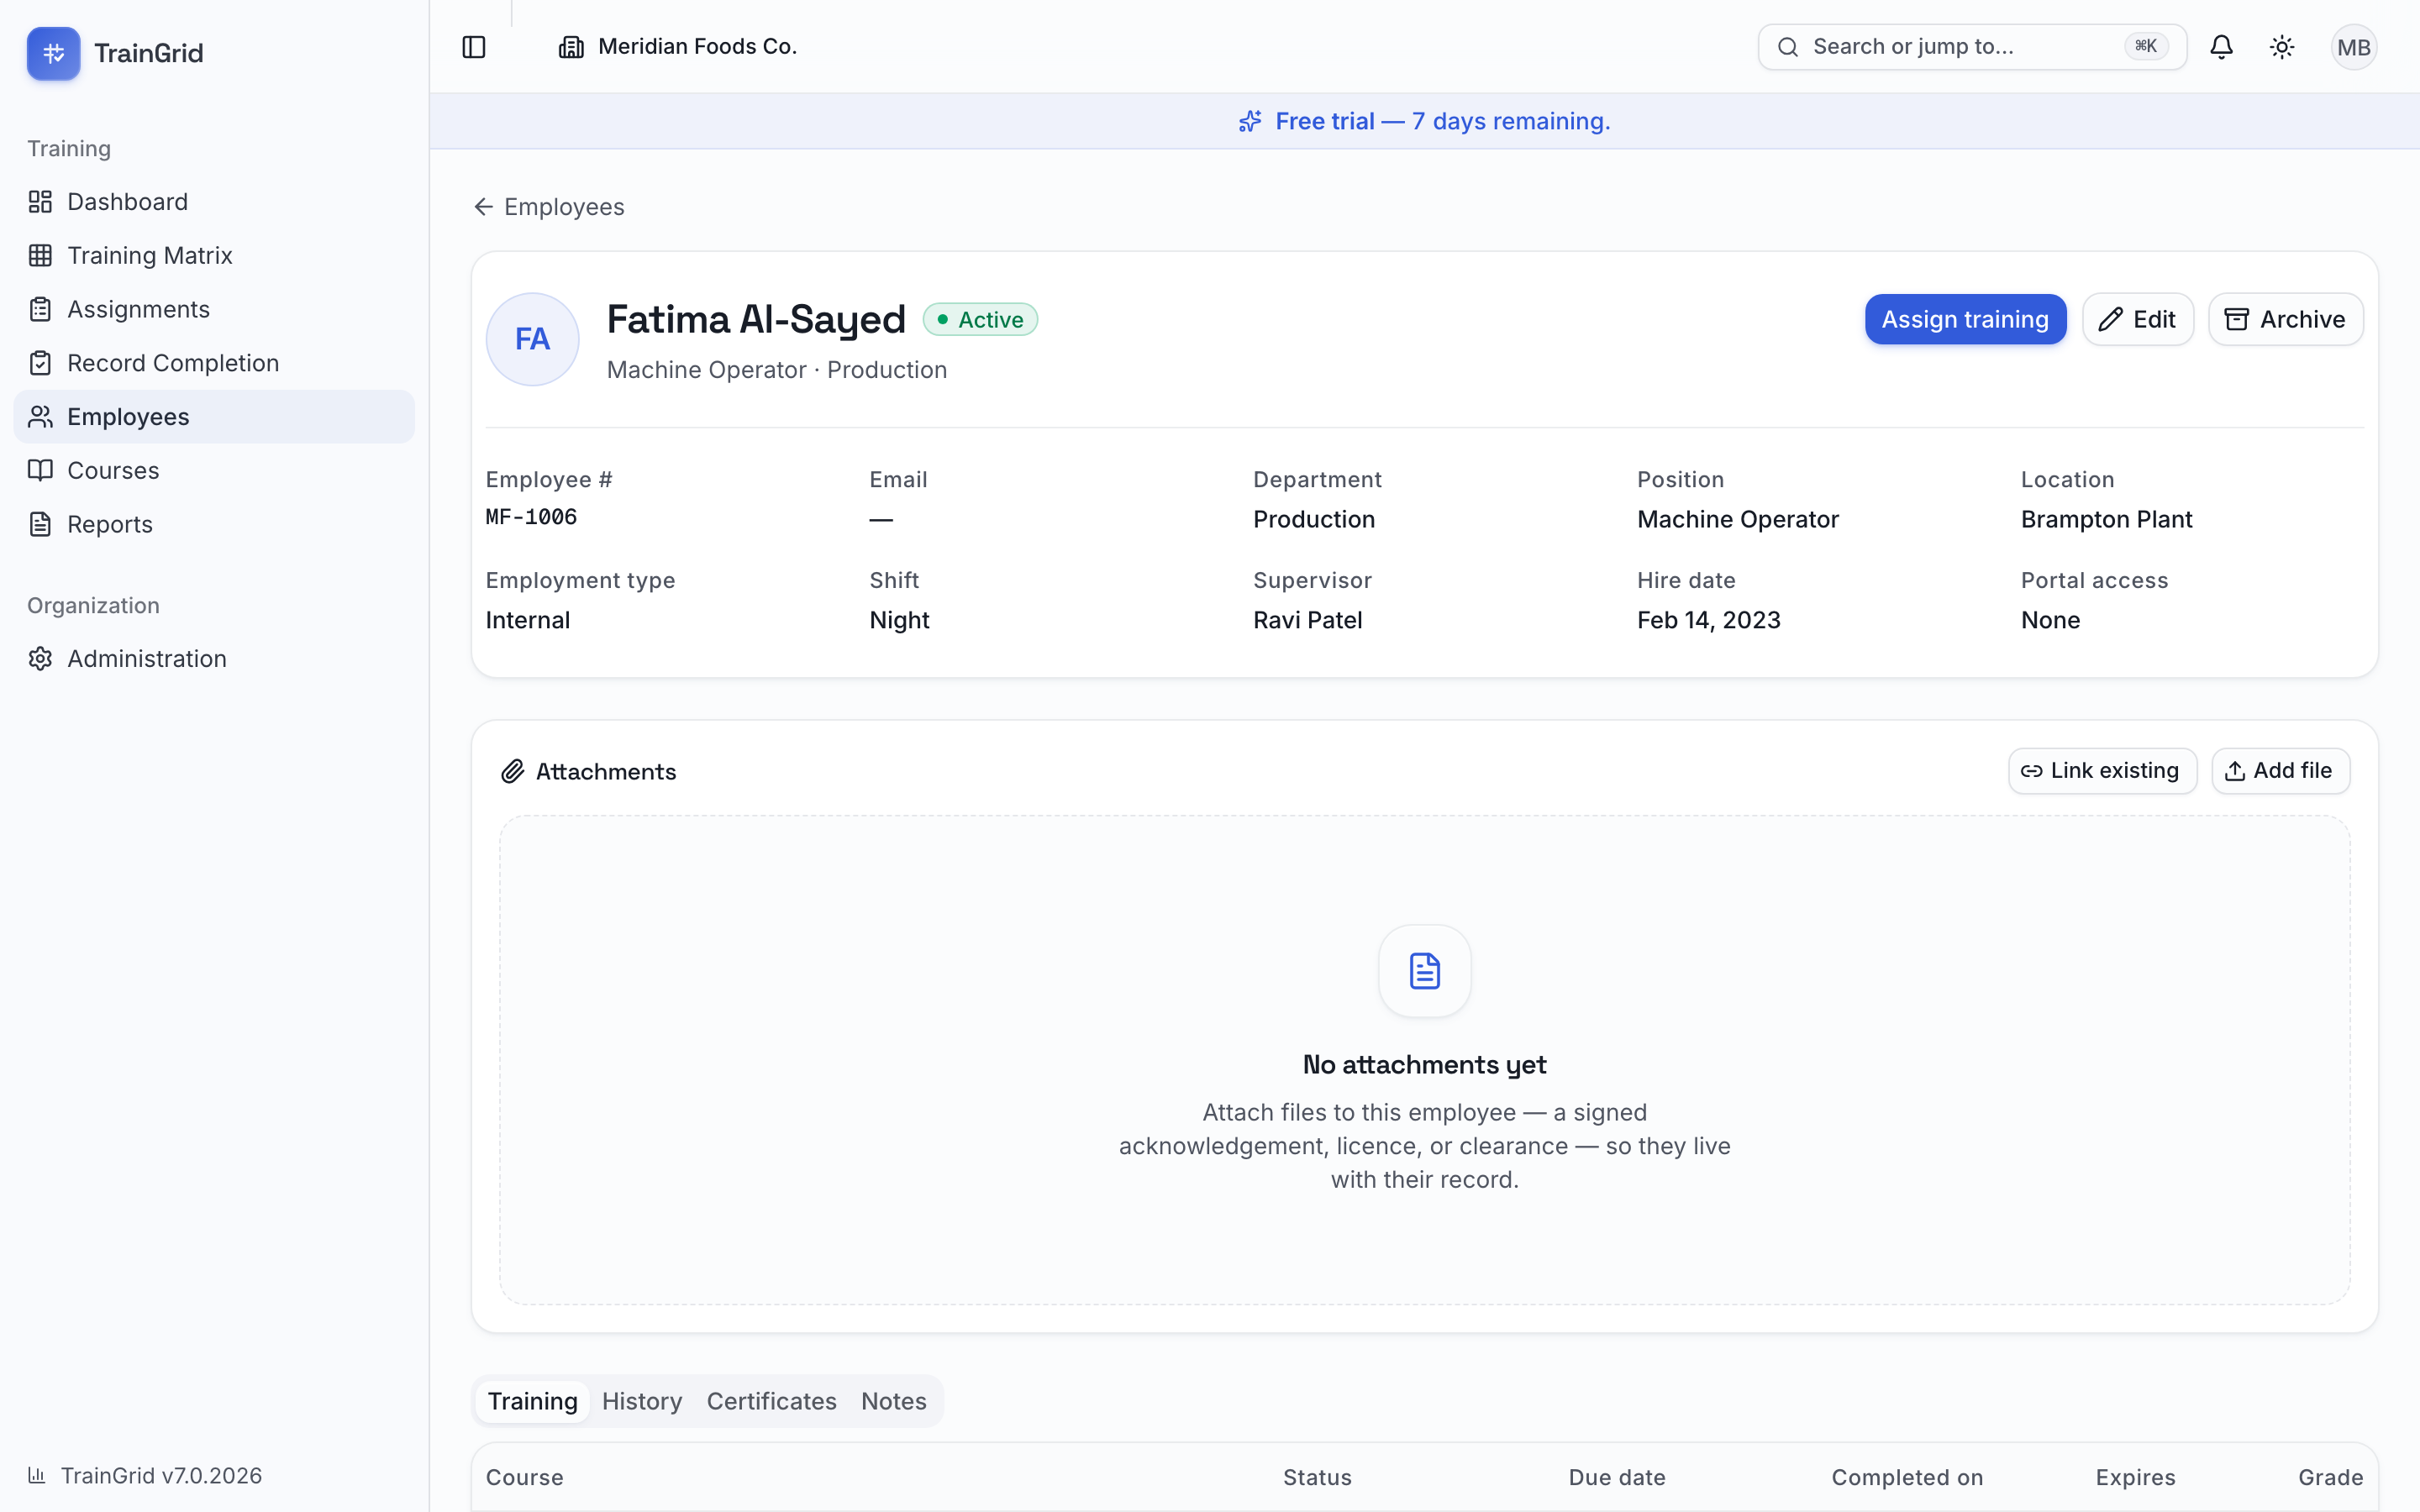
Clicking a person opens their profile. The top card shows their name, status, and details — Employee #, Email, Department, Position, Location, Shift, Supervisor and Hire date — plus any Custom fields that have a value. From here you can Assign training (for active employees), Edit the record, or Archive them. An Administrator also sees a Delete button — but only while the person has no training records at all (someone added by mistake, say). The moment any training is assigned, permanent deletion is off the table and Archive is the way to remove them, so history is never lost.
Below the card are four tabs:
- Training — the person's current status for each course they're assigned: due date, when they completed it, certificate expiry and grade. This is the "where do they stand right now" view.
- History — every assignment they've ever had, newest first: completed, waived or pending. This is the audit-ready record. Click any row to see the full detail. A Version column names the revision of the course each record was earned against — v1.0 · Superseded sitting beside v2.0 · Current — so the history still reads correctly after a course has been revised.
- Certificates — completed courses that carry a certificate, each shown as a card with its completion date, expiry date and a colored chip telling you how many days are left (or how long ago it expired). Any attached certificate files are linked here.
- Notes — free-text notes about the employee. If you can edit, type and save here; TrainGrid records who last edited the notes and when.
Editing an employee
- Open the person's profile and click Edit (or Edit from the row).
- Change any details, including custom fields and notes.
- Click Save changes.
Archiving and unarchiving
Archiving is how you handle people who leave — it keeps their full training history for audits but removes them from active lists and from your compliance numbers, so departed staff never drag your percentage down.
To archive someone:
- Open their profile and click Archive (or select one or more people in the list and click Archive in the selection bar).
- Optionally enter a Reason (for example, "Left the company").
- Confirm by clicking Archive.
To bring someone back (for example, on rehire), find them by switching the list's status filter to Archived or All statuses, open their profile, and click Unarchive — or select them in the list and click Unarchive. They return to active status and rejoin your compliance calculations, with all of their history intact.
Tip: After unarchiving a rehire, glance at their Training tab. Old due dates may now be overdue; you can reschedule those from each record.
Custom fields
If your organization tracks something TrainGrid doesn't have a built-in field for — a badge color, a union code, a contractor flag — an Administrator or Manager can define it under Admin → Custom fields as text, number, date or dropdown. Once defined, custom fields appear in a Custom fields section on the employee form, show on the profile (when they have a value), and are included in the employees Export CSV.
Building Your Course Catalog
Courses are the foundation of TrainGrid. Everything else — assignments, the compliance matrix, certificates and reports — is built on the courses in your catalog. A course defines what the training is and how it behaves: whether it repeats, whether it issues a certificate that expires, whether it counts toward compliance.
Note: Creating and editing courses is available to Administrators and Managers.
The course catalog
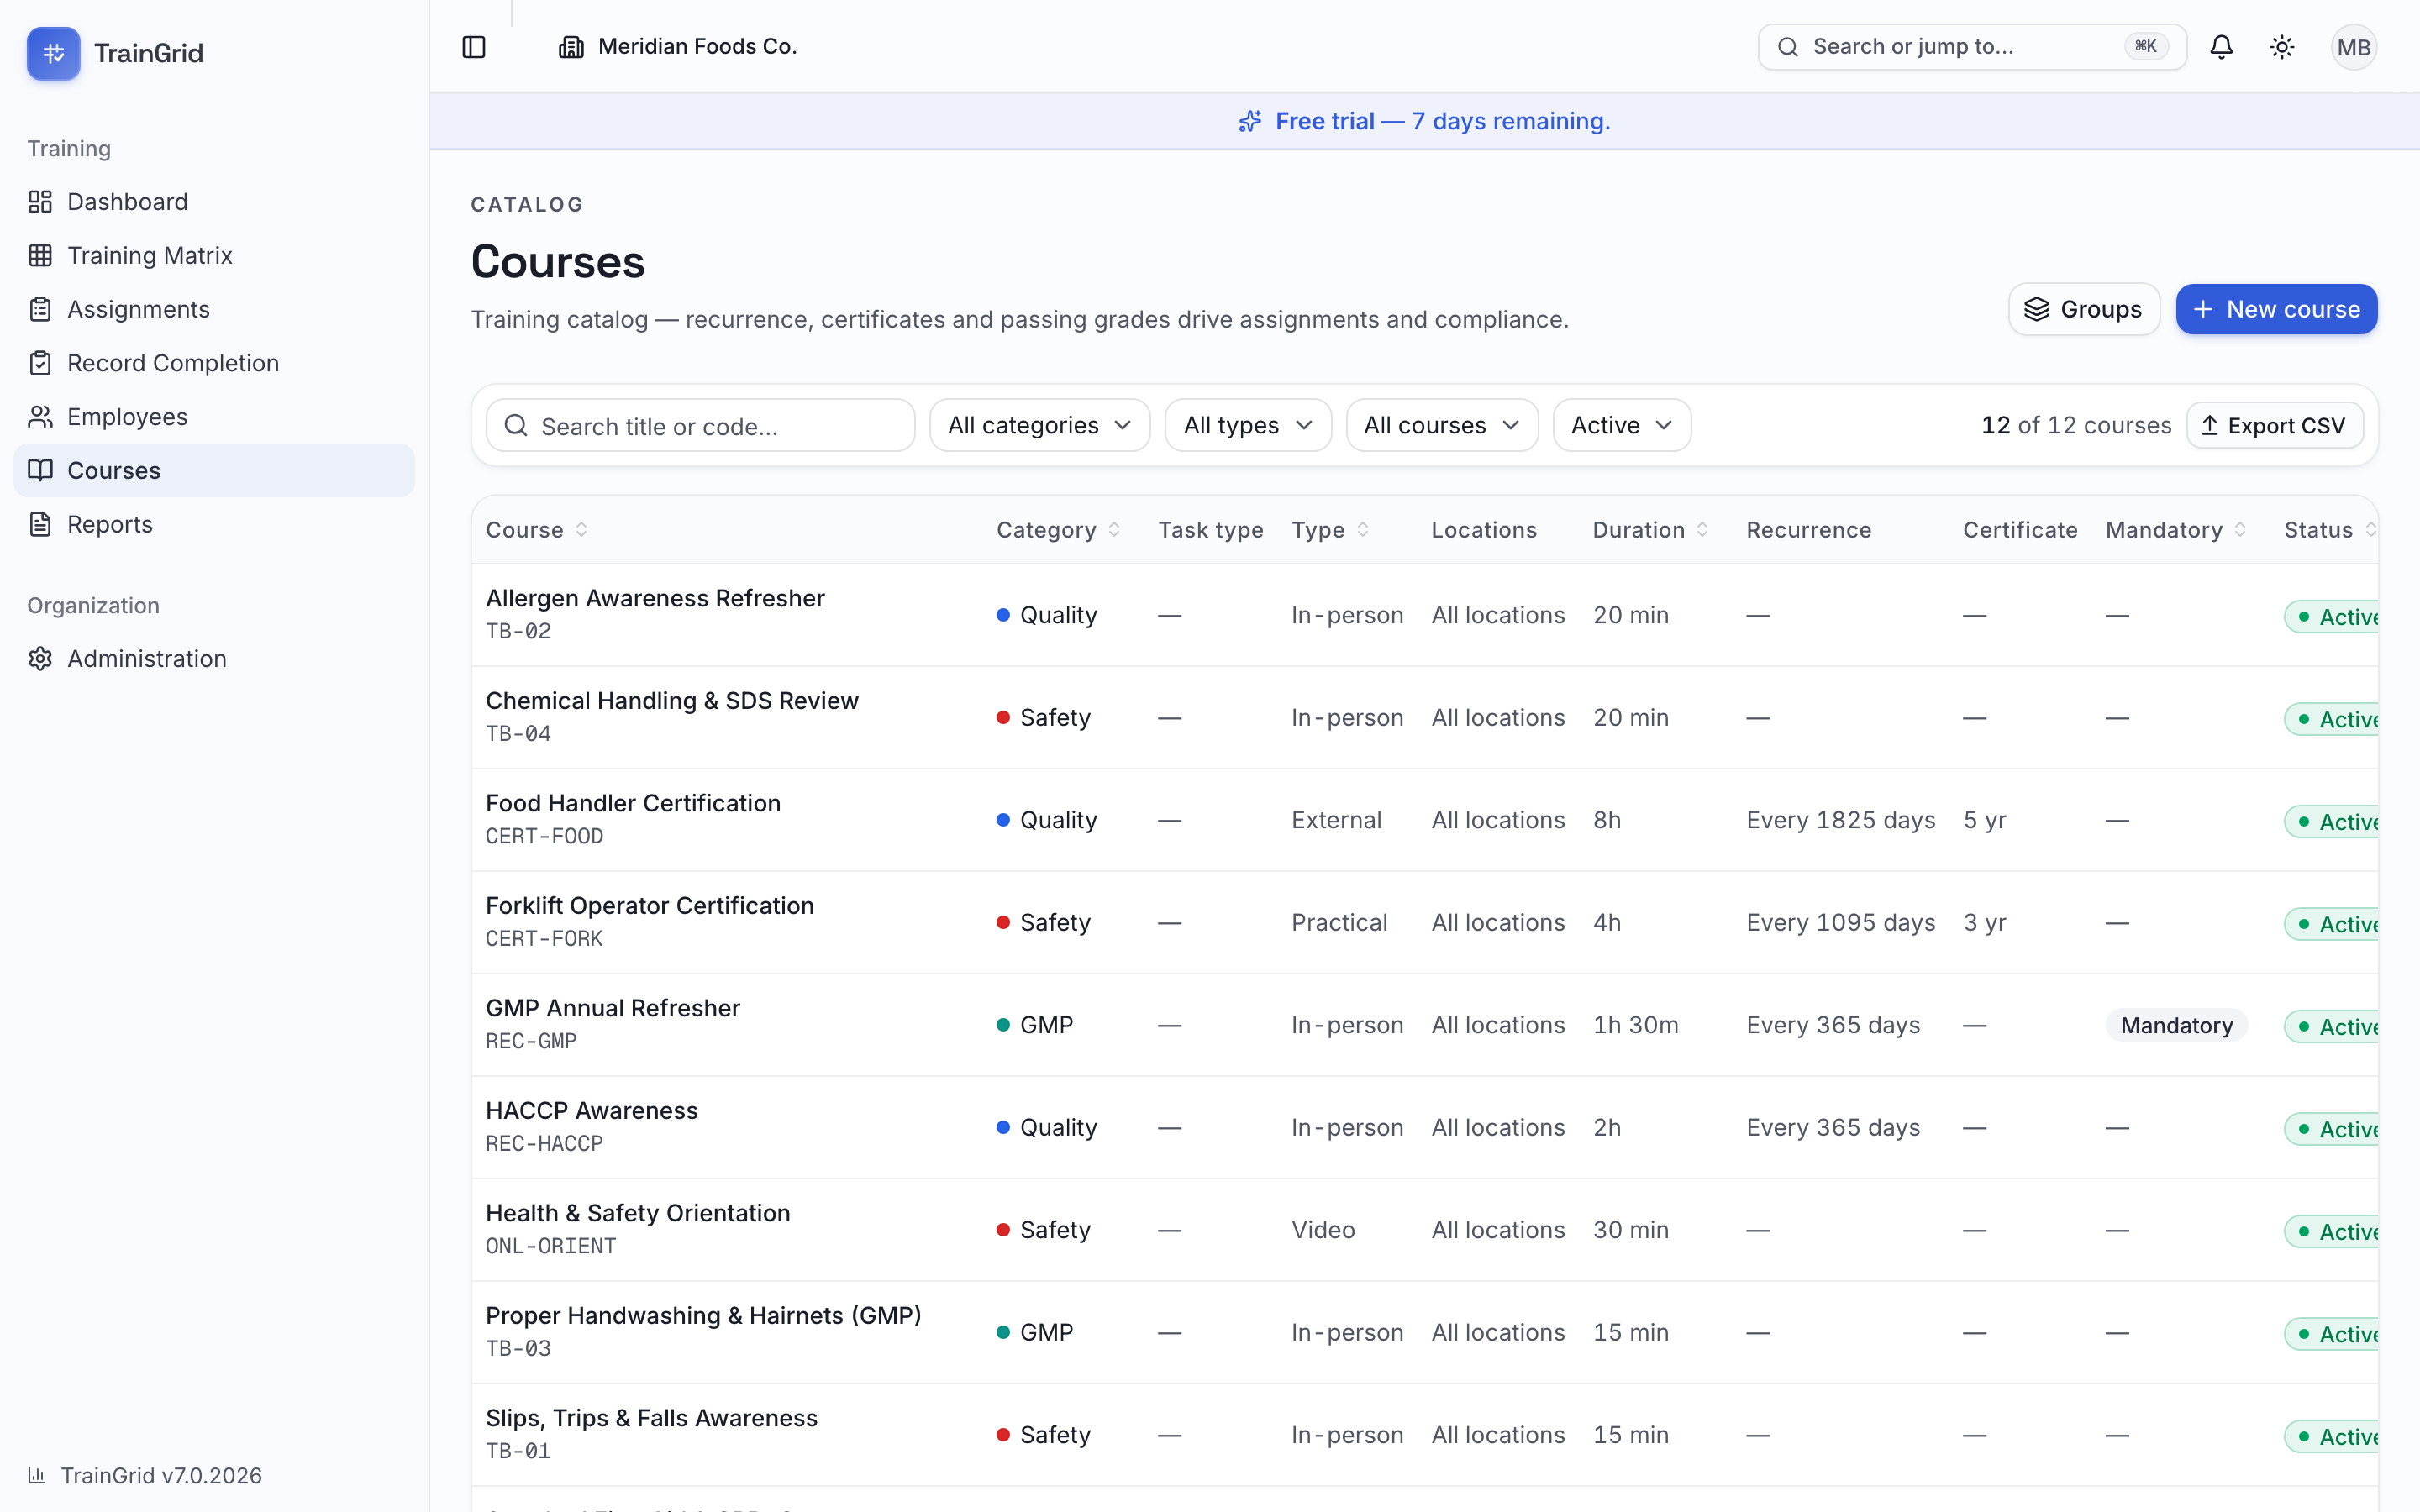
Open Courses from the sidebar to see your catalog. Each row shows the course's title and code, plus Category, Type, Duration, Recurrence, Certificate validity, whether it's Mandatory, its Status, and the default Instructor. Click any row to open the course's detail page.
The toolbar lets you narrow the catalog:
- Search title or code — filter as you type.
- All categories — show one category, or Uncategorized.
- All types — filter by delivery type (in-person, online, and so on).
- All courses — switch to Mandatory only or Optional only.
- Status — Active, Inactive, Archived versions, or All statuses. Active courses show by default. Inactive means a current course that somebody switched off. Archived versions is separate: it holds the superseded versions of courses that have since been revised. Those stay searchable and readable so an auditor can see what was taught at the time, but they are read-only and are never offered for new assignments.
Click Clear to reset all filters, or Export CSV to download the currently filtered list. A count on the right tells you how many courses match ("X of Y courses").
Starting from scratch: Add starter courses
If your catalog is empty, TrainGrid offers a head start. On a brand-new organization's Courses page you'll see two choices:
- Add starter courses — instantly loads a set of common training courses so you have something to build on. Edit or remove any that don't fit your operation.
- New course — build your first course by hand.
Tip: Even if the starter set isn't a perfect match, it's usually faster to load it and tweak than to start from a blank page.
Creating a course
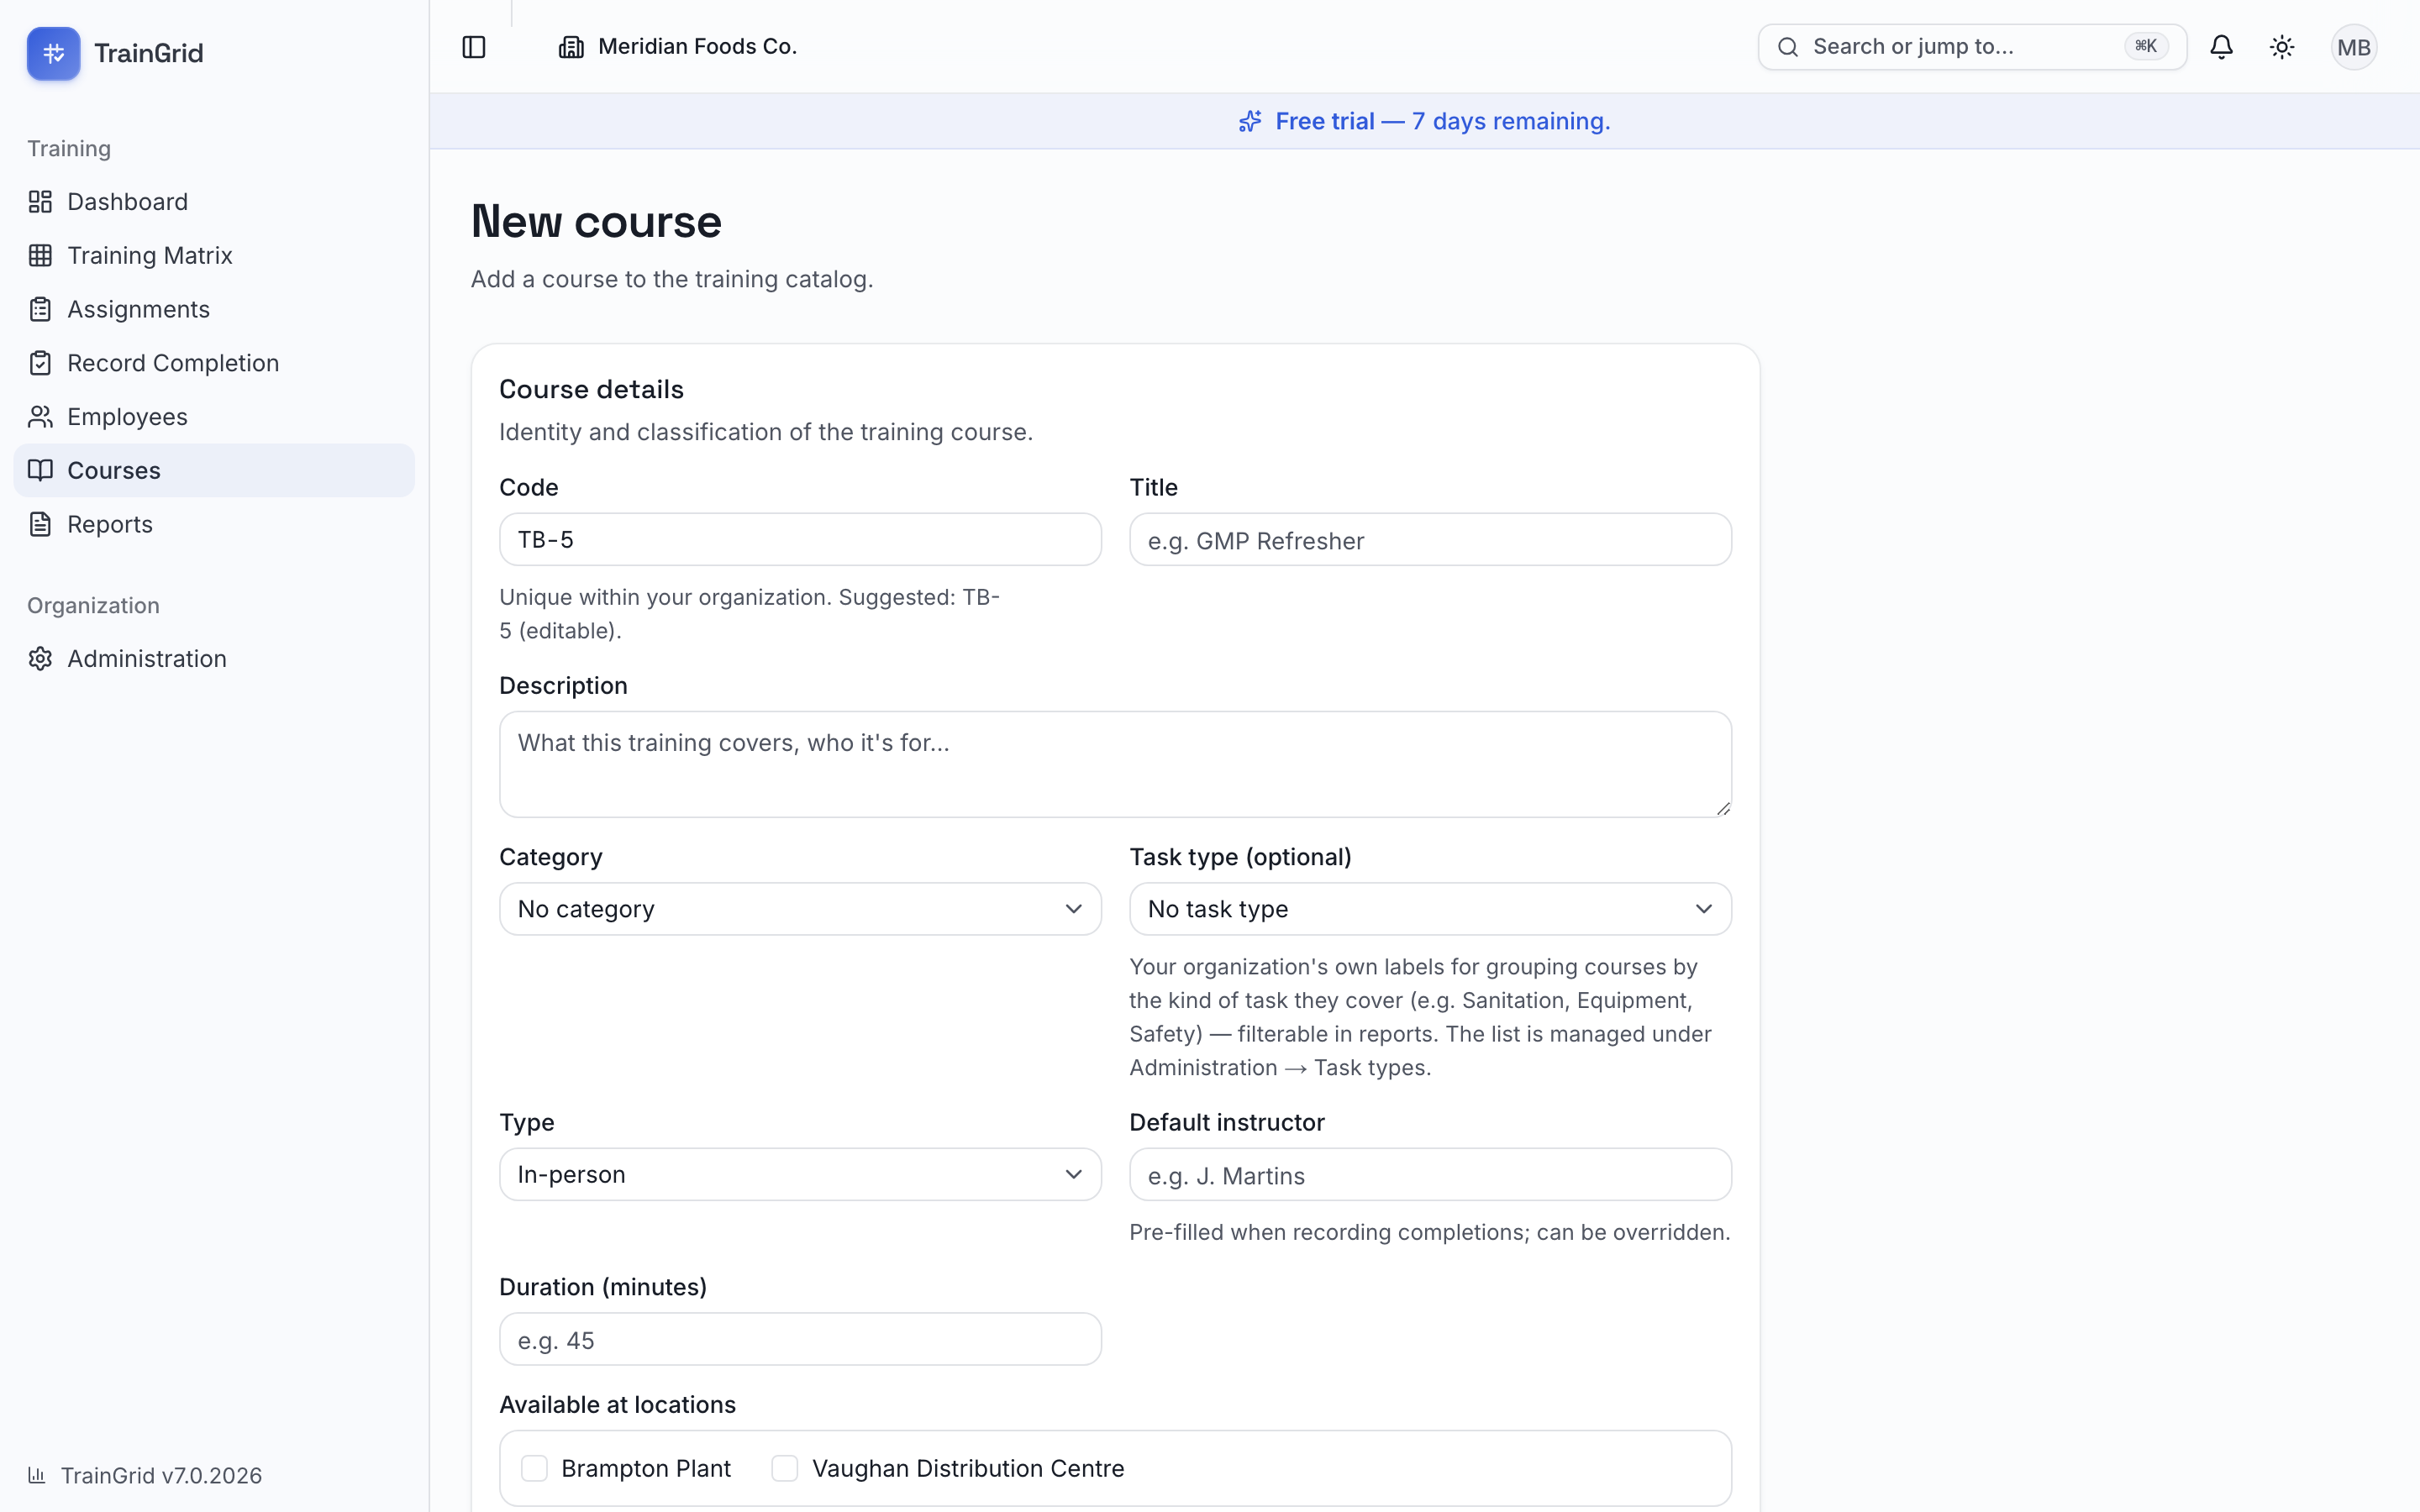
- On the Courses page, click New course.
- Fill in the Course details section:
- Code — a short identifier, unique within your organization (for example,
TR-1001). TrainGrid suggests one automatically, which you can keep or change. - Title — the course name people will recognize (for example, "GMP Refresher").
- Description — what the training covers and who it's for. Optional but recommended.
- Category — group the course (Safety, Quality, and so on), or leave it as No category.
- Type — how the training is delivered: In-person, Online, Video, External or Practical.
- Default instructor — pre-filled when someone records a completion; it can always be overridden at that point. Optional.
- Duration (minutes) — how long the course takes. Optional.
- Set the Scheduling & certificates section (each of the toggles below reveals more options when turned on):
- Repeats — turn this on for training that must be redone on a cycle. Then set Repeat every (days), either by typing a number or using the Weekly, Monthly, Quarterly or Annual shortcut buttons. When someone completes the course, TrainGrid automatically schedules the next assignment this many days later. Leave Repeats off for one-time training that never needs redoing.
- Requires certificate — turn this on if completing the course issues a certificate that expires. Then set Valid for (days), either by typing a number or using the 1 yr, 2 yr, 3 yr or 5 yr shortcuts. The certificate expires this many days after completion, and TrainGrid tracks the countdown on the employee's profile and in reports. Changing Valid for (days) later applies to certificates issued from that point on; certificates already issued keep the validity they were issued under, so nobody's expiry date moves under an auditor's feet. To put someone on a new validity period, record the training again.
- Passing grade (%) — optional. If you set one, a completion recorded below it is still kept, but it shows as Failed: it does not count as compliant on the dashboard, in the matrix or in any report, and it cannot support a competency qualification. A grade exactly equal to the passing mark passes. A course with no passing grade — or a completion recorded without a grade — can never read as Failed.
- Mandatory course — turn this on for training required of everyone. Mandatory courses count toward your compliance percentage for every employee and drive the missing-mandatory-training report.
- Click Create course. TrainGrid saves it and opens the course detail page. If your workspace has no assignments yet and your role can assign training, TrainGrid opens Assign training with the new course already selected instead. This shortcut is available only to members with access to all workspace locations.
Note: When a course both Repeats and Requires certificate, the next recurring assignment is scheduled for the certificate's expiry date (completion date + validity) rather than the plain repeat interval — so retraining lines up exactly with when the certificate lapses.
The course detail page
The detail page is the home for a single course. At the top you'll see the title, code, category, type, and badges for Mandatory and Active/Inactive status, plus Edit, Copy, Deactivate (or Reactivate) and, in some cases, Delete buttons. Assign this course is shown when you can assign training and the course is the current, active version. Your role must also manage courses, and the course must be available at your locations.
The page then shows:
- Assignment stats — four tiles: Total assignments, Completed, Pending, and Needs attention (overdue, expired, and failed records together), so you can see the health of this course at a glance.
- Upcoming sessions: the next three scheduled sessions for this course, each linking to its session page, with a Schedule session button for anyone who can assign training, while the course is active and current. When nothing is scheduled it reads "No instructor-led session is scheduled for this course." (See Training Calendar & Session Booking.)
- Recent assignment activity — the latest people assigned this course, with their department, due date, status, completion date and grade.
- Properties — the course's full configuration (code, category, type, duration, recurrence, certificate validity, passing grade, mandatory, default instructor, status, and created/updated dates) in one reference list. Where a version was created through the New version flow, it also shows Version created by, Approved by and the approval date.
- Version history — shown once a course has more than one version: each version newest first, with its revision note, who created and approved it, and whether it is Current, a Draft or Superseded. Click any version to open it.
- Materials & SOPs — attach the talk sheet, SOP, handout or translated versions for this course so they're one click away. Click Add material to upload a file; click a file's name to open it; use the trash icon to remove one.
Copying a course
Sometimes the same training has to exist as a separate course: the same content under another code for a second programme or site, or the starting point for a course that will diverge. Copy does that without touching the original. On the course detail page, click Copy. The dialog Copy this course explains that it "Creates a new, independent course from the current version" of the course and asks you to "Pick a code no course in your catalog has ever used."
- Accept or change the suggested Course code (up to 30 characters) and the Title (pre-filled with the original's title, up to 200 characters).
- Read the two lines in the dialog. Copied: "settings, locations, tags, topics, materials, competency settings." Not copied: "training records, versions, task-group membership." (Task-group membership means the course groups the original belongs to.)
- Click Create copy. A toast confirms the new course was created as a copy of the original, and its detail page opens.
Note: The copy is a brand-new course: version 1.0, active, with no assignments and no version history, and not linked to the original in any way. Its code must be unused anywhere in your catalog, including by superseded (archived) versions, so a code that once belonged to an old version cannot be reused; if the code is taken you see "Course code "X" is already in use. Pick another code." under the field. Copy is offered on the current version only (not on a draft or an archived version) and needs the Manage courses permission. Materials on the copy point at the same uploaded files as the original.
Tip: Copy is for a genuinely separate course. To revise what people are trained on, publish a new version so records keep pointing at what was taught; to run the existing course on a date, schedule a session; to make people take it again, assign it with a new due date.
Versions and revisions
Training documents get revised, and an auditor will ask what people were actually taught at the time. So rather than editing a course in place and quietly rewriting history, you publish a new version of it: completed records keep pointing at the version they were completed against.
On the course detail page, click New version. Give it a Version number (2.0, say), an optional Effective date, and a Change / revision description — what changed, and why. The new version copies the current definition, so you only edit what differs. Then there are three decisions, and the dialog counts how many active employees completed a previous version before you commit to any of them:
- This revision requires retraining — tick this when the change is significant enough that people already trained must sit the course again. Everyone who completed an earlier version is then assigned the new one, by the Retraining due date you set. Left unticked, their existing training stays valid.
- This revision affects competency or qualification — offered when the course requires a competency assessment. Tick it, set a Reassessment due date, and every trained employee's current record is marked for reassessment. Existing qualifications are kept until each person is actually reassessed — this schedules the work, it doesn't revoke anyone.
- Make it current now — retires the previous version (read-only, kept for audits) and makes this the one that appears in the matrix and the assignment pickers.
Leave Make it current now unticked and the new version is saved as a draft instead. Both due dates, and the competency question, belong to the moment a version actually goes live, so they are asked again — with a fresh count of who is affected — when you activate the draft from the course page.
A retired version moves into the Archived versions bucket of the catalog's status filter. It stays searchable and readable, topics and materials included, but it can't be edited or assigned again.
Editing and archiving a course
To change any of a course's details, click Edit on its detail page, make your changes, and click Save changes.
To retire a course, click Deactivate. Deactivating stops the course from being used for new assignments while keeping all existing assignments and completion history intact — nothing is lost, and you can click Reactivate at any time to bring it back. This is the right choice for almost every course you no longer use, including mandatory ones.
Note: A permanent Delete button appears only for a course that has never had any assignments — a course used by mistake, say. Once a course has any assignment history, deletion is disabled and Deactivate is used instead, so your records stay complete for audits. Deletion is available only to Administrators and cannot be undone; every deletion is written to the audit log. Administrators can also tick several courses in the catalog and click Delete N in the selection bar: the same rules apply to every course selected, nothing is deleted if any one of them is blocked, and the dialog asks for your password first (see "Delete a course" in the Function Reference).
Part 3 Training Matrix & Assignments
Training Matrix
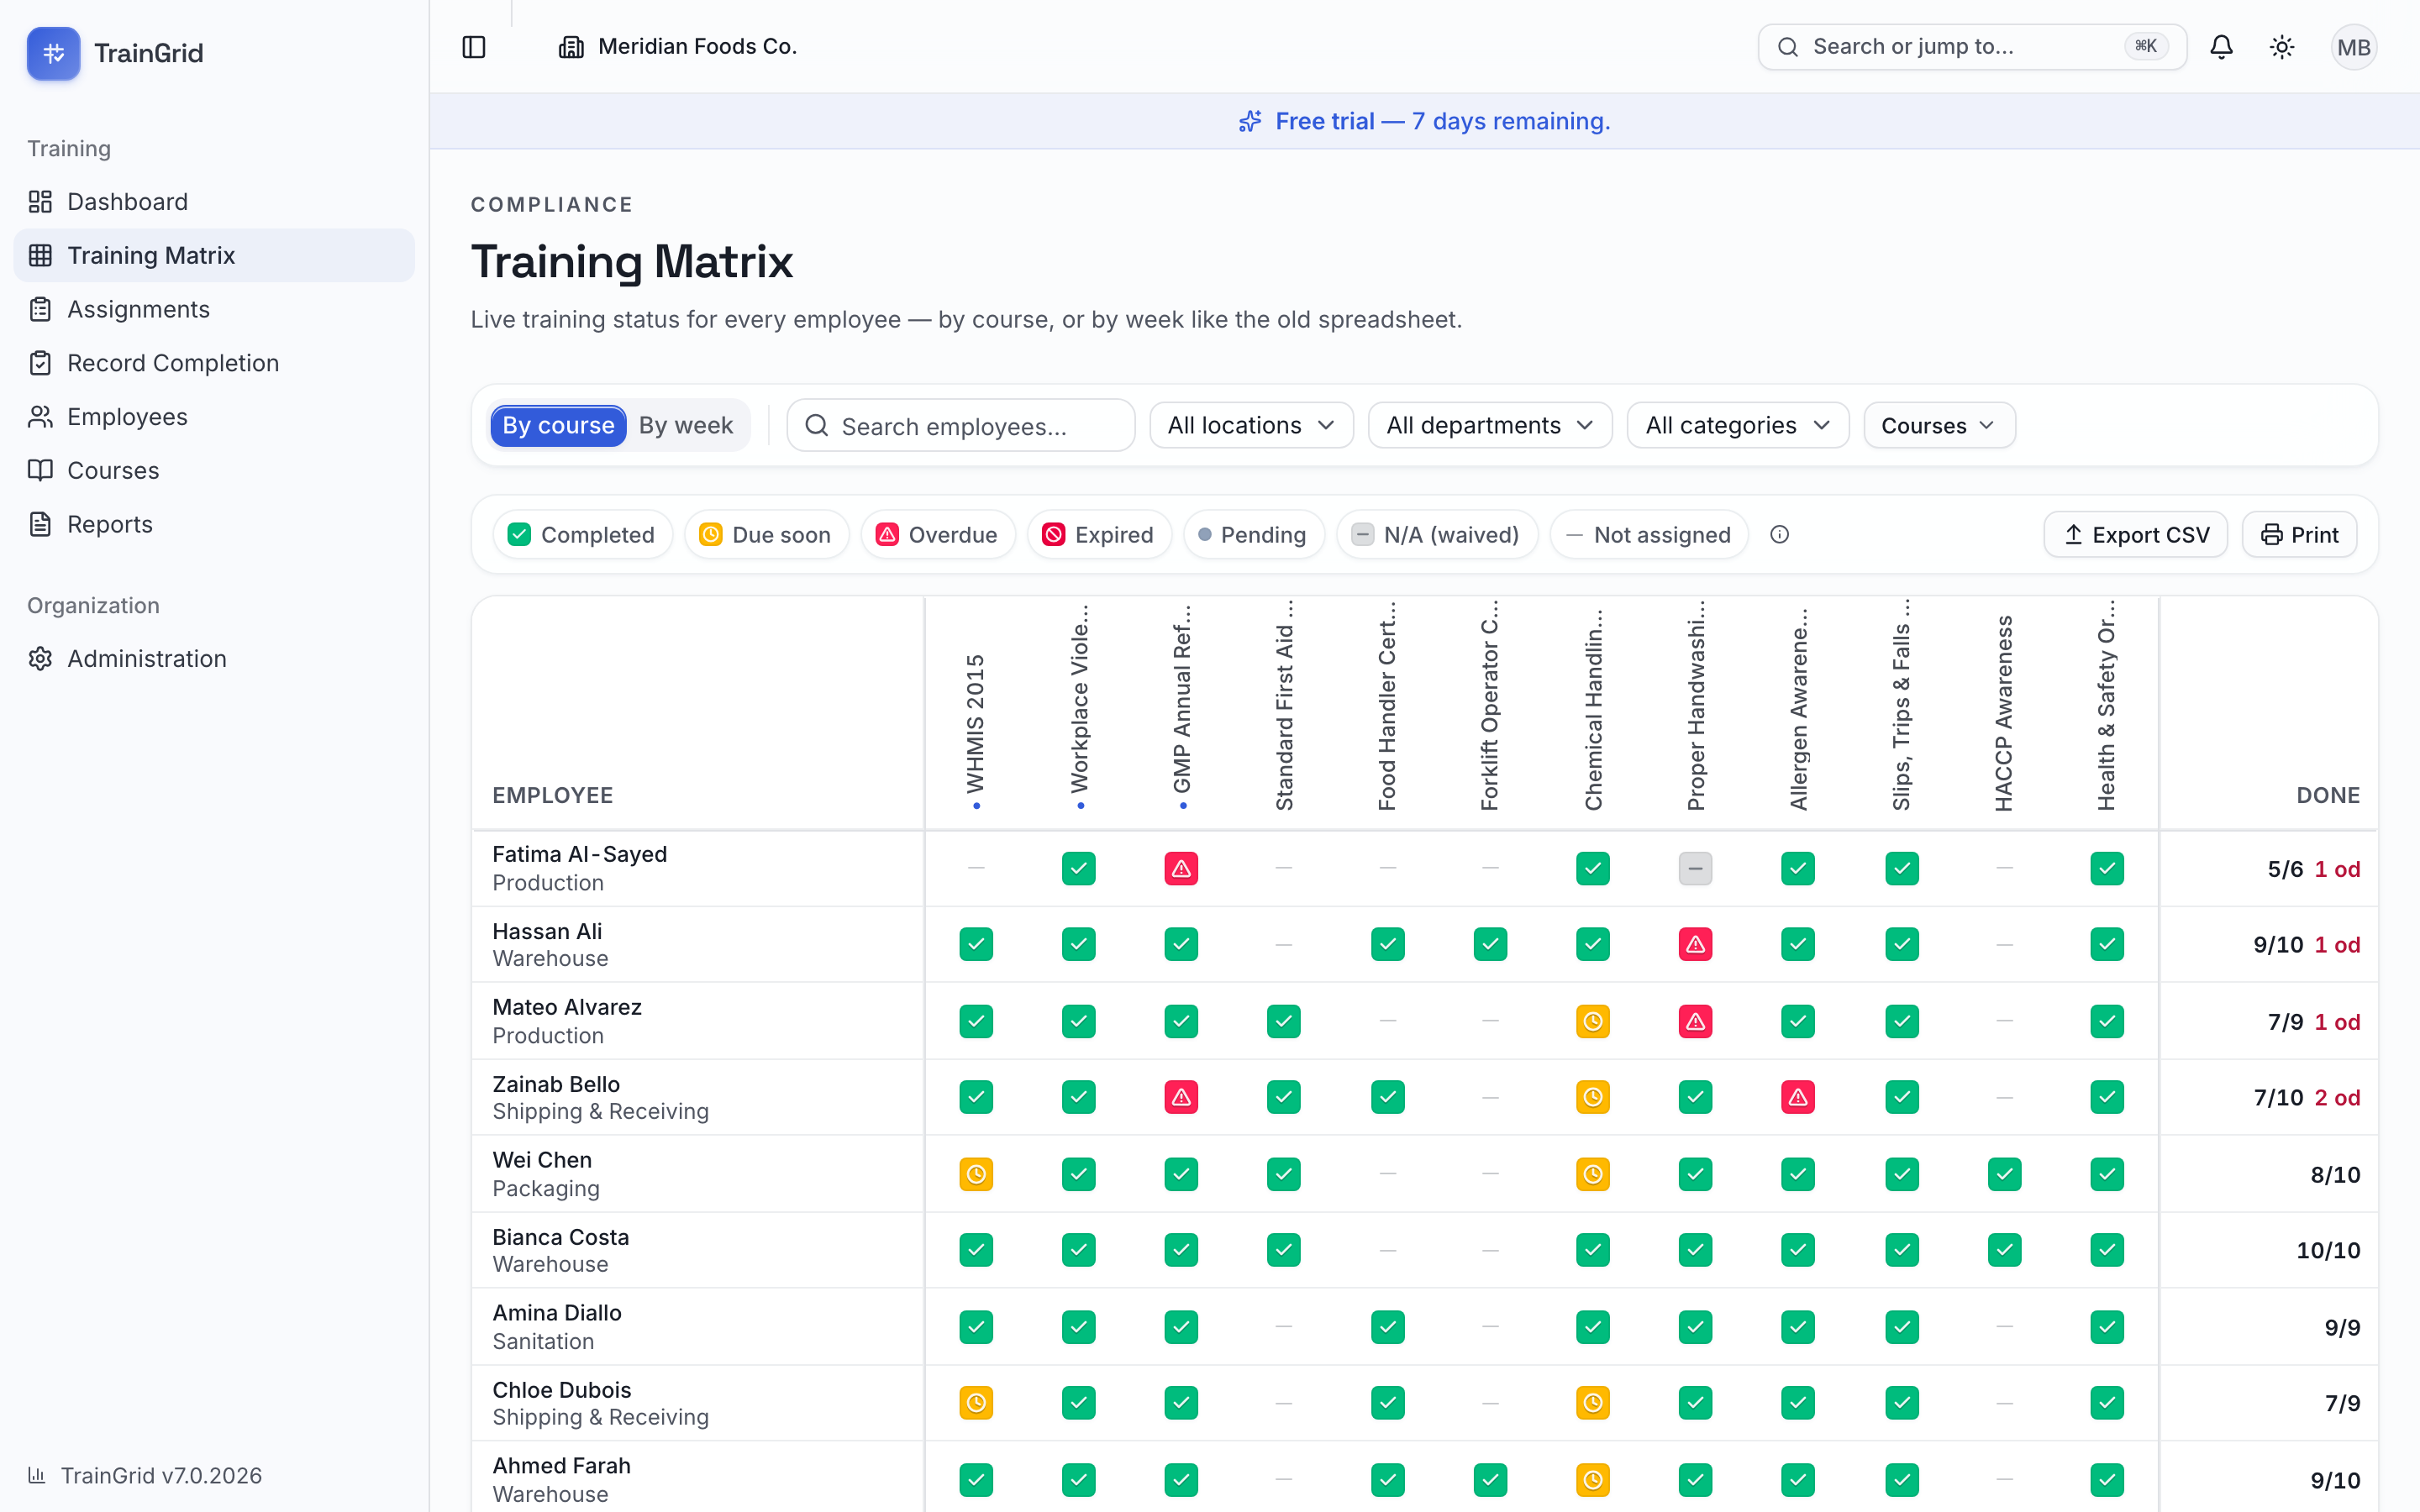
The Training Matrix is your live, at-a-glance grid of who has what training. Every employee is a row; every course (or every week) is a column; and each cell is colour-coded to show status right now — no spreadsheet to maintain, no formulas to update. It's the fastest way to spot a gap, and the report an auditor most wants to see.
Open it from the sidebar under Training Matrix.
Note: The matrix always respects your access. Supervisors and other location-scoped roles see only the employees and sites they're responsible for — the grid, filters and printout are all limited accordingly.
The two views
At the top left, a toggle switches the whole grid between two ways of looking at your training.
Training, Competency and Qualification
In By course mode a second toggle changes what the cells are about. The grid stays the same shape; the question changes:
- Training — the familiar view: completed, due soon, overdue, expired.
- Competency — the assessment outcome for each person: competent, with conditions, needs improvement, not competent, exempt, or not assessed yet.
- Qualification — the answer to “can this person do this job unsupervised?”, worked out from both of the above.
Someone who finished the course but has never been assessed reads Completed under Training and Not qualified under Qualification. That difference is the entire point of the three lenses.
Note: Exports and printouts follow the lens you are looking at, and say which one produced them — a competency print can never be mistaken for a training print.
Course versions and topics on the grid
Each column header carries the course’s current version, and hovering it shows that version’s topics — the agenda — without leaving the grid. Records completed against an older version still sit in the same column: history stays pinned to the version it was delivered under, while the column always reflects the course as it stands today.
Filtering by task type
The task type filter narrows the grid to one kind of activity — toolbox talks, inductions, practical assessments, whatever your organization defines under Administration → Task types. It works in both views, and like every other filter it is named on the printout.
- By course — employees down the side, courses across the top. This is the compliance master grid: one glance tells you every course each person holds and where they stand. Mandatory courses are marked with a dot in the column header. A Done column on the right shows each person's completed-vs-assigned tally, with an overdue count in red when they're behind.
- By week — employees down the side, calendar weeks across the top. This mirrors the old weekly toolbox-talk sheet: each cell shows how many of that week's sessions the person has completed (for example,
2/3). The current week is tagged now; upcoming weeks are shaded and tagged upcoming.
Reading the colour-coded cells
In By course, each cell tells you the status of one course for one person:
- Completed (green) — done and current.
- Due soon (amber) — assigned and coming up.
- Overdue (red) — past its due date and not completed.
- Expired (red) — a certificate that has lapsed. For certificate courses, a fresh retraining assignment is created automatically, so look for a new pending cell in the same column.
- Failed (the darkest red, marked with an ✕) — the course was completed, but below its passing grade. It is deliberately darker than Overdue and Expired: those were once valid or are merely late, whereas this training was never passed. It does not count as compliant.
- Pending (a small grey dot) — assigned, with time still to go.
- N/A (waived) — deliberately marked not applicable for this person.
- Not assigned (a faint dash) — this course was never assigned to this person.
In By week, the same colours describe the whole week's toolbox talks for that person:
- All completed (green), Partially completed (amber), None completed (past) (red), Due, not completed yet (grey), and Nothing due for an empty week.
A colour key sits beneath the toolbar in both views. Every colour is also backed by a small symbol and full text, so the grid stays readable in black-and-white and for colour-blind users.
Opening a cell for detail
Click any cell to open a detail panel on the right.
- In By course, the panel shows the course, the employee, the due date, completion date, grade, certificate expiry, instructor, location and the Source the training came through (Internal, External or Online), plus any notes or waive reason. A grade below the passing mark is called out in place, and the record reads Failed.
- A badge beside the status names the course version the record was earned against, marked Superseded when the course has moved on since — so you can see at a glance that a green cell survives from an older revision.
- If the course requires a competency assessment, a Competency block shows the outcome and the resulting qualification, with the Assessor, the date it was Assessed, and any Reassessment due date.
- View training history opens that employee's History tab, where every record they hold is listed with its own version.
- In By week, clicking a cell opens the same panel. If the week held more than one session, a short list appears first — pick the one you want.
From this panel you can act on the spot:
- If the course is still open and you have permission, click Mark complete, set the Completion date and, optionally, a Grade %, the Hours (this session) and an Instructor, then confirm. Recurring and certificate courses schedule their next occurrence automatically.
- If the cell is Not assigned and you're a coordinator or above, you'll see an Assign this course option — set a Due date and click it to start tracking that course for that person right away.
Filtering the grid
The toolbar lets you narrow the matrix to exactly the group you care about. Filters combine, and the current filter set is printed on any audit copy.
- Search employees… — type a name to jump to specific people.
- Location — shown when your organization has more than one site.
- Department — the list automatically narrows to departments in the chosen location.
- Category — filter courses by their category.
- Courses — click Courses to pick one or more specific courses; a badge shows how many are selected, and Clear selection resets it.
Click Reset at any time to clear all filters and return to the full grid.
By-week extras: the week window
When you're in By week, an extra control appears:
- Window — choose how many weeks of history to show (weeks back) and how many upcoming weeks to include (upcoming). Widen the window to review a full quarter, or narrow it to focus on recent activity.
Printing an audit-ready copy
To hand an inspector a clean, dated record:
- Set the view and filters you want captured (for example, one location and only mandatory courses).
- Print the page from your browser (Ctrl/Cmd + P).
The printout drops all on-screen controls and prints in landscape with your organization's logo and name, the view (By course or By week), the exact filters applied, and the generation date across the top — everything needed for a defensible compliance snapshot.
Prefer a file? Both matrix views can also be exported as a spreadsheet that mirrors exactly what's on screen, current filters included.
Assignments & Recording Completions
This work lives on two sidebar pages, deliberately separated so a records screen never looks like a place you create work:
- Assignments — the assign wizard: where you hand training out.
- Record Completion — your master training report: the full record of who was assigned what, when it's due, and whether it's done. From here you record completions one at a time or in bulk, waive requirements, reschedule, attach certificates, and export or print.
Note: What you can do depends on your role. Coordinators and above can assign, reschedule and waive; anyone with record permission can mark completions; only Administrators can delete a record.
Assigning training
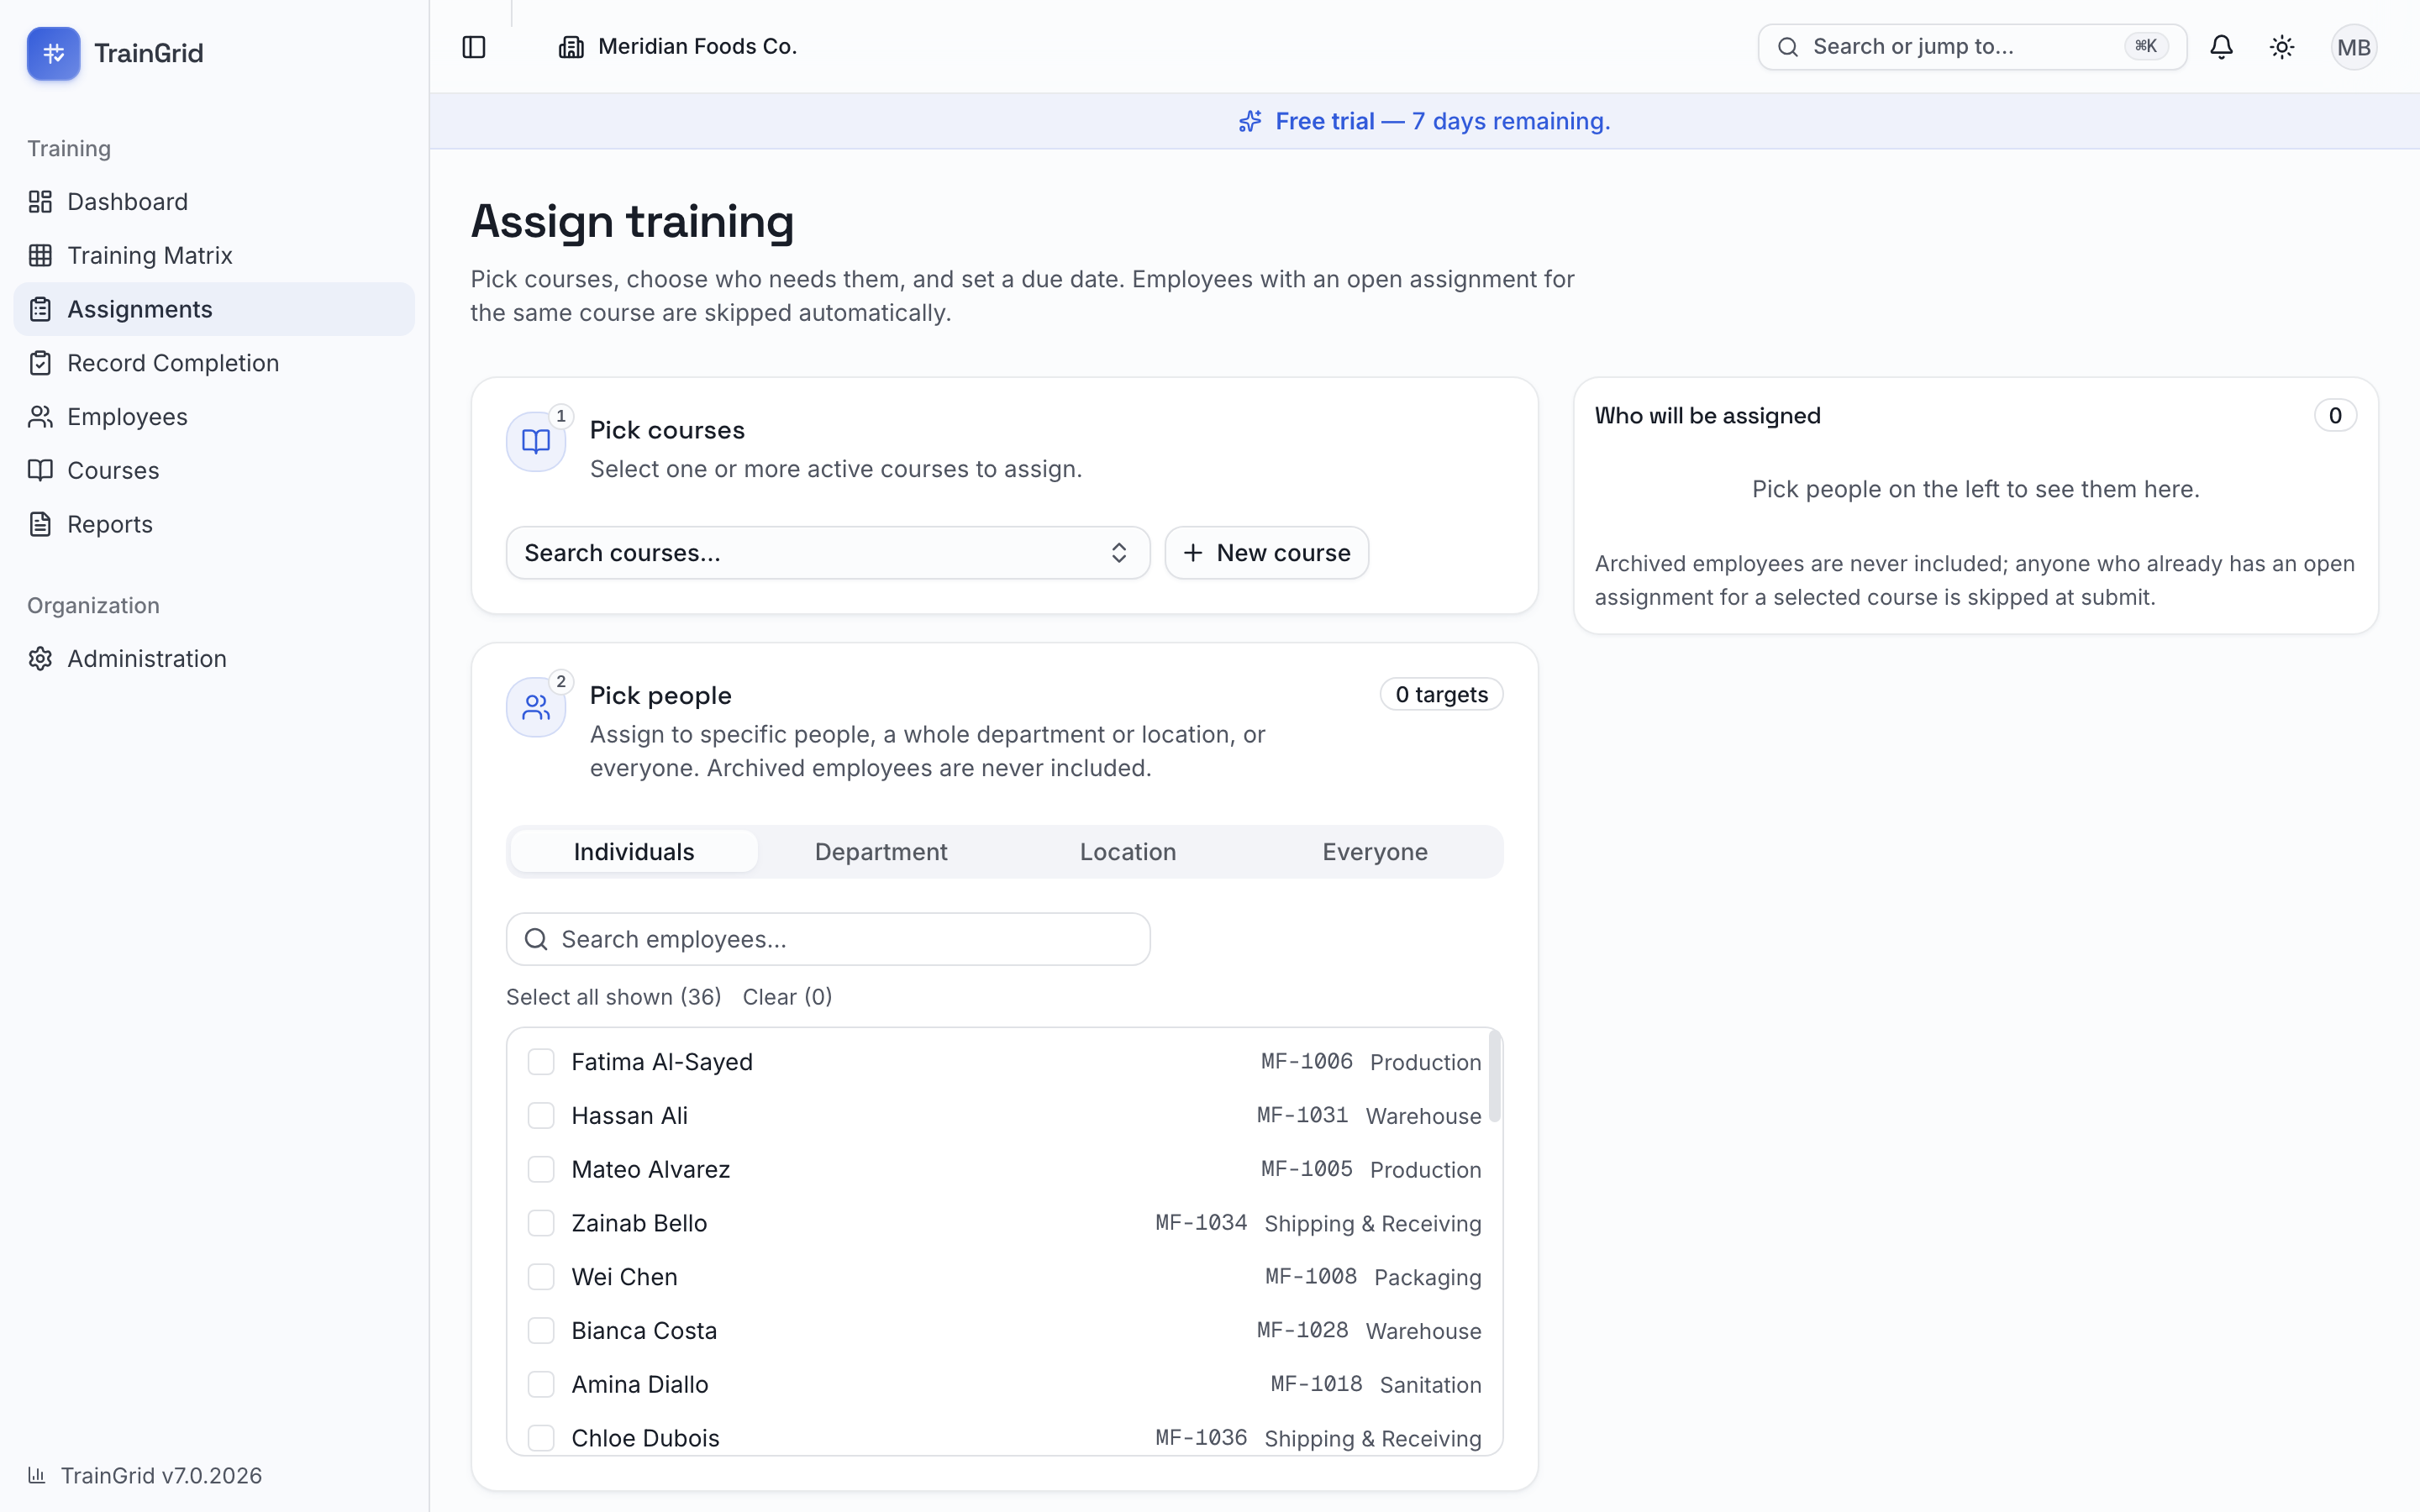
Open Assignments in the sidebar for a short three-step wizard. A running tally at the bottom shows courses × people = assignments so you always know the scope before you commit.
- Pick course(s). Search and select one or more active courses. Each selected course appears as a removable chip. If you manage courses, New course… lets you create one without leaving the wizard.
- Pick people. Choose a tab for who receives the training:
- Individuals — search and tick specific employees. Use Select all shown or Clear to move quickly.
- Department — choose a department; everyone active in it is included.
- Location — choose a site; everyone active there is included.
- Everyone — every active employee. Archived employees are never included. A targets badge shows how many people are selected, and if some already hold this training, a note tells you how many duplicates will be skipped.
- Schedule. Set a Due date and, optionally, add Notes that appear on each record. To log training that already happened, switch on Already completed (impromptu / past training) and enter the Completion date, an optional Grade, Hours and Instructor — the records are created and completed immediately.
Click Assign training (or Assign & record completion for past training) to finish. TrainGrid skips anyone who already has that open assignment, so you never double-count.
Tip: Completing a recurring or certificate course automatically creates the next occurrence — the next toolbox talk or the renewal before the certificate expires — so nothing falls off your radar.
The Assignments master list
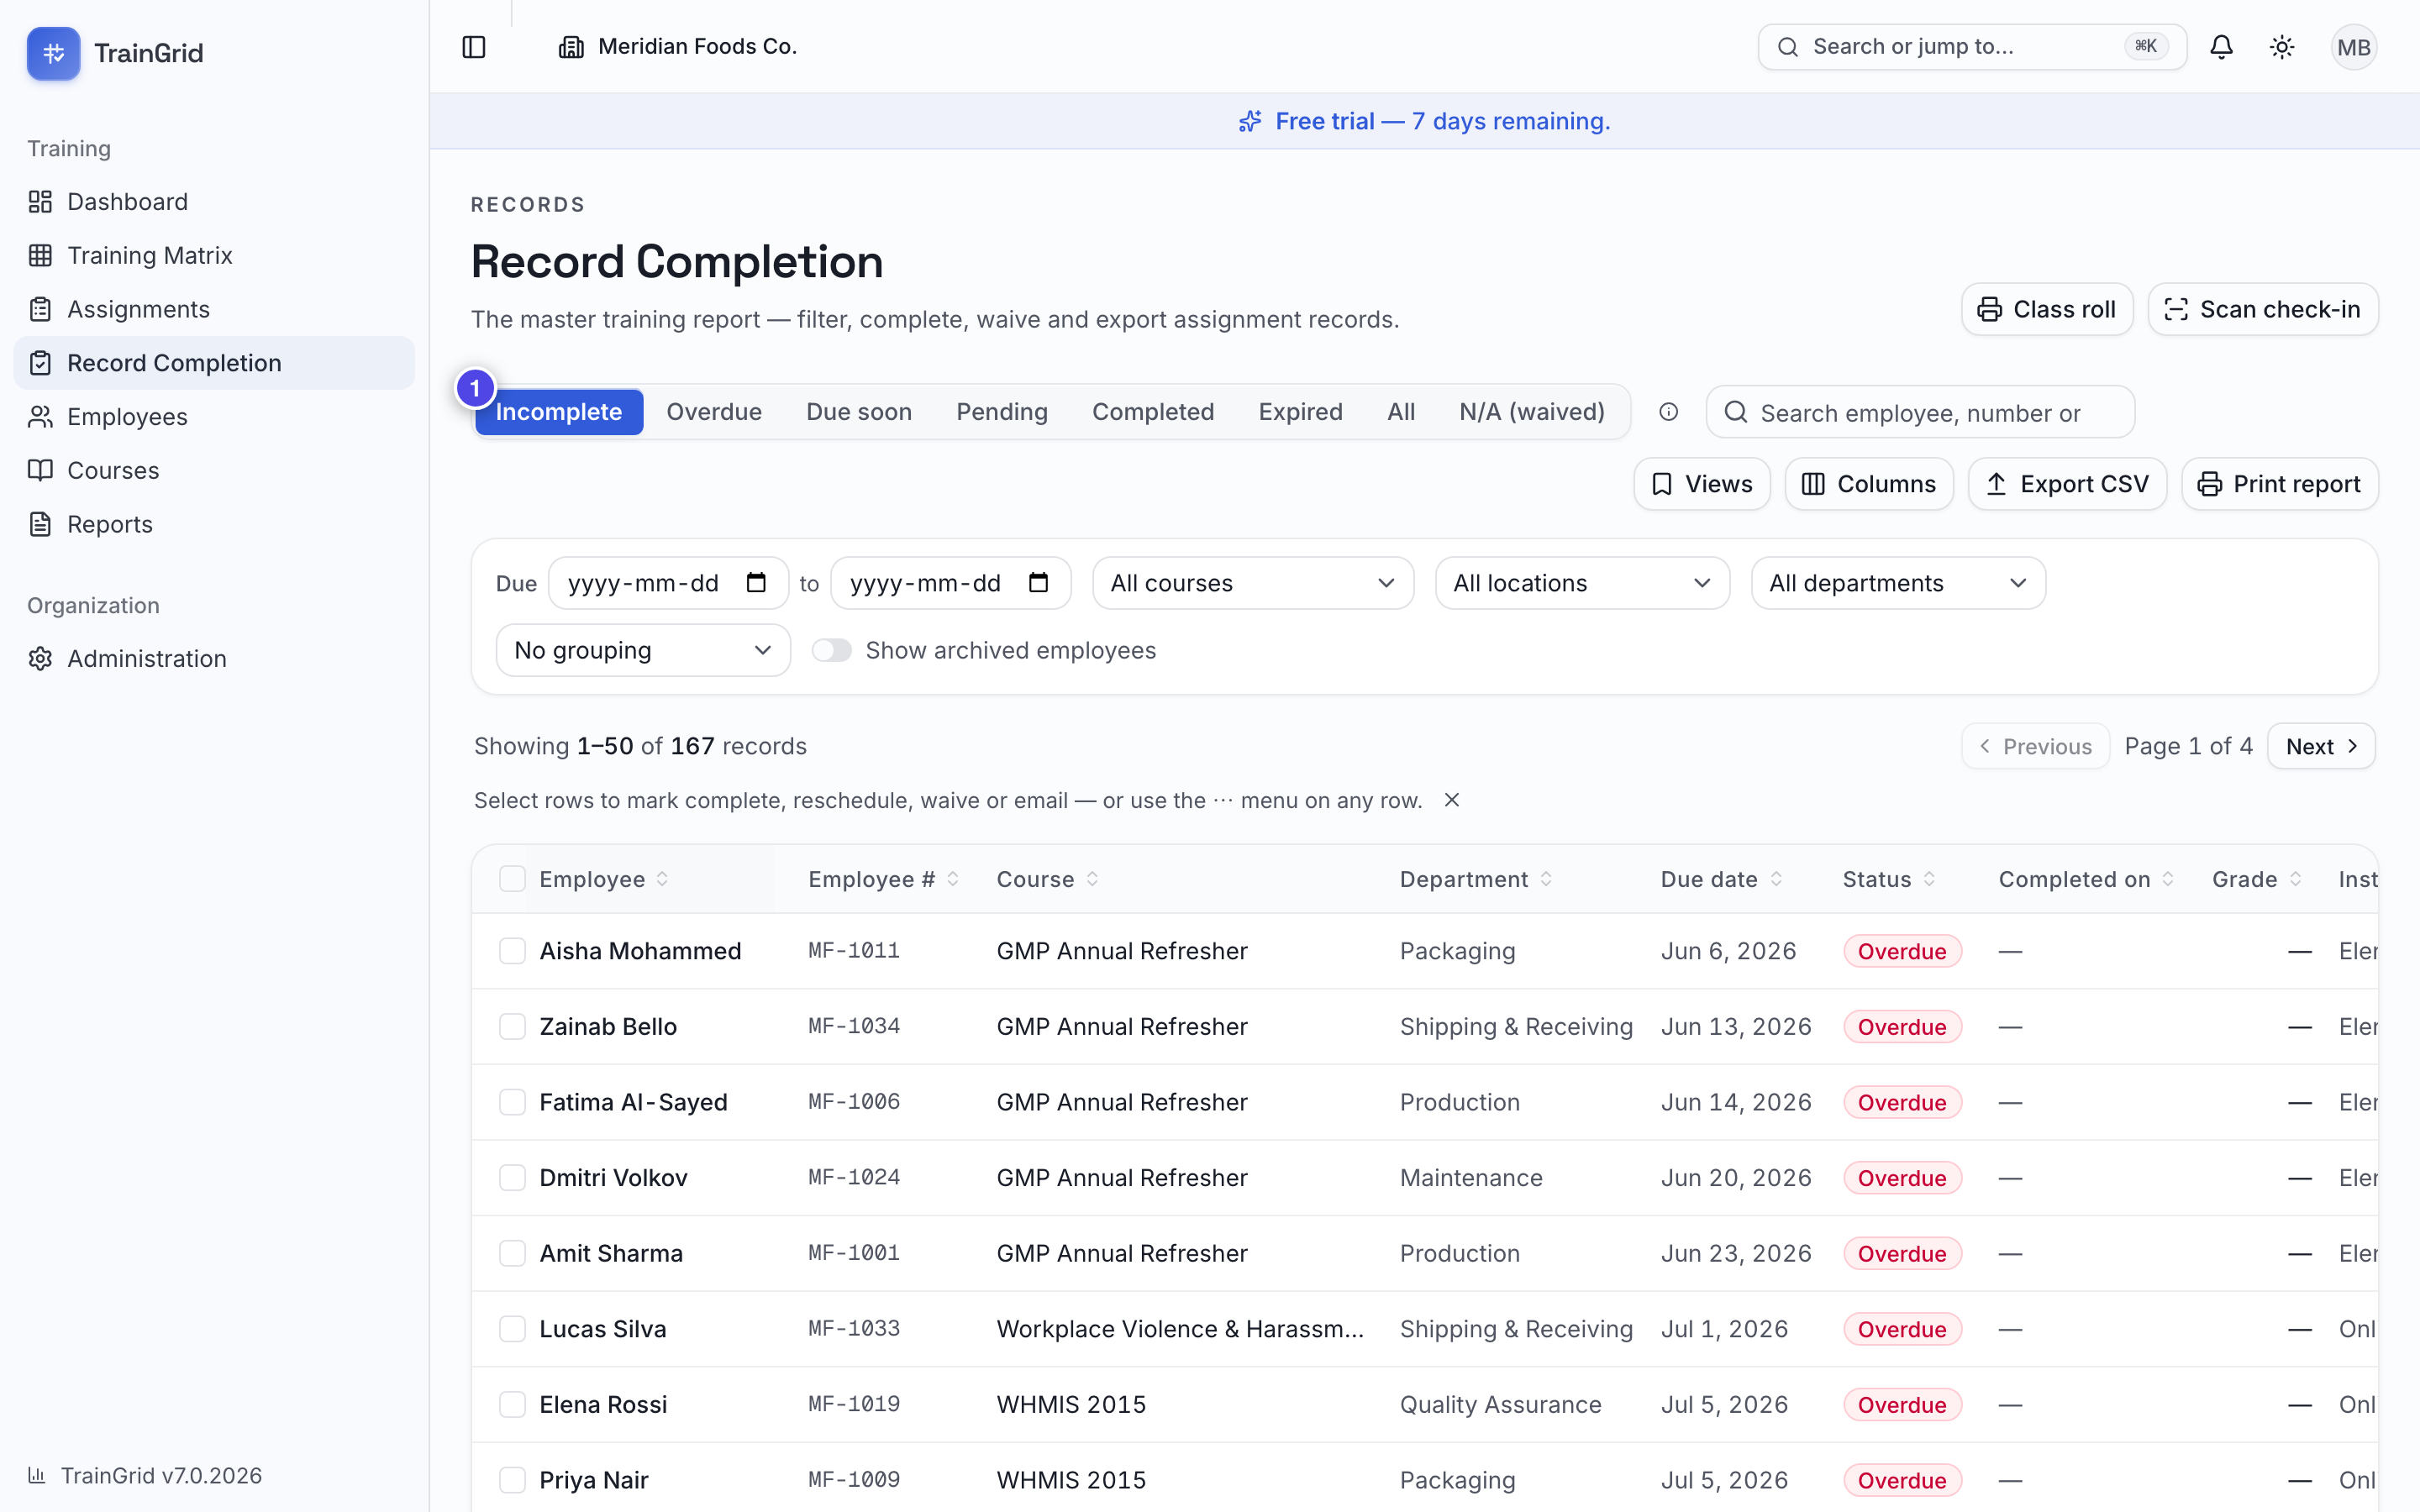
The list is where you review and act on records in bulk.
- Views. The toggle at the top switches between Incomplete, Overdue, Due soon, Pending, Completed, Expired, Failed, All and N/A (waived). Incomplete, Completed, Expired, Failed and N/A (waived) between them hold every record exactly once — so a completion below the passing grade appears under Failed and not under Completed, and the tab you are on always agrees with the status badge on the row.
- Search by employee, employee number or course.
- Filters. Narrow by due-date range (Due … to …), course, department, and Show archived employees. Clear filters resets them.
- Group by. Choose Group by employee or Group by course to see records clustered with per-group counts, or keep No grouping.
- Columns. Click Columns to show or hide any column (department, grade, instructor, certificate expiry, and more). Your choice is remembered on this device.
- Views (saved filters). Click Views → Save current filters…, give it a name, and reload that exact set-up any time. A tick marks the view you're currently on.
- Export CSV downloads the current filtered records as a spreadsheet; Print report produces a clean printable version.
Rows with a paperclip already have an attachment. Use the row's ⋯ menu for View details, Mark complete, or Waive (N/A).
The assignment detail panel
Click View details on any row to open the record's panel, with the employee, department, location, due and completion dates, grade, instructor, certificate expiry, notes, and — for completed records — Recorded by. Depending on your role you can:
- Upload certificate — attach a certificate or other file. Download it later with the download icon, or remove it with the trash icon.
- Reschedule — for a pending assignment, set a New due date and click Reschedule (for example, a postponed toolbox talk or a rehire's stale training).
- Edit completion — for a completed record, adjust the completion date, grade, hours or instructor and Save changes. This is also where you add hours to a record that was captured without them.
- Delete record (Administrators only) — permanently removes the record; the deletion is written to the audit log. If that completion had scheduled a follow-up occurrence, the follow-up is removed too, so compliance stays accurate.
Recording completions in bulk
The fastest way to log a whole session:
- Filter the list to the group you completed (a course, a date range, a department).
- Tick the checkbox on each attendee's row — or tick the header box to select every eligible row on the page. Only pending assignments can be selected.
- In the floating action bar that appears, click Mark complete.
- Set the Completion date, and optionally a Grade, Hours (this session) and Instructor. You can also attach one Attendance sheet / shared attachment — it's uploaded once and linked to every selected record.
- Confirm. A summary confirms how many were completed and how many next occurrences were scheduled.
Hours is how long the session actually took, in decimal hours — 1.5 for ninety minutes, up to 24. You type it once and every record you selected receives it, which is how a session really runs: one class, fifteen people, the same two hours each. It's what the Training Hours report counts, and it's optional everywhere — a record without hours is still a valid record, it just counts as zero hours until someone fills it in.
To bulk-Waive instead, select the rows and choose Waive — enter a reason (kept for audit), and those pending assignments are marked N/A without being deleted.
Quick-complete a single record
To record just one completion, open a row's ⋯ menu and choose Mark complete, then set the date, grade and instructor. You can also quick-complete straight from a matrix cell (see the Training Matrix section).
Sign-in sheet
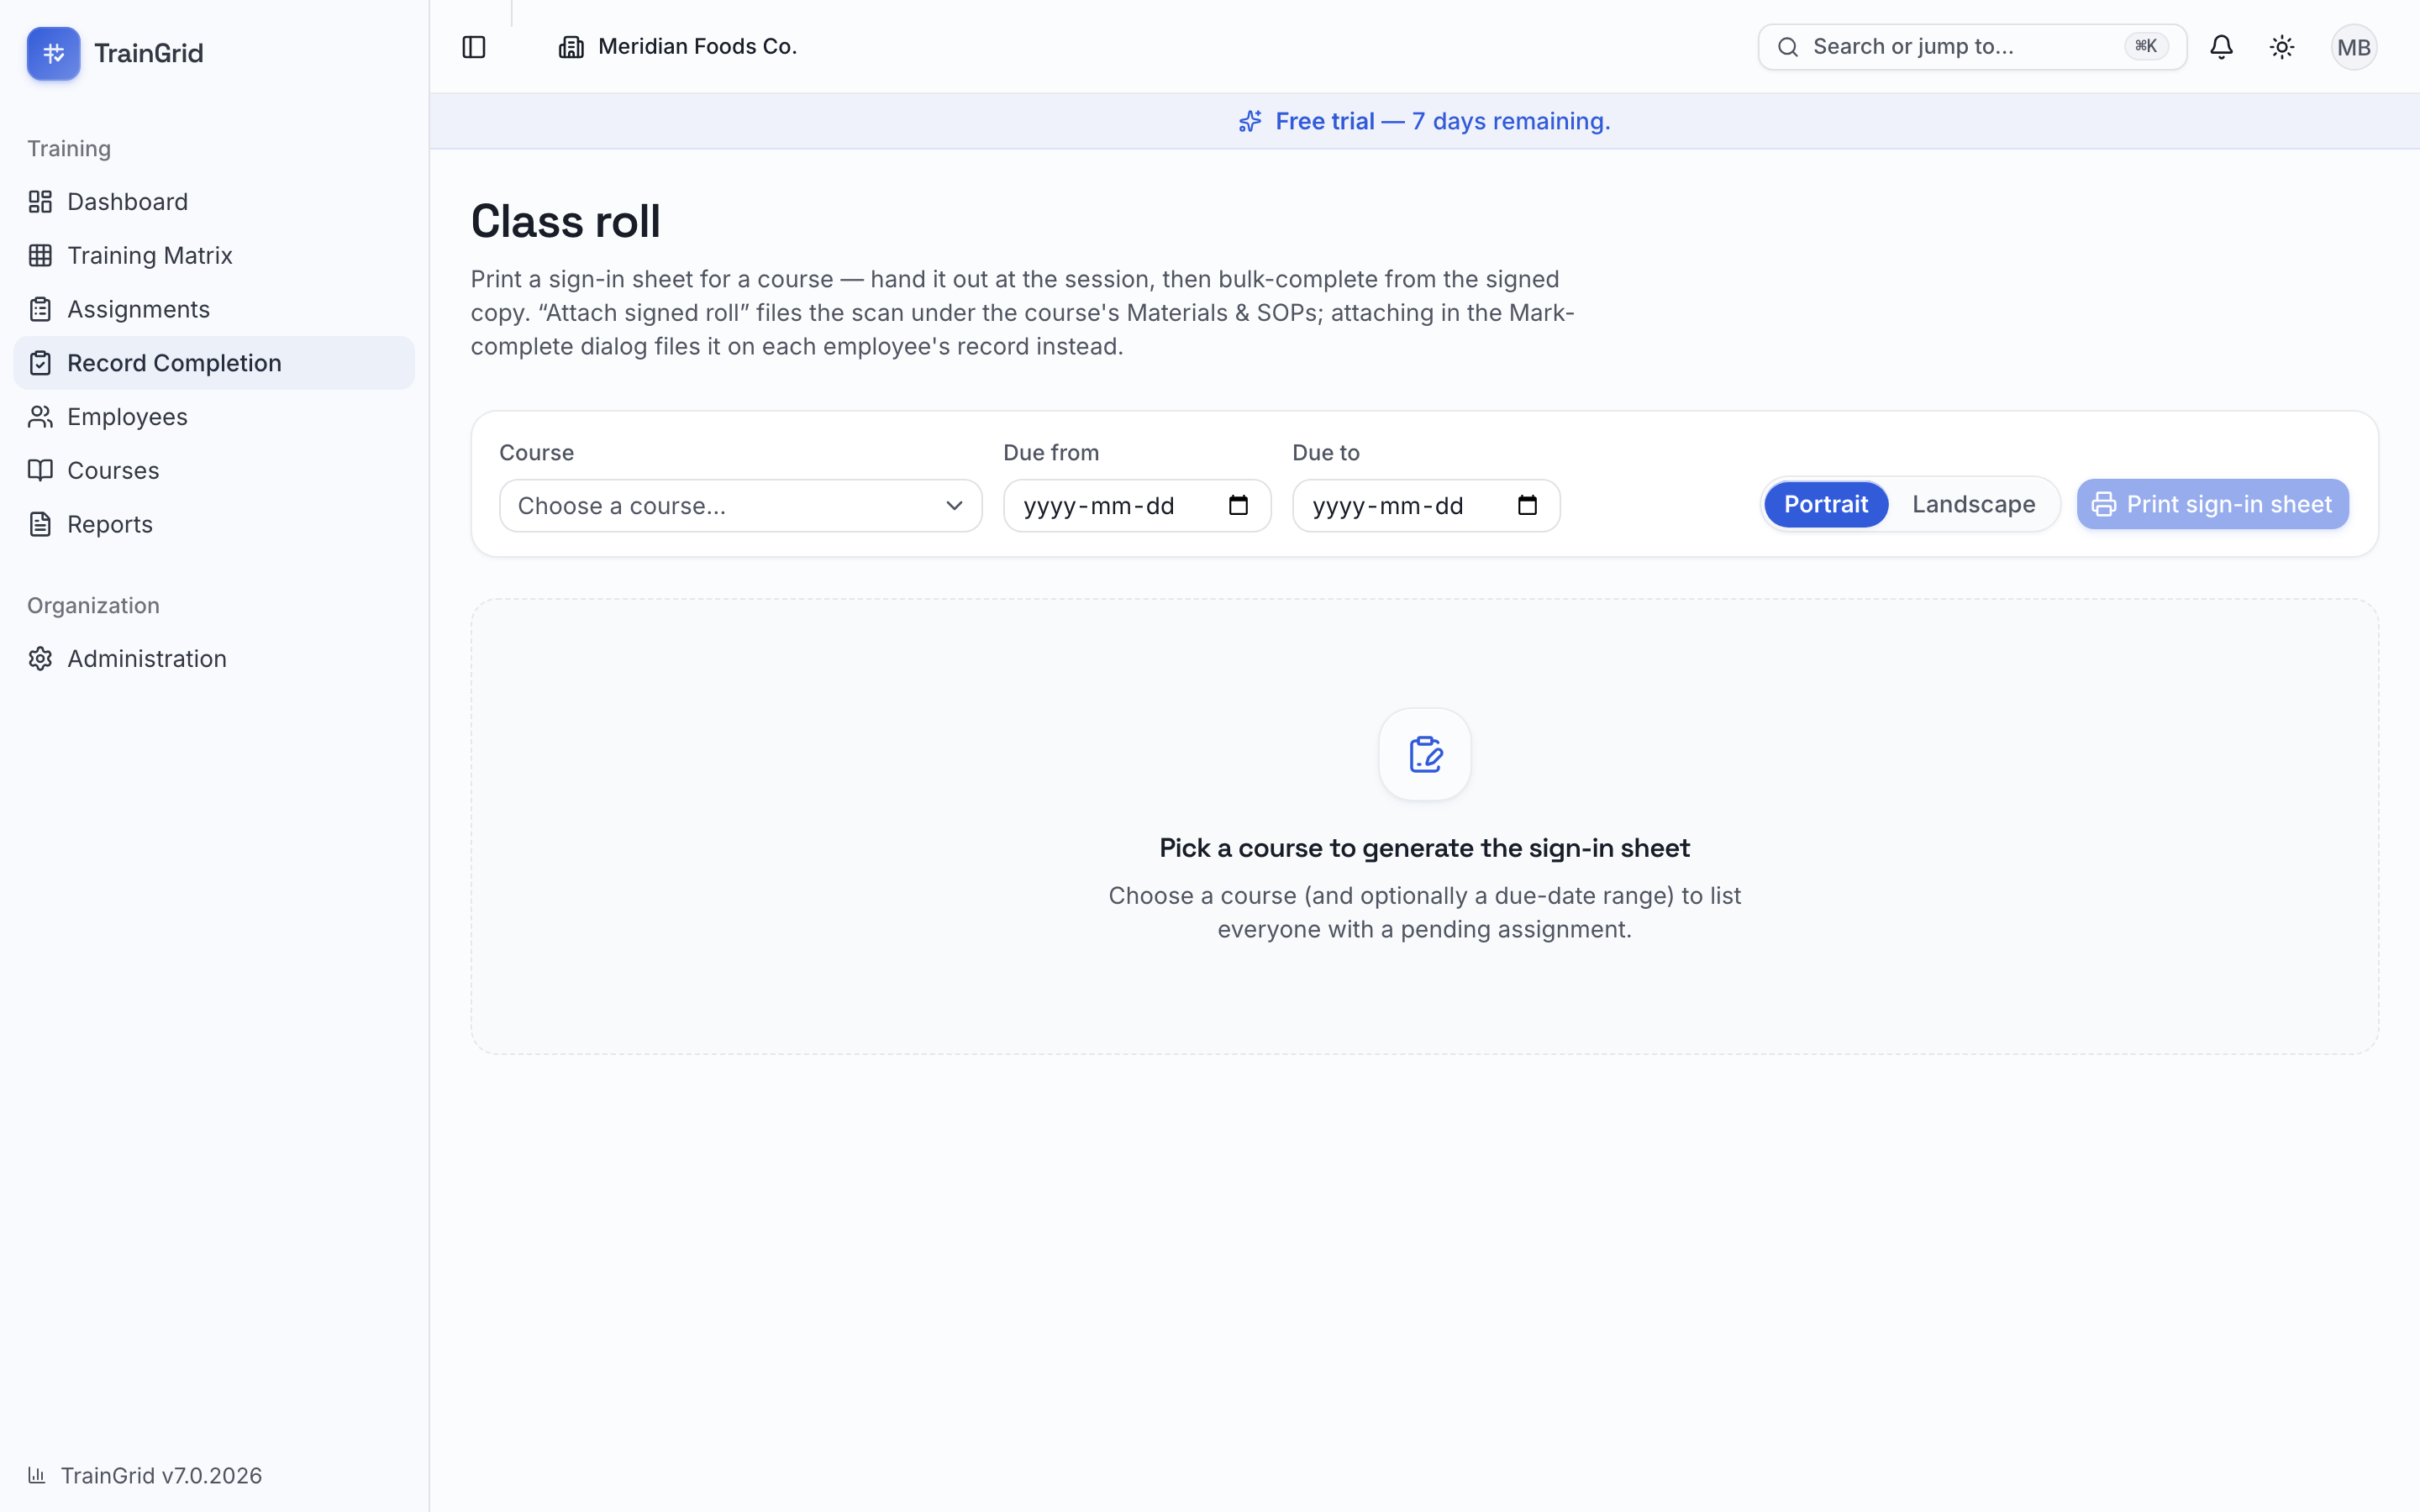
For an in-person session, print a professional sign-in sheet, run the class, then record everyone in a few clicks:
- From Assignments, click Sign-in sheet.
- Choose the Course and, optionally, a Due from / Due to range. TrainGrid lists everyone with a pending assignment for that course (plus a few blank rows for walk-ins).
- In the row above the filters, choose Portrait or Landscape, then click Print sign-in sheet. The printout carries your organization's logo, the course, due date and instructor, blank lines for the session date, time and location, and a numbered attendee list with signature lines. It is the same layout, toolbar and header as a scheduled session's sign-in sheet.
- Run your session and collect signatures.
- Back in TrainGrid, click Record completions in that same row (Back returns to Record Completion). This jumps straight to the Assignments list, pre-filtered to the same course and dates — tick the attendees who signed and bulk-complete as above.
Tip: Because completing a recurring or certificate course automatically schedules the next one, running your toolbox talks and renewals through the sign-in sheet keeps the next round already queued and visible in the matrix.
Training Calendar & Session Booking
The Calendar is where instructor-led training gets a date, a time and a room before it happens. A coordinator schedules a session for a course, employees book a seat from their portal (or staff add them), the sign-in sheet prints with the roster already filled in, and after the class one Record attendance step writes everyone's completion records. It sits in the sidebar between Record Completion and Employees, and anyone who can view reports can open it.
Note: Permissions follow the work. Scheduling, editing and cancelling sessions and adding or removing employees use Assign & schedule; recording attendance uses Record completions. A location-scoped member sees the sessions at their locations and any session with no specific location and must schedule at one of them.
What a session is
A session is one course, on one date, from a start time to an end time on that same day, at a location (or "No specific location"), optionally with an instructor, a seat limit and notes for employees. It has a roster: the employees booked onto it. Scheduling a session does not assign anything and booking a seat does not change a due date; the connection to training records is made once, when attendance is recorded. Every session shows one of five states, always worked out from the clock and the facts on the session, never typed: Upcoming, In progress, Ended (finished, attendance not yet recorded), Attendance recorded and Cancelled.
The calendar page opens as a List grouped by day (with a Today marker) showing the Next 90 days; switch to Past 90 days to find sessions that have happened, or to the Month view to step through months. Filter by Course (a course filter finds sessions scheduled on any version of that course) and, where your organization has locations, by Location. Each row shows the time with its zone abbreviation, the course and its version, location, instructor, Seats ("3 of 8", "Full", or "3 booked" when there is no limit) and the state badge.
Scheduling a session
Where: Sidebar → Calendar → Schedule session; or a course's detail page → Upcoming sessions → Schedule session, which pre-selects the course. Before you start: Administrator, Manager or Training Coordinator (the Assign & schedule permission). The course must be current and active: "Only current, active courses can be scheduled."
- Choose the Course.
- Set the Date (today or later), Start time and End time. Both times fall on that date and the end must be after the start ("End time must be after the start time."); a session cannot be longer than 24 hours.
- Choose the Location, or leave No specific location. Under the picker the form names the time zone the times are read in, for example "Times are in America/Toronto (the location's zone). Employees see the session in this zone too."
- Optionally type the Instructor (pre-filled from the course's default instructor when it has one; up to 200 characters).
- Set the Capacity (1 to 500) or leave No limit ticked, which is the default.
- Decide whether Employees can book themselves. It is ticked by default; the helper text says "Untick for a closed session that only staff enrol (an academy week, a mandated group day). Employees you add still see it in their portal." A closed session appears in the portal only for the employees you add to it.
- Optionally add Notes (shown to employees) (up to 2,000 characters), for example what to bring.
- Click Schedule session. The toast "Session scheduled." appears and the new session's page opens.
Time zone rule: a session's times are shown in the session location's time zone, or in your organization's time zone when the location has none or the session has no specific location. Every screen, the sign-in sheet, the portal and the emails use that zone, never the reader's browser zone. Where it differs from your organization's zone, the zone is named beside the time, and the portal adds the time in the organization's zone underneath.
The session page and roster
Click any session to open it. The header shows the course, the state badge, the date and time range with its zone abbreviation (for example "Thu, Sep 25 · 9:00 AM to 12:00 PM EDT") and the course version; a status line below reads "Upcoming", "In progress", "Ended, attendance not recorded", "Attendance recorded on <date>" or "Cancelled (<reason>)". The Details card lists When, Location, Instructor, Seats (with how many are left when there is a limit), Portal booking ("Employees can book themselves" or "Staff enrol employees"), Attended once recorded, who created the session and when, and the notes shown to employees.
The Roster card starts with the count ("6 booked") and lists every booked employee with their Department, when they were Booked, the Source (Self-booked from the portal or Added by staff) and their Attendance (Not recorded; then Attended with a View record link, or Absent). An employee without an email address is marked "no email": session emails cannot reach them, so tell them in person. While the session is open, Remove takes someone off the roster after a confirmation ("<name> loses their seat on this session. Their training records are not affected, and they can be added again while the session is open.").
The buttons across the top follow the work they do: Add employees, Edit and Cancel session need Assign & schedule and disappear once attendance is recorded or the session is cancelled; Print sign-in sheet is always available; Record attendance needs Record completions and stays disabled until the session date ("Attendance can be recorded from the session date onward."). Location scope applies on top of that: a location-scoped member gets those four buttons only on a session held at one of their own locations. On any other session they can open — including one scheduled with No specific location — Add employees, Edit, Cancel session and Record attendance are absent and the page says "This session is outside your location scope, so it is read-only for you. A member with access to its location can add employees, edit, cancel or record attendance." Print sign-in sheet still works.
Location scope: a location-scoped member sees only the booked employees at their own locations. When the roster holds people they cannot see, the count line says so ("6 booked · 4 shown (others are outside your location scope)") and the sign-in sheet carries the same notice, so a partial roster is never mistaken for the whole class. Record attendance is not offered at all on such a roster, because attendance is recorded for the whole class in one step: a member whose scope covers every booked employee records it instead.
Adding employees and walk-ins
Click Add employees. The dialog Add employees to this session states the seats left (or "This session has no seat limit.") and that "Booked employees with an email address are notified." Search by name, number or department, tick people (active employees you can see who are not already booked; up to 500 at a time) and click Add N employees. The toast reports exactly what happened, for example "Booked 12 · 2 already booked · 1 not booked: the session is full · 10 will be emailed". If you tick more people than there are seats, the dialog warns that "the extra will not be booked"; the seat limit is enforced when the booking is saved, so two coordinators cannot overbook a room. Booked employees who have an email receive "Booked: <course> on <date>" with the time, place and instructor.
Walk-ins are handled the same way: someone who turned up unbooked is added with Add employees before attendance is recorded. Only booked employees can be marked attended.
Printing the sign-in sheet
Click Print sign-in sheet on the session page. The sheet page carries the same toolbar as the course sign-in sheet: Back returns to the session, Portrait / Landscape sets the print orientation (portrait by default), Attach signed sheet files a scan of the signed sheet under the course's Materials & SOPs (Manage courses permission), and Print sign-in sheet opens the browser's print dialog. The sheet carries your organization's logo and name, the Course, Session date, Time (with the zone abbreviation), Location and Instructor already filled in, one numbered row with a signature line for every booked employee, and five blank rows for walk-ins. It is the same layout the course sign-in sheet prints, with the roster taken from the bookings instead of from pending assignments. The page states what comes next: "Hand it out at the session, then record attendance from the session page with the signed copy in front of you."
Recording attendance
This is the step that turns the roster into training records. From the session date onward, click Record attendance. The dialog says what it will do: "Ticked employees get a completed record for <course> (their existing due assignment is completed if they have one). Unticked employees are marked absent and nothing is recorded for them. Attendance is recorded once."
- Under Attended, every booked employee is ticked except anyone whose employee record has been archived: they stay on the list with an Archived tag but start unticked, because a completion record cannot be written for them. Untick the people who did not come; the count reads "5 of 6".
- Check the Completion date. It defaults to the session date and must fall between the session date and today.
- Optionally enter a Grade (optional) (0 to 100) that applies to everyone ticked.
- Check Training hours. It defaults to the scheduled length of the session ("Defaults to the scheduled length; edit if it ran shorter or longer."), from 0 to 24, and is stamped on every attendee's record.
- Check the Instructor, pre-filled from the session.
- Click Record 5 attended, 1 absent. The toast reads, for example, "5 attended, 1 absent · 5 completion records written" (adding "N already recorded for this class" or "N walk-ins assigned" when either applies) with a View the records action that opens Record Completion on the Completed view for that course, newest completion first.
What happens to each ticked employee: if they hold a pending assignment for the course, their earliest one is completed, whatever its due date; if they hold none, a completed record is created for them (this needs the Assign & schedule permission as well, otherwise the dialog refuses with "N attendee(s) have no assignment for this course and you cannot assign training. Ask a coordinator to assign the course, then record attendance."); if they already hold a completion for the course dated anywhere from the session date to the completion date — somebody scanned in at the door on the day, say — that record is this class's and is kept, not duplicated. From there the records behave exactly as if you had used Mark complete: a certificate is issued where the course requires one, a grade below the passing grade makes the record Failed, and a recurring course schedules its next occurrence. Records are written against the course's current version, so a session scheduled before a new version went live still records correctly.
Once only: attendance is recorded one time per session. Afterwards the session reads Attendance recorded, the roster shows each person as Attended (with a View record link) or Absent, and Add employees, Edit and Cancel session are gone. Trying again says "Attendance has already been recorded for this session. Correct individual records from Record Completion." An Administrator can change who was attended or absent from the session page with Correct attendance: a completion record is written for anyone marked attended; for anyone marked absent, the record this session wrote is reopened (or removed, for a walk-in the class added) and its next scheduled occurrence cancelled, while a record another session or a kiosk scan wrote is left in place; every change is in the audit trail. Other corrections (a date, a grade, hours) stay on the individual record in Record Completion. Absent employees get no record and keep whatever assignment they had.
Editing and cancelling a session
Edit opens the same form as scheduling, with the course fixed ("The course cannot change on an existing session; schedule a new one instead."). You can move the date and times, change the location, instructor, capacity, notes and the self-booking setting; the capacity cannot go below the number already booked, and a session cannot be moved into the past. The page warns that "Changing the time or the place emails every booked employee who has an email address." Click Save changes; the toast reads "Session updated." and, when the time or place changed, how many booked employees will be emailed (their email is headed "Changed: <course> now on <date>").
Cancel session asks "Cancel this session?" and tells you how many booked employees will be emailed ("those with an email address"); the session "stays on the calendar as cancelled; no training records are created or changed." Add a Reason (optional, shown to employees) (up to 500 characters) and click Cancel session, or Keep session to back out. Booked employees with an email receive "Cancelled: <course> on <date>" with your reason; in their portal the session shows Cancelled by your organization. A cancelled session cannot be edited, booked or recorded, and a session cannot be cancelled once attendance is recorded.
What employees see
Employees with portal access get a Calendar tab beside My training. It lists My bookings (their upcoming seats, and recent ones for 30 days after the session) and Open for booking: sessions that have not started, are marked for self-booking, whose course is current and available at their location, that are held at their own location or at No specific location, and that they are not already booked on. An employee with no location on their profile is therefore offered only the sessions scheduled with No specific location. Each card shows the course, the date and time in the session's zone (with the organization's time underneath when it differs), location, instructor, notes and the seats ("Seats: 3 of 8 left", "Full", or "No seat limit"). Book a seat books instantly and emails a confirmation to employees who have an email address; Cancel my booking appears only on a session marked Employees can book themselves, and releases the seat any time before the session starts; on a closed session the card prints "This session is enrolled by your training coordinator; ask them to remove you." where the button would be, because staff own that roster. Their booked sessions carry a pill: Booked, then Attended or Marked absent once you record attendance, Cancelled by your organization when you cancel the session, or Removed by your organization when staff remove them from a session that still goes ahead (it stays under their bookings as history and is not offered to them again). The My training page also shows their next booked session in one line. The exact states are in Book or cancel a seat in a session (portal).
Good to know:
- There is no waitlist. When a session is Full, employees see it as full and cannot book; a seat someone releases is simply free for the next person.
- There are no reminder emails before a session. Employees are emailed when they are booked, when the time or place changes and when the session is cancelled, and only if they have an email address on their profile.
- Sessions are scheduled one at a time. There is no recurring series, no draft session and no calendar (ICS/Outlook) export.
- Sessions cannot be edited or cancelled after attendance is recorded; corrections happen on the records.
- Employees can only book sessions marked Employees can book themselves; closed sessions are filled by staff.
Competency Assessments
Completing a course and being competent at the task are two different things, and being qualified to do the work unsupervised is a third. TrainGrid keeps all three separate, because assuming they are the same is how an unqualified person ends up on a machine.
The rule: Training completed ≠ Competent ≠ Qualified. An employee can finish Forklift Training on Monday and still be Not qualified on Tuesday, because the practical assessment hasn't happened yet.
Turning competency on for a course
Competency is a per-course setting. Open the course, and in the Competency & topics card tick Requires a competency assessment. You can then describe what the assessor should look for, and set how many days a passed assessment stays valid before it needs redoing.
Only courses with this switched on ever ask for an assessment; everything else records as training alone.
Recording an assessment
Open any completed record (from Record Completion, the employee's History tab, or a matrix cell) and choose Record assessment. You capture:
- Outcome — one of the six below. The legend link beside it explains each one on screen.
- Assessor and date — who watched the demonstration, and when.
- Suggested actions — what should happen next. These are chosen separately from the outcome, so a single result can carry any combination of follow-ups.
- Reassessment due — optional for any outcome other than Competent. Anything with a date appears under Reports → Competency Status in the Reassessment scheduled view, and is counted on the dashboard Competency card once the date arrives.
- Comments — free text for the detail that matters later.
The six outcomes
| Outcome | Meaning | Suggested action |
|---|---|---|
| Competent | Demonstrated the required skill to the expected standard | Mark achieved; issue or maintain the qualification |
| Competent with conditions | Can perform the task, but with restrictions or extra supervision | Record the conditions; assign follow-up or supervised work |
| Needs improvement | Some capability, but not fully to standard | Remedial training and a reassessment date |
| Not competent | Did not demonstrate the required competency | No independent work; retraining and reassessment |
| Not assessed | Not evaluated yet — a status, not a result | Schedule the assessment |
| Exempt | The requirement does not apply to this person | Record the exemption, its reason and who approved it |
Competent with conditions asks for the restriction in writing (“supervised operation only”), which is more useful than a bare pass. Needs improvement lets you tick exactly which of the course's topics need work, so the record says Needs improvement — changeover procedure rather than just “failed”. Exempt always requires a reason and an approver.
How qualification is worked out
TrainGrid never stores “qualified” as a flag — it works it out from the facts, so it can never drift out of date:
- Training not complete → Not qualified, whatever the competency says.
- Competency required but never assessed → Not qualified.
- Competent (or Exempt), and not expired → Qualified.
- Competent with conditions → Qualified (conditions), so the restriction stays visible.
- Competency lapsed past its validity date → Not qualified again.
Tip: The Competency Status report has a Trained but not qualified view — that is the list to check before an audit.
Evidence and reassessment
Attach the assessor's sign-off sheet, a photo or a quiz result to the record and mark it as Competency evidence, which keeps it distinguishable from the course certificate. When you set a reassessment date, the record appears in the Competency Status report under its Reassessment scheduled view as the date approaches, and turns red once it passes. Picking that view retitles the report Reassessments Due, so that is the heading on a printed copy.
QR Badges & Scan Check-in
For a room full of people, typing names is the slow part. TrainGrid prints a QR badge for each employee and lets you scan them in at the session.
Printing badges
From Employees → Print QR badges. Narrow the sheet before printing:
- by department,
- by training course — everyone assigned that course, across every version of it,
- or individually — untick anyone you don't need and they drop off the printed sheet.
Each badge encodes the employee's identifier, not personal data. The Print button stays disabled until every QR image has actually rendered, so you never print a sheet with blanks on it.
Scan check-in vs the sign-in sheet — which one do I want?
They solve opposite halves of the same session, and it's worth being precise about the difference:
| Sign-in sheet | Scan check-in | |
|---|---|---|
| What it is | A printed sign-in sheet | A live screen that records completions |
| When you use it | Before/during the session | During or right after the session |
| What it lists | People with the training still pending | Whoever you scan, in the order you scan them |
| What it produces | Paper with signatures — evidence to attach | Completed records in TrainGrid |
| Does it change data? | No. Printing changes nothing. | Yes — “Mark complete” writes the records. |
Most sites use both: print the sign-in sheet for wet signatures (auditors like those), run the scan to record the completions, then attach the signed sheet to the records as an attendance sheet.
What actually happens when you scan
Open Record Completion → Scan check-in, pick the course and the date, then scan badges with the camera or type an employee number. Each scan adds that person to the on-screen roster — nothing is saved yet. When the room is done, press Mark complete and every person on the roster gets a completed record for that course, dated as you set it.
- Scanning the same badge twice does nothing — the person appears once, and re-running a session cannot double-record.
- Someone who wasn't assigned the course can still be checked in if your role may assign training; the record is created for them and noted as added at check-in.
- The camera needs a secure connection (https, or localhost), which is a browser rule rather than a TrainGrid one. Manual entry always works.
- Scanning does not capture training hours. It records attendance and the completion date. If you track hours, either record the session from the Record Completion list instead — where Hours is applied to everyone you selected at once — or add them afterwards through Edit completion on each record.
Note: Scan check-in records the training. If the course also requires a competency assessment, that is still assessed per person afterwards — scanning a badge proves attendance, not competence.
Part 4 Dashboard, Reports & Notifications
Dashboard
The Dashboard is your home screen and your compliance command center. It answers the question every plant manager, QA coordinator, and auditor asks first: "Are we on track?" Everything on it is filtered to what you're allowed to see, so a site supervisor sees their location while an administrator sees the whole organization.
At the top you'll find the page title, your organization name, and the date it was generated ("as of…"). Below that are your filters, then the numbers, then the charts.
The KPI cards
Five cards run across the top. Each shows one headline number, and most are clickable — selecting a card takes you straight to the matching list so you can act on it.
- Overall compliance — the single most important number: the percentage of training that is currently up to date. It's colored green at 90% or above, amber from 75–89%, and red below 75%, with a progress bar underneath. Overdue, expired and failed training all count against it. If nothing has come due yet, you'll see a dash (—).
- Active employees — your active workforce in scope. Select it to open the Employees list.
- Overdue — assignments past their due date that still aren't complete. Select it to see exactly which ones (the overdue list, up to yesterday). When this is zero, the card congratulates you.
- Due this week — training coming due within your organization's due-soon window (a set number of days). Select it to see the assignments due between today and the end of that window.
- Certs expiring — certificates expiring within the next 30 days. Select it to open the Expiring Certificates report.
Tip: The overall compliance number here is the same figure used across the app — the Department Compliance report, the matrix, and the emailed reports all agree with it, so you can quote it with confidence.
Filters: location and date range
Two filters sit in the top-right of the page. Changing either one re-draws the numbers and charts beneath.
- Use the location filter (shown only when your organization has more than one site you can view) to focus on All locations or a single site.
- Use the date range filter to choose All time, Last 30 days, Last 90 days, or Last 12 months.
Note: The date range bounds the compliance percentage and the department/category charts to training that came due inside that window. The current-state cards — Overdue, Due this week, and Certs expiring — and the completion trend always reflect right now, regardless of the range you pick. That's intentional: you always see live problems.
The charts
Below the cards are four panels. Two of them are interactive — you can drill straight into a filtered list.
- Completion trend — an area chart comparing training Due vs. Completed each week over the last 12 weeks, with a running total of completions. It shows your team's momentum at a glance.
- Department compliance — a horizontal bar per department showing the completed share of training due to date, sorted best to worst. Select any department bar to open the Assignments list filtered to that department's incomplete training — the fastest way to chase down a lagging area.
- Training by category — a donut chart of required training in scope, colored by course category, with your overall compliance percentage in the center. Select any slice to open the training matrix filtered to that category.
- Top overdue courses — a ranked list of the courses with the most employees past their due date, each with a count. Select any row to open the Assignments list filtered to that course's incomplete training. When nothing is overdue, you'll see a friendly "all clear."
The activity feed
Recent activity shows the latest audited changes across your organization — completions, imports, new courses, edits, and more — each with who did it and when. Select View all to open the full audit log. This panel appears only for members whose role can view the audit log.
The Getting-Started checklist
The Get set up card shows one next step at a time, with a primary action and a count of completed checklist items. Its five checklist items appear in this order:
- Add people: add people by hand or import a people CSV.
- Add courses: add starter courses or create your own.
- Assign training: pick a course, pick people (or everyone), and set a due date.
- Record training people already have: enter existing completions by hand.
- See your matrix: open the training matrix to see your team's training.
The remaining items are under Other setup steps, collapsed until you open it. Visiting the matrix marks that item done in this browser and advances the displayed count without hiding the card. The card disappears once people, courses, an assignment and a completion all exist, or when you dismiss it with the X in its corner. Only members who can manage employees see the card, and each action respects their role's permissions.
Reports
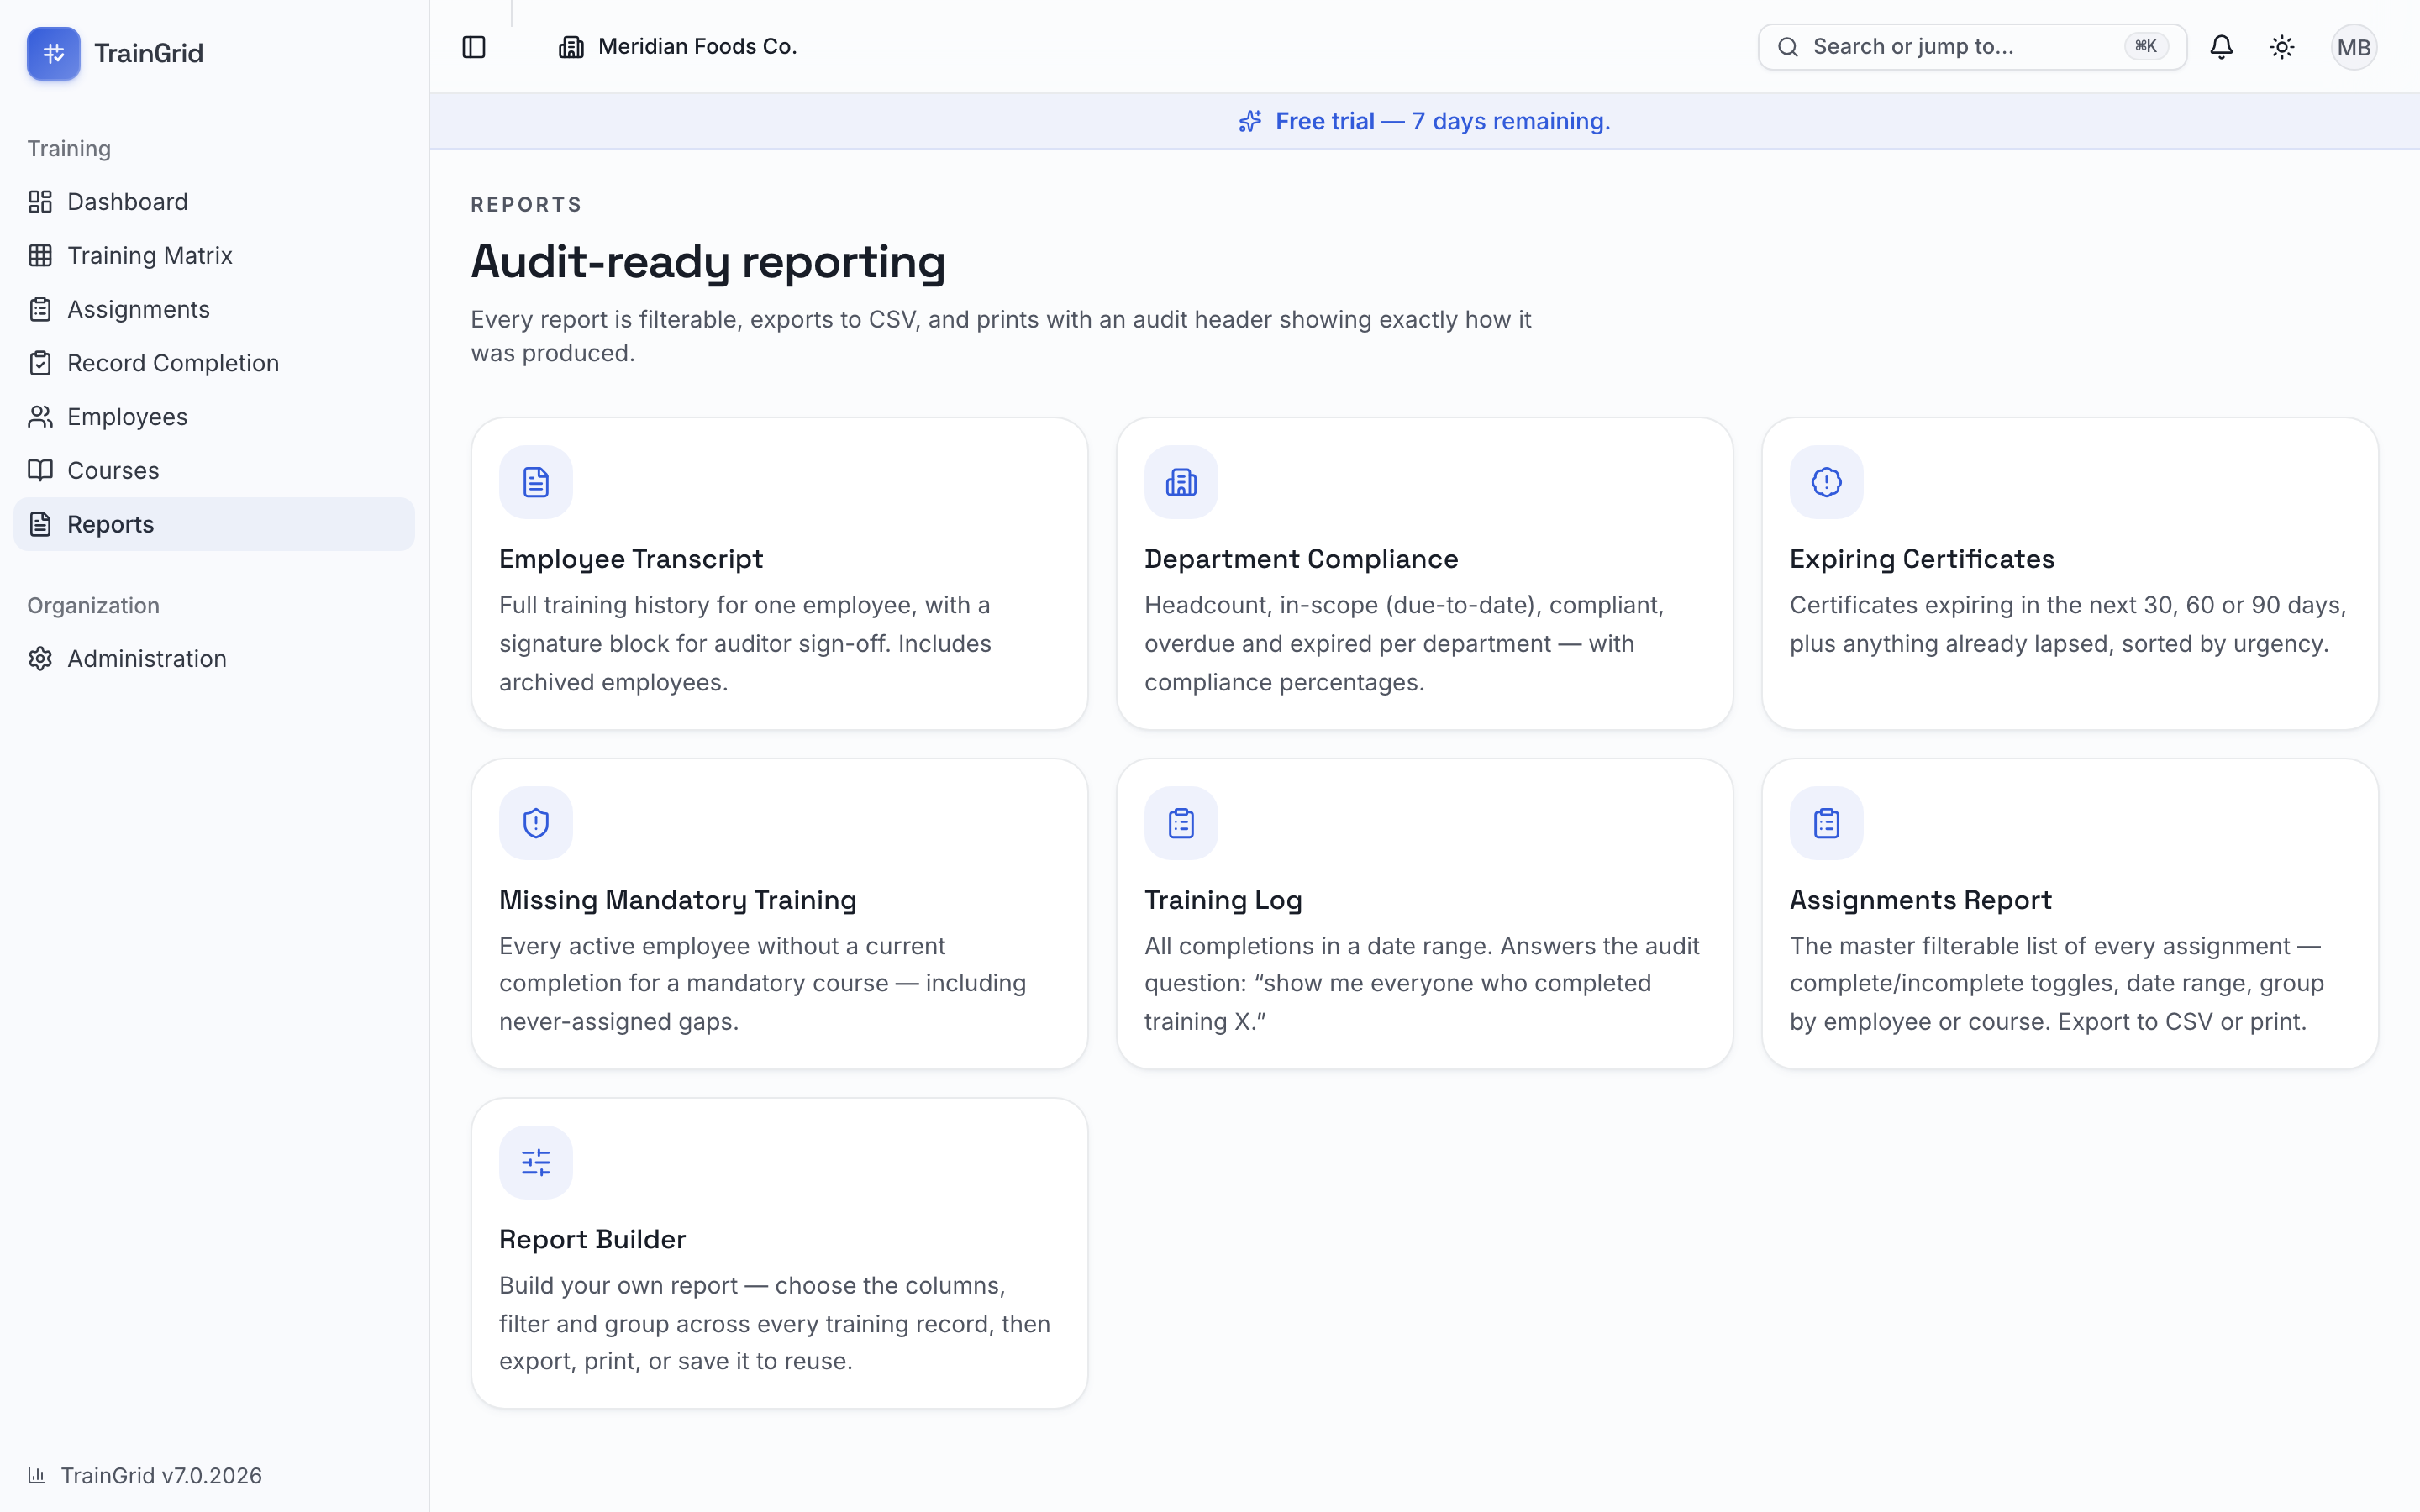
The Reports hub is where you produce audit-ready answers. Open it from the main navigation to see every report as a card — select one to open it.
A few things are true of every report:
- Filter it to narrow the results to exactly what you need.
- Export CSV to download the current view as a spreadsheet.
- Print to produce a clean, landscape document that starts with an audit header — your organization name and logo, the report title, the filters you applied, and the generated timestamp — so anyone reading it knows precisely how it was produced.
Note: What each report can show respects your role and location. A supervisor scoped to one site sees that site's people and records; an administrator or manager sees the whole organization.
Employee Transcript
Answers: "Show me everything this one person has ever done."
This is the report you hand an auditor for an individual. Pick any employee — including archived staff — and you'll get their identity block (department, position, location, shift, supervisor, hire date) followed by their complete training history: course, category, status, due date, completion date, grade, instructor, who recorded it, and certificate expiry. A summary line tallies completed, pending, overdue, expired, and waived records.
- On the report, use the employee search to find and select a person.
- Review their full history on screen.
- Select Print to produce the transcript — the printed version ends with an Auditor sign-off block with lines for a reviewer's name, signature, and date.
Department Compliance
Answers: "How is each department doing?"
A single table with one row per department: active Headcount, training In scope (what has come due and must be current), Compliant, Overdue, Expired, Failed, and a Compliance percentage, plus a grand-total row. Percentages are colored green (healthy), amber (watch), and red (at risk). Expired certificates and failed training both count as non-compliant, so the numbers reconcile with the dashboard.
- Optionally use the location filter to focus on one site.
- Read down the Compliance column to spot the departments that need attention.
Competency Status
Answers: "Who is trained, who is competent, and who is actually qualified?"
Every competency requirement in the organization, with where each one stands. The lens picker switches between All competency requirements, Trained but not qualified — the list to check before an audit — and Reassessment scheduled. Filter by location. The heading follows the view you pick — Competency Status, Qualification Gaps or Reassessments Due — so a printed copy names the question it answers, and the view is written into the audit header alongside it. The outcomes themselves, and how qualification is worked out from them, are explained under Competency Assessments.
Expiring Certificates
Answers: "Whose certifications are about to lapse?"
Current certificates for active employees, sorted by urgency, so you can renew before anything expires.
- Choose a window — 30, 60, or 90 days.
- Leave Include already expired on to also surface certificates that have already lapsed (turn it off to see only upcoming ones).
Missing Mandatory Training
Answers: "Who is missing a required course?"
Every active employee without a current completion for a mandatory course — including people who were never assigned it at all, which is the gap that's easiest to miss.
- Optionally filter by department and/or a specific mandatory course.
- Review the flagged employees and assign the missing training.
Note: This report only appears with results once you've marked at least one course as mandatory in your course catalog. If none are marked, it will point you there.
Workforce Competency
Answers: "Is each person actually competent for the job they hold?"
The other reports ask about courses. This one asks about roles. Under Administration → Positions you declare which courses a position requires; this report then checks everyone holding those positions against that list and names the gaps. It is the report to run when someone asks whether your line operators are qualified to be on the line.
One row per employee: Employee, Position, Department, how many Requirements met (for example 4 of 6), and a Status — one of:
- Competent for role — every declared requirement is met.
- Reassessment due — otherwise met, but at least one competency has a reassessment that has come due. A reassessment scheduled for a future date leaves the employee competent for the role until the date arrives.
- Not competent for role — at least one requirement is not met. The missing courses are listed underneath the status.
A requirement counts as met when the person holds a current completion that is qualified — competency and certificate included. A waived requirement counts as met, because waiving it is a deliberate decision that it doesn't apply. Failed or lapsed training, missing assessments and courses that were never assigned are all gaps.
- Filter by position and/or location, or leave both open for the whole workforce.
- Work down the Not competent for role rows and assign what's missing.
Note: The report only has something to say once at least one position declares required courses. If none do, it tells you so and points you at Administration → Positions. Only active employees are included.
Training Hours
Answers: "How many hours of training did each person receive this year?"
The number a management review or a customer audit asks for. It totals the Hours recorded against completions in a period, and shows the records behind every total rather than just the total.
- Set From and To — it opens on the current year to date.
- Optionally narrow by department or a single employee.
- Switch between By employee and By department with the view picker.
By employee gives one row per person — Records and Training hours — and clicking a name expands the individual records behind the number, each with its date, course, source and hours. By department compares departments: Employees, Training hours and Avg hours / employee. Either way, a summary line at the top gives the totals and the internal, external and online split.
Note: Hours are optional on a completion, so some records carry none — anything recorded before hours tracking existed, or entered without them. Those count as zero, and the report says on screen how many records that applies to, so a low total is never mistaken for a complete one. Add the missing hours through the record's Edit completion form.
Internal vs External Training
Answers: "How much of our training do we deliver ourselves, and how much do we buy in?"
A single comparison table: the metrics down the side, Internal, External, Online and Total across the top. It's the budget and dependency picture — how much of your programme rests on outside providers.
The metrics are Employees trained (distinct people, so the total is the distinct count overall rather than the sum of the row), Training records, Competencies assessed, and Certificates expiring (next 30 days) — that last one counted from today regardless of the date range. If any completions in the period fell below their passing grade, a Failed records row appears too; those are excluded from the rows above it.
- Set the From and To dates, and optionally a location.
- Read across each row to see where that kind of training comes from.
A record's source is its own override where one was set, otherwise the course's classification — the same rule every other screen uses, so this report can't disagree with the matrix or the assignment list.
Training Log
Answers: "Show me everyone who completed training X between these dates."
This is the classic audit question. It lists every completion recorded within a date range.
- Set the From and To dates (it opens on the last 30 days).
- Optionally filter by course and/or department to narrow to a specific session.
Assignments Report
Answers: "Show me the master list, filtered however I like."
This opens the full Assignments screen — every assignment in your organization. Toggle between complete and incomplete, set a date range, and group by employee or course. Like the reports, it exports to CSV and prints. Use it when you want the raw, filterable record rather than a summary.
Report Builder
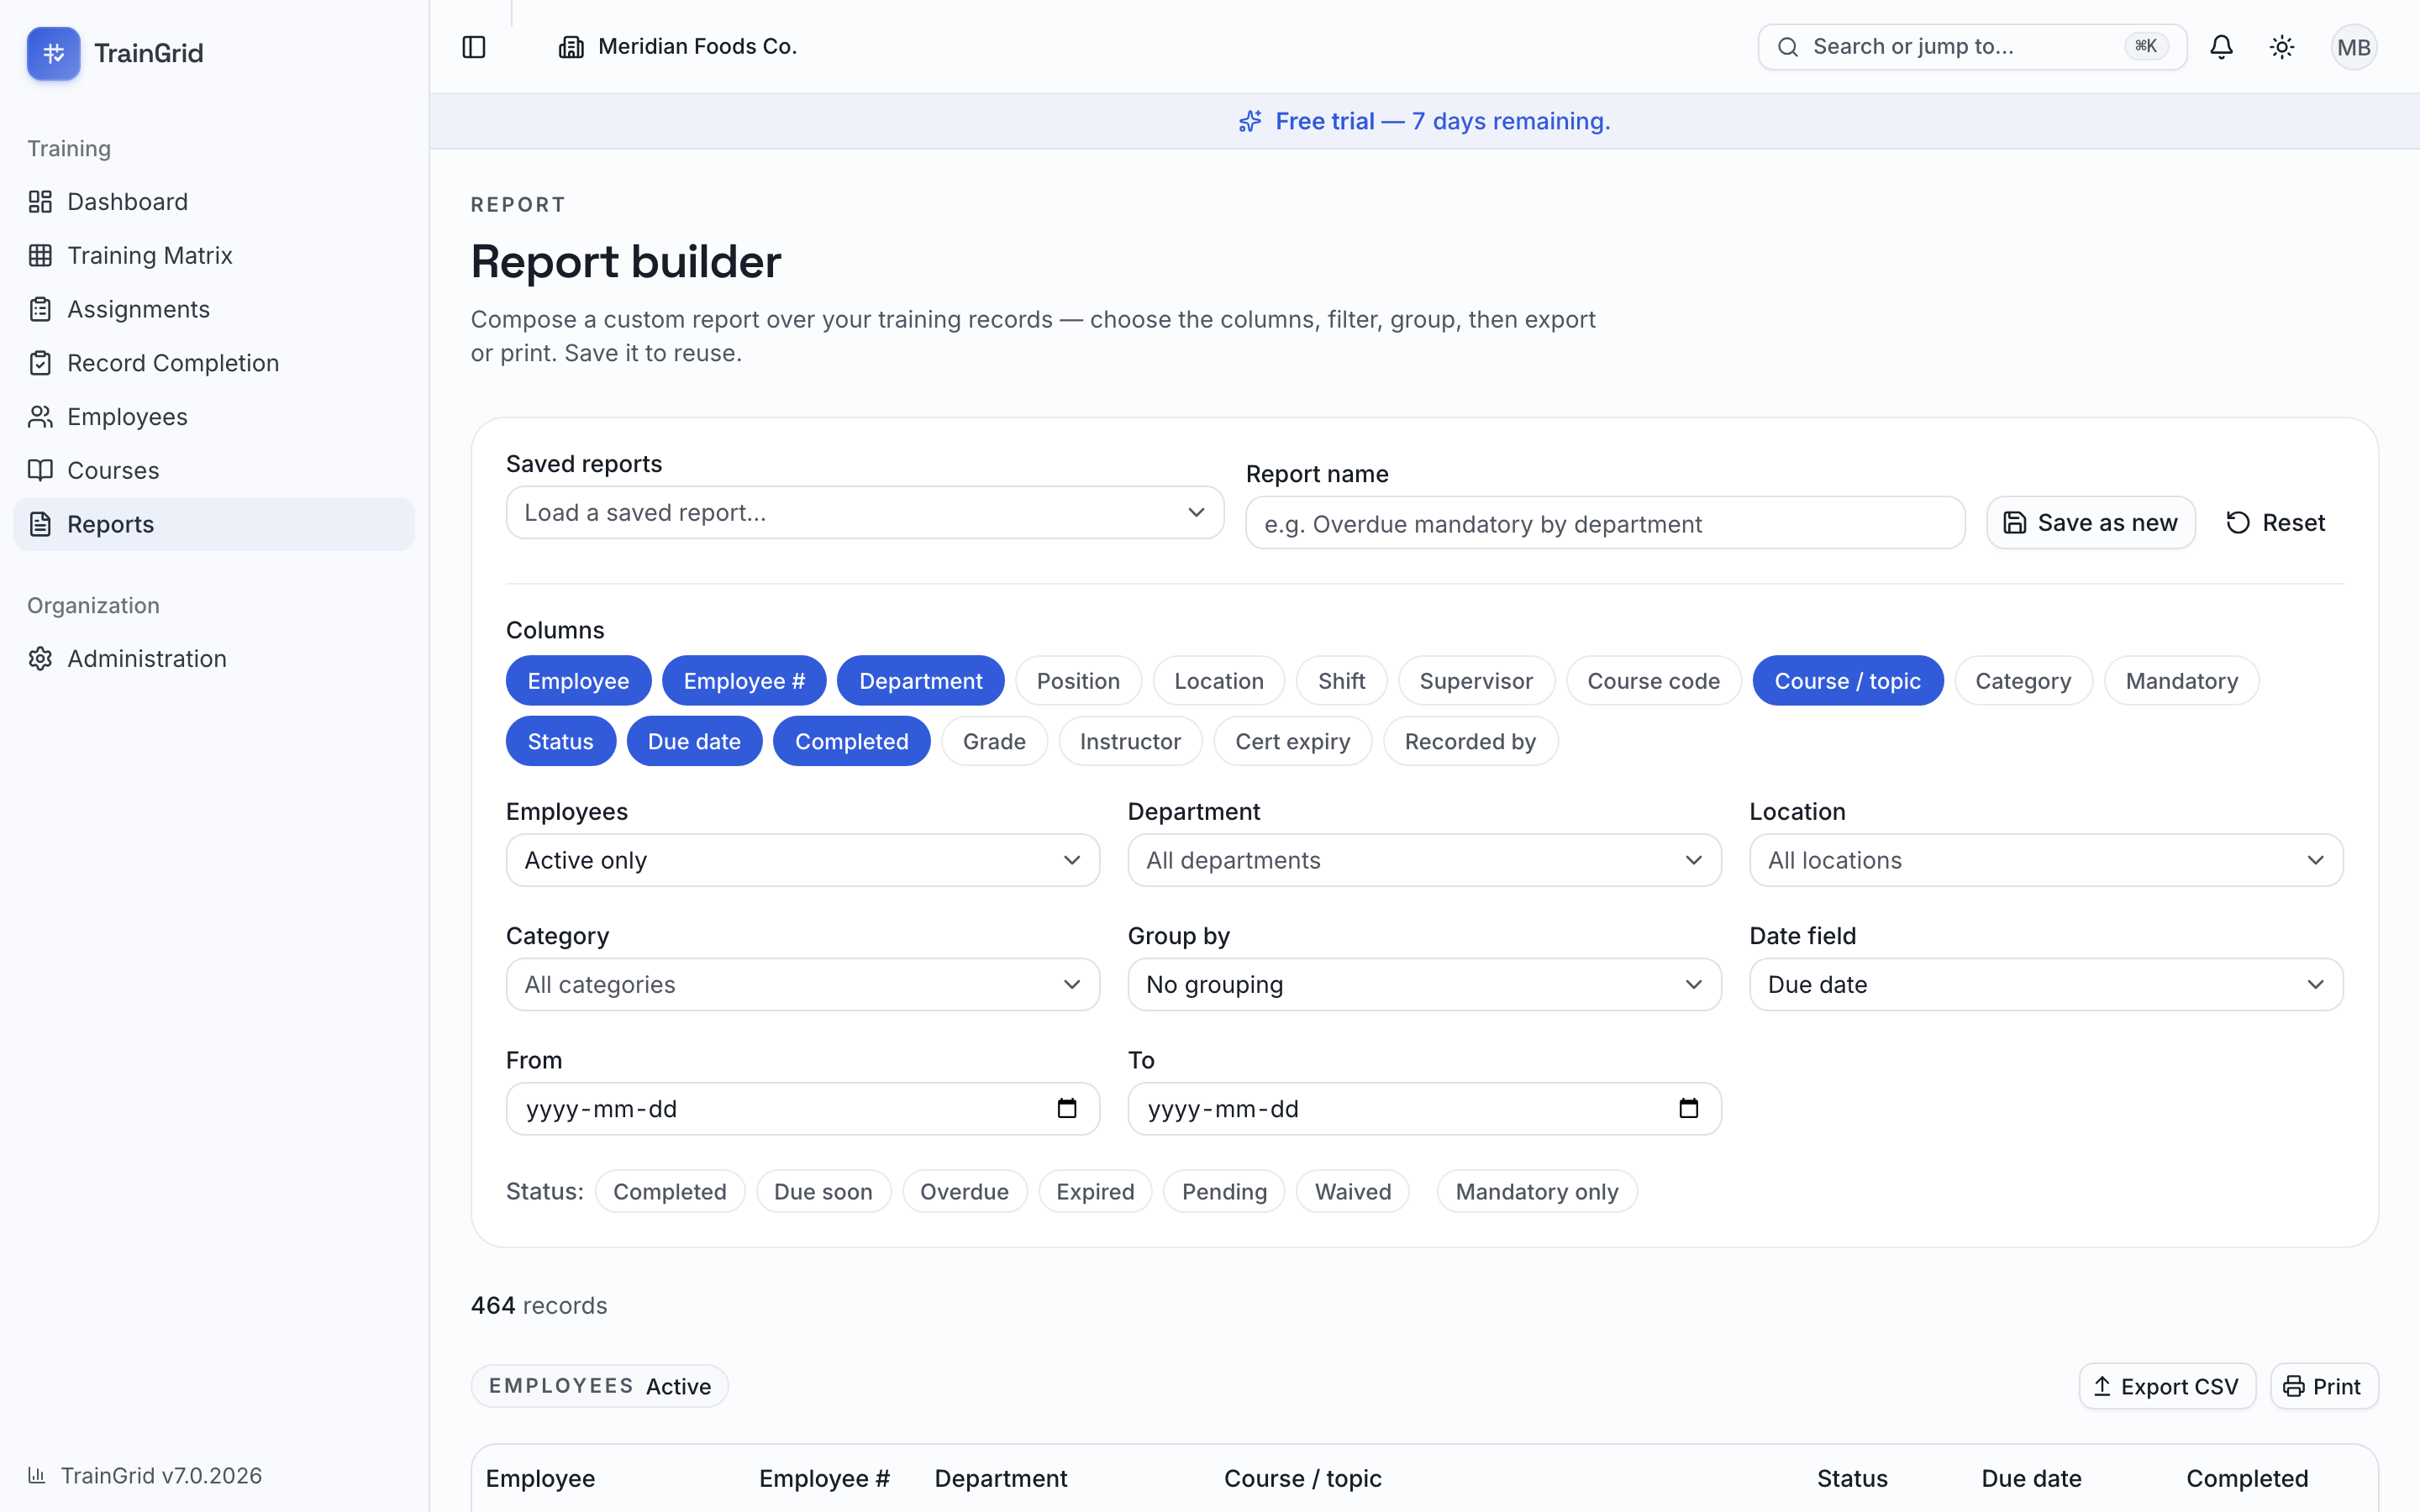
Answers: "None of the standard reports is quite right — let me build my own."
The Report builder lets you compose a custom report over every training record, then save it to reuse.
- Under Columns, select the fields you want (employee, department, location, course, category, status, dates, grade, instructor, and more) — selected columns are highlighted.
- Apply Filters: employee status (active / archived / all), department, location, category, a date range on either the Due date or Completed date, one or more Status chips, and Mandatory only.
- Optionally choose Group by to break the results into sections (for example, by department or status), each with its own count.
- The results update live and show a record count. When the result set is very large it caps at the first 10,000 rows — narrow your filters for a complete export.
- Export CSV or Print the report.
- To reuse it, type a name and select Save as new. Later, pick it from Load a saved report…, then Update it or Delete it.
Note: You can always manage the reports you created. Administrators and Managers can also manage reports saved by others; everyone else can load and run any saved report but only change their own. Select Reset at any time to clear your choices and start over.
Notifications
TrainGrid keeps you ahead of deadlines with reminders about overdue training, upcoming due dates, expiring certificates, and competency reassessments falling due. These appear in two places, and you control whether they also reach your inbox.
The bell
The bell icon in the top bar is your quick view. A red badge shows how many unread notifications you have (or "99+" for a lot). Select it to open a dropdown with your five most recent notifications; unread ones are shown in bold with a dot. Selecting a notification takes you straight to the relevant screen — an overdue or due-soon alert opens your incomplete assignments, an expiring-certificate alert opens the Expiring Certificates report, a competency reassessment alert opens the Competency Status report on its Reassessment scheduled view, and a weekly summary opens the dashboard. Select View all notifications at the bottom to open the full page.
The Notifications page
Open Notifications for your complete history. Each item shows an icon and label for its type — Due soon, Overdue, Certificate expiring, Certificate expired, Training assigned, Competency reassessment, Roster status, Weekly summary, or System — along with its subject, details, and how long ago it arrived. Unread items are highlighted with a colored edge and a dot; longer messages can be expanded with Show more. Select an item's subject to jump to the screen it's about.
Marking items read
- Notifications on the page mark themselves as read automatically once you've viewed them — you don't have to do anything.
- To clear everything at once, select Mark all read at the top of the page.
- Older notifications are paged; use Previous and Next to move through them.
Email reminders (your personal on/off switch)
At the top of the Notifications page is the Email me training reminders card with a toggle. This is self-service — it affects only you, so every member decides for themselves, and no administrator is needed.
- Turn the switch off to stop the matching reminder emails.
- Turn it on to receive them again.
Tip: Turning email off doesn't hide anything — your in-app notifications always appear in the bell and on the Notifications page. You're only choosing whether the same reminders also land in your inbox.
Part 5 Administration
Administration
The Administration area is where you shape TrainGrid to fit your organization — who can sign in, how your sites and departments are structured, how the app looks, and what your plan includes. You reach it from Manager in the main navigation.
Most of Administration is reserved for Administrators and Managers. Training Coordinators and Viewers (auditors) can open only the Audit log; Supervisors have no admin access. Where a page needs a specific role, the note at the start of each subsection says so.
Across the top of every admin page is a row of tabs — Overview, Users, Roles & Permissions, Divisions, Locations, Departments, Positions, Employment types, Categories, Task types, Custom fields, Audit log, Integrations, Alerts, Email log, Settings, and Billing — so you can jump between areas quickly. You'll only see the tabs your role can use.
Overview
The Overview page (titled Organization control) is your admin home. Administrators and Managers can open it.
At the top, a card shows your organization's name, its current plan (for example, Trial, Starter, Professional, or Enterprise), and — if you're on a trial — how many days remain before it ends. Below that are three headline counts:
- members — people who can sign in and work in TrainGrid
- active employees — the staff whose training you track
- locations — the sites or divisions you operate
Under the summary you'll find quick-access cards for each admin area — Users, Locations, Departments, Positions, Course categories, Audit log, and Settings — each showing its current count. If you have invitations that haven't been accepted yet, the Users card shows a pending invites badge. Select any card to open that area.
Tip: The Overview is the fastest way to sanity-check your setup at a glance — for example, confirming every site you run appears in your location count before you start assigning training.
Users & invitations
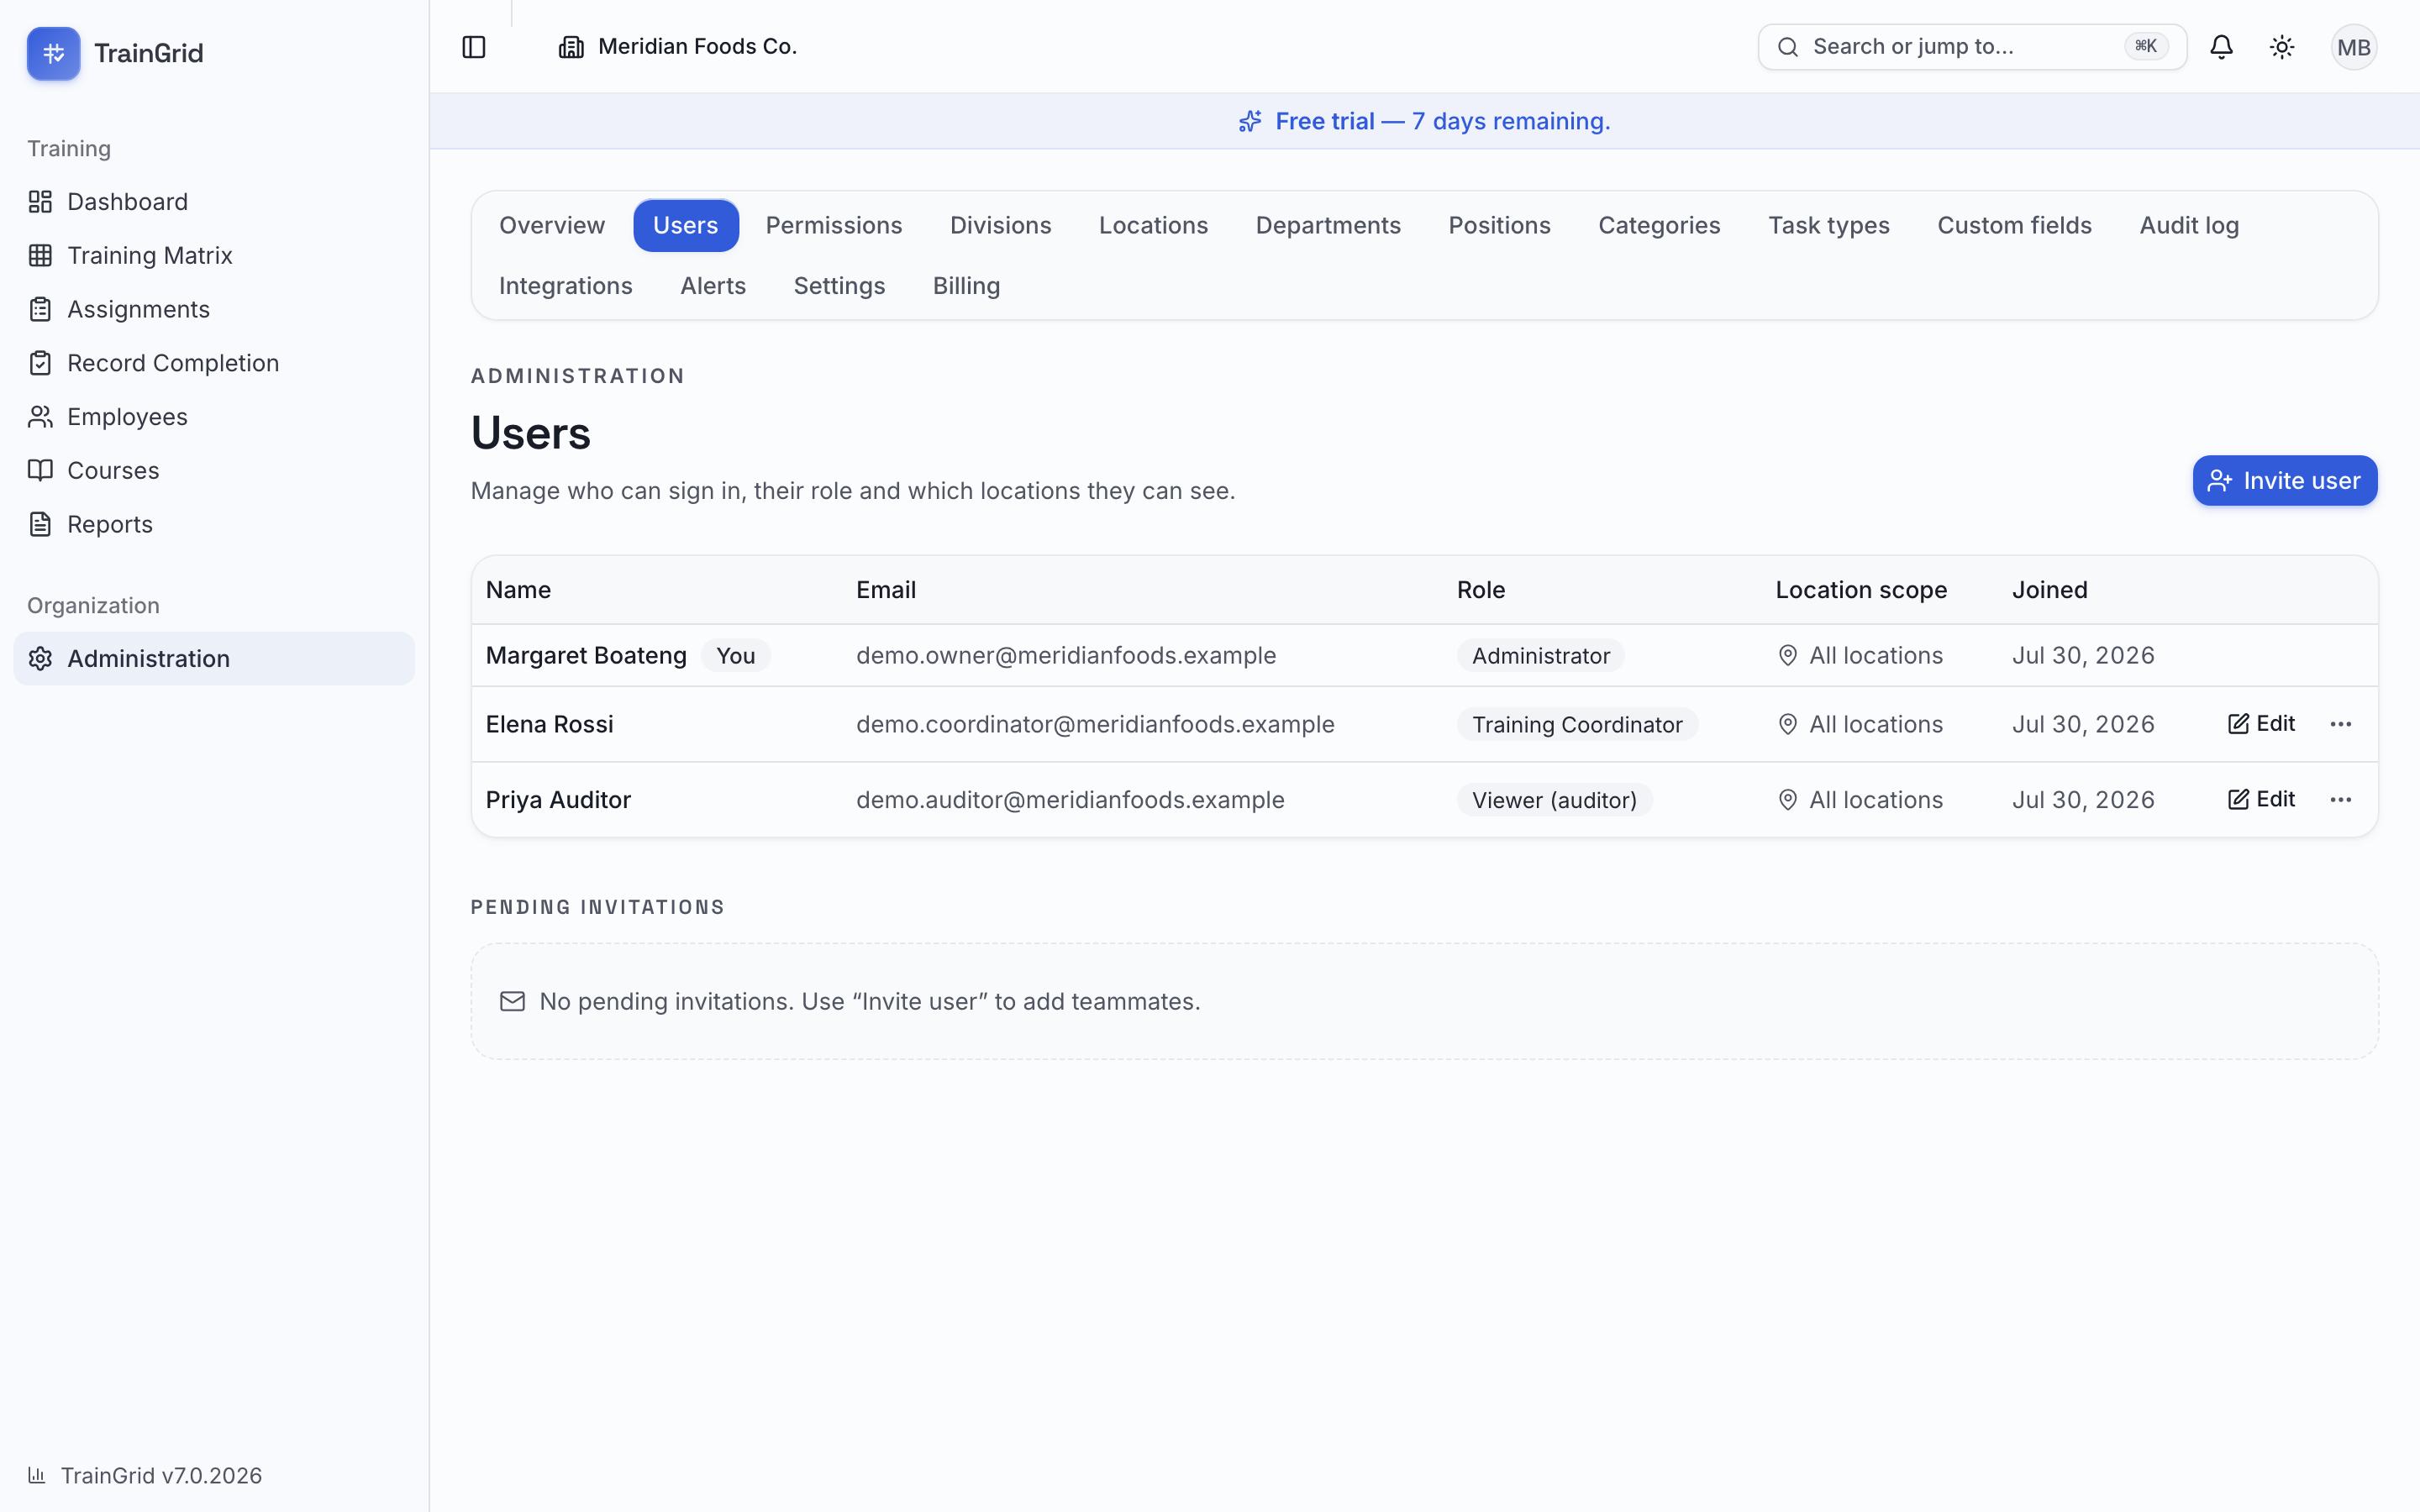
The Users page (Administration → Users) is where you control who can sign in, what they're allowed to do, and which locations they can see. Administrators and Managers can manage members.
The page has two parts: a Users table of everyone who has joined, and a Pending invitations list of people you've invited who haven't accepted yet.
Inviting a teammate
- Select Invite member at the top right.
- Enter the person's Email.
- Choose a Role from the dropdown — Manager, Training Coordinator, Supervisor, or Viewer (auditor). A short description of what that role can do appears beneath the picker.
- Optionally, under Location scope, check one or more locations to limit what they'll see. Leave everything unchecked and they'll see all locations.
- Select Create invite.
TrainGrid then shows an Invitation ready screen with a ready-to-send link. The invite expires in 7 days. When the person opens it, they create an account (or sign in) and join with the role you chose.
Copying the invite link to send manually
On the Invitation ready screen, select the copy button next to the link (it shows a checkmark once copied), then paste the link into your own email or chat message to the person. This is handy when you'd rather send the invite yourself.
To invite several people in a row, select Invite another and repeat. When you're finished, select Done.
Note: For any invitation still listed under Pending invitations, you can select Copy link at any time to grab a fresh copy of the link to send again.
Resending an expired invitation
If an invitation's expiry date has passed, it shows an Expired badge and a Resend button. Select Resend to generate a new 7-day link; the new link is copied to your clipboard automatically so you can paste and send it.
Editing a user
In the Users table, select Edit on that person's row. The dialog holds their name, sign-in email, role and location scope together, and nothing is saved until you press Save changes — Cancel or the × discards the lot. Administrators can also correct a user's name and sign-in email here. You can't change your own role, and only an Administrator can grant or remove the Administrator role.
An organization can have more than one Administrator: if you are an Administrator, pick Administrator in the dropdown to promote someone. Other roles don't see that option. TrainGrid always keeps at least one active Administrator — you can't demote, deactivate, or remove the last one.
Scoping a member to specific locations
- In the member's row, select the Location scope button (it shows their current scope, e.g. All locations).
- Check the locations they should be able to see. Scoped members only see employees, assignments, and reports for the checked locations.
- Leave everything unchecked for All locations.
- Select Save scope.
Tip: Location scope is ideal for plant managers or supervisors who should only work with their own site's records.
Removing a member
- Select the trash icon on the member's row.
- Confirm by selecting Remove member.
They lose access to the organization immediately. Any training records they created are kept, and you can invite them again later. You can't remove yourself this way.
Transferring ownership
Transfer ownership hands your Administrator role to someone else and steps you down to Manager in the same action — useful when you're leaving and replacing yourself. (To simply add another Administrator without stepping down, use the Role dropdown instead.)
- In the row of the member you want to promote, select the crown icon.
- Read the confirmation carefully — the other person becomes an Administrator with full control, and you become a Manager.
- Select Transfer ownership.
This change is recorded in the audit log. Only an Administrator can transfer ownership back.
Removing someone’s access
Access is removed by an Administrator, from Administration → Users, rather than by users removing themselves:
- Open the row’s overflow menu (…).
- Choose Deactivate login to suspend access while keeping the person’s role, location scope and history — reversible at any time, and a deactivated login does not use a seat. While deactivated, that email address cannot sign in anywhere or start a workspace of its own; to free the address for good, remove the member instead.
- Or choose Remove from organization to remove them entirely. Training records they created are kept, and they can be invited again later.
The organization can never be left without an active Administrator: removing or deactivating the last one is refused, so transfer ownership or promote someone else first.
Roles & Permissions
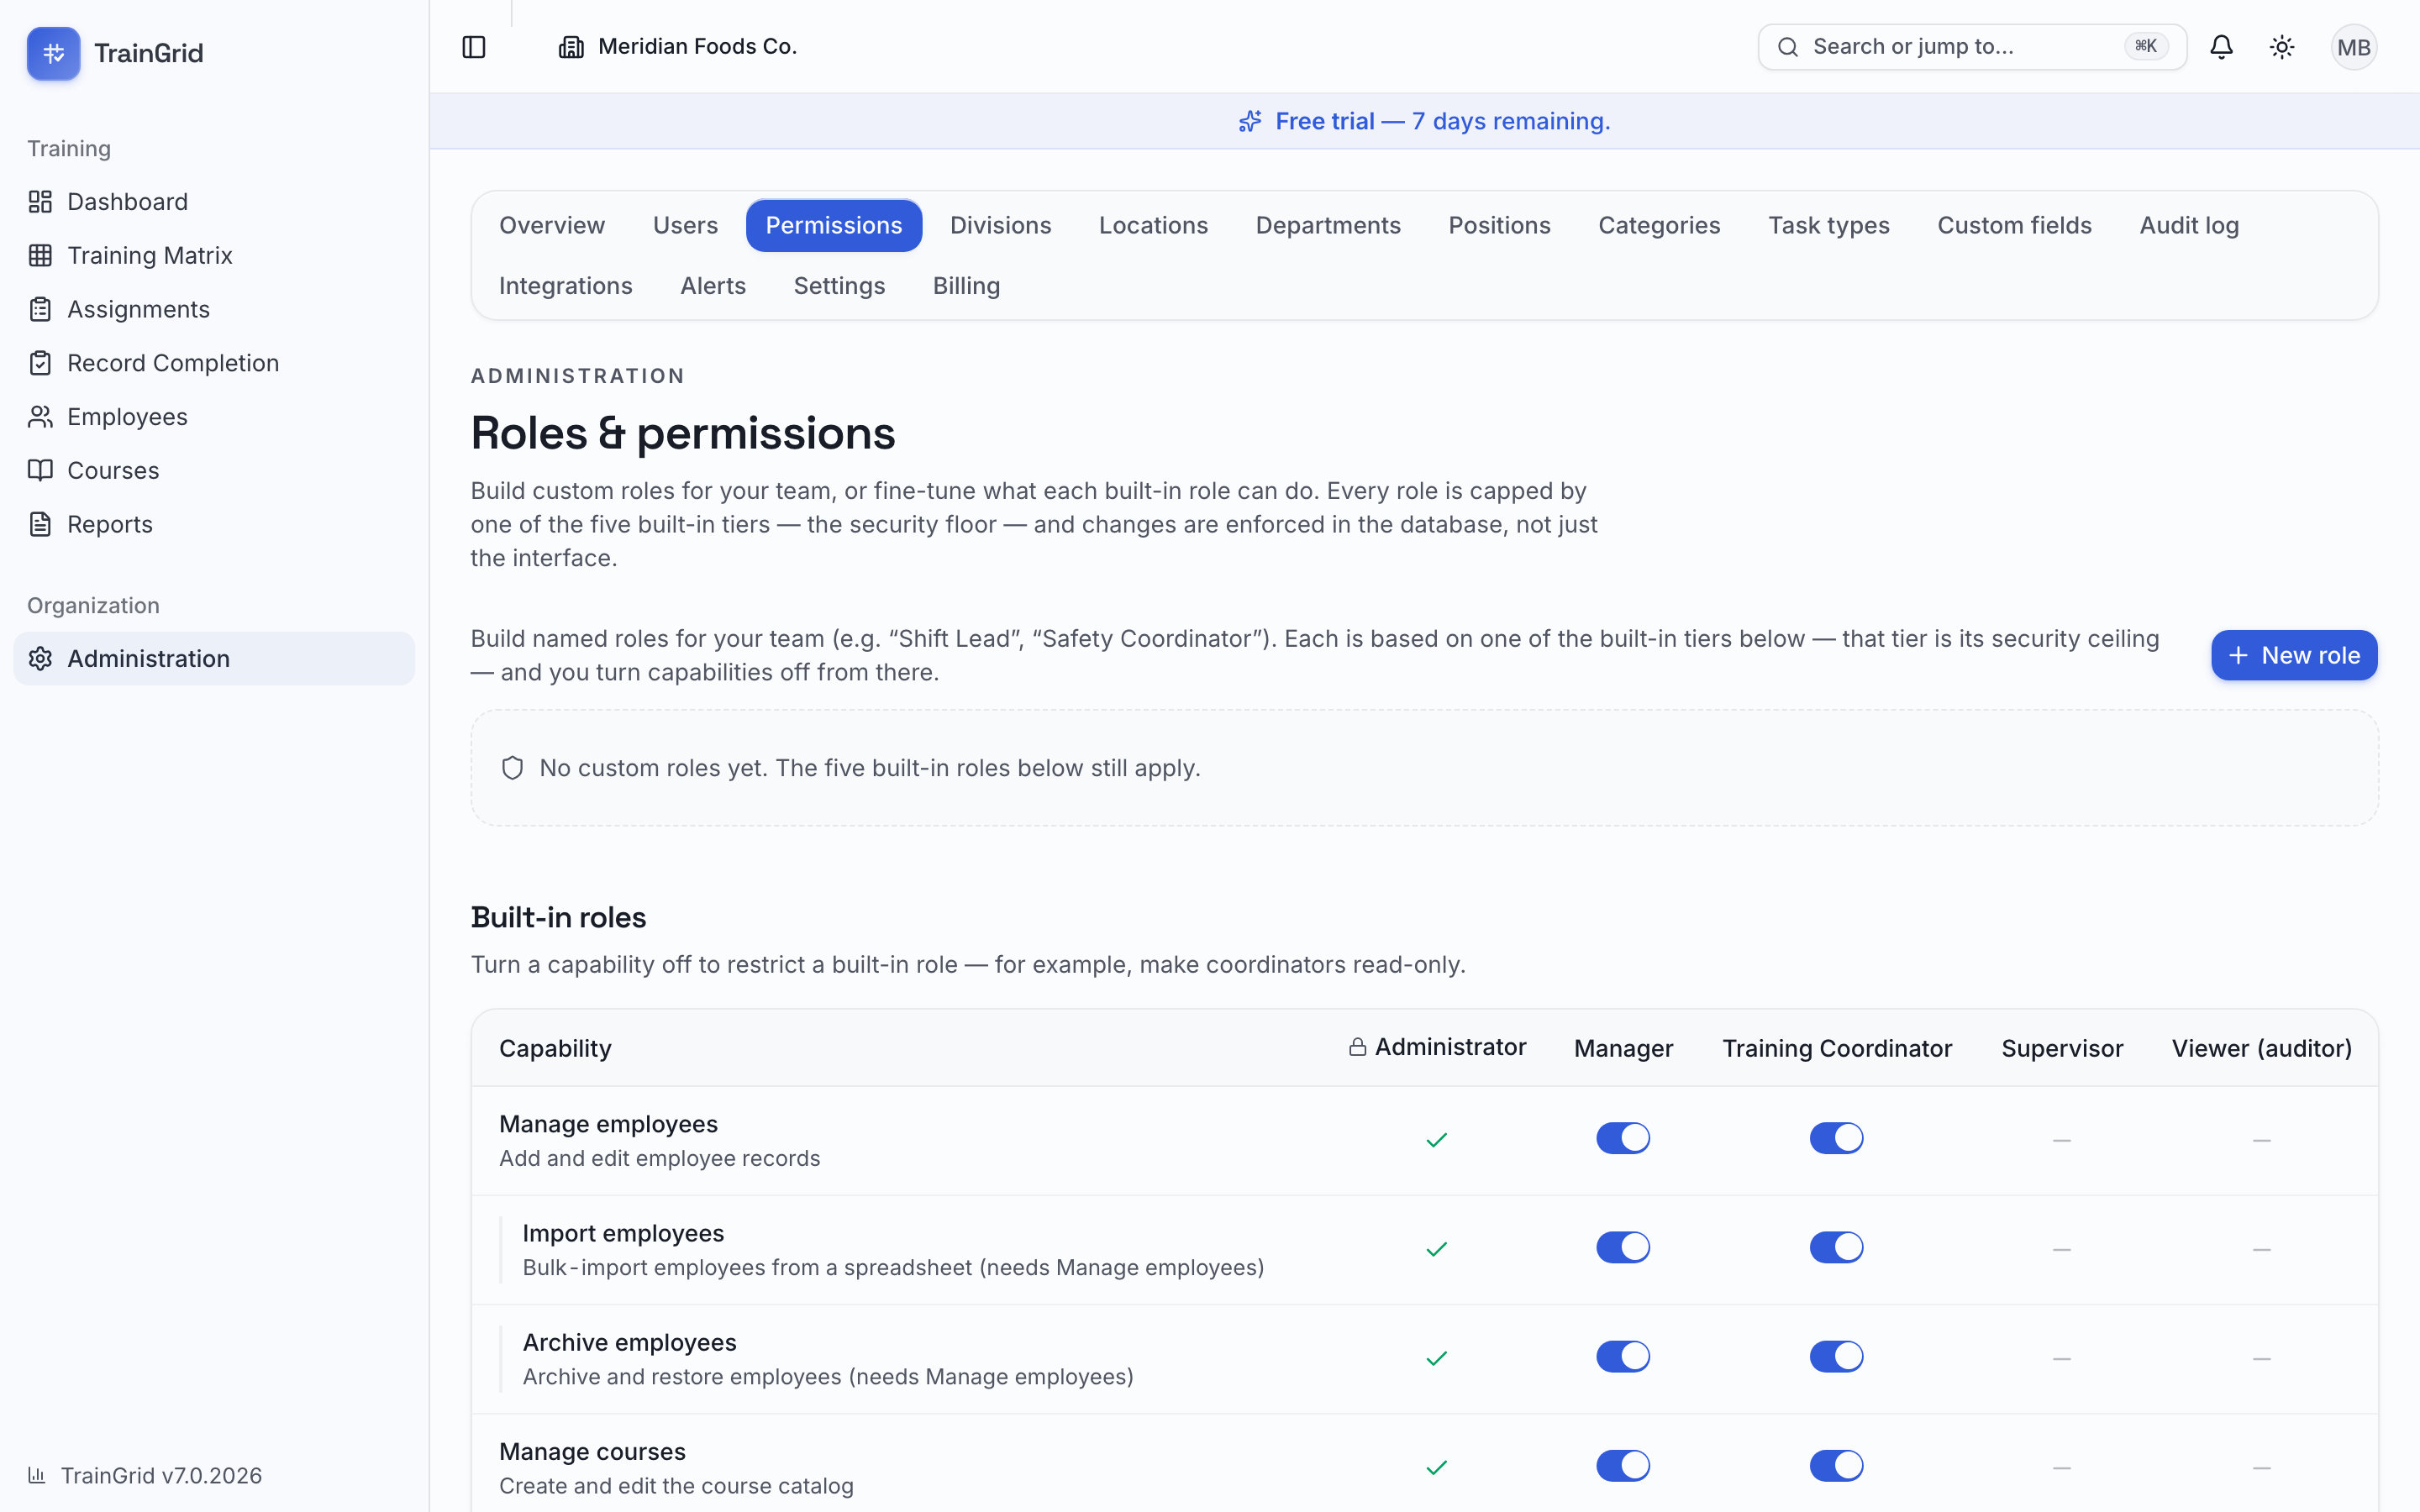
The Roles & Permissions page (titled Roles & Permissions) lets you fine-tune what each role can do. Administrators and Managers can open it.
TrainGrid has five built-in roles: Administrator, Manager, Training Coordinator, Supervisor, and Viewer (auditor). Each starts with a sensible set of capabilities. On this page you can turn a capability off for a role to make it more restrictive — for example, making Training Coordinators read-only.
The capabilities you can control are:
- Manage employees — add, edit, and archive employees
- Delete employees — permanently delete employees with no training records (Administrator-only)
- Manage courses — create and edit the course catalog
- Delete courses — permanently delete courses with no assignments and no sessions (Administrator-only)
- Import CSV — bulk-import employees, courses and the administration lists from CSV files (Administrator by default; an Administrator can turn it on for Managers and Training Coordinators)
- Assign & schedule — assign training, waive requirements, and reschedule
- Record completions — mark training complete (in bulk and per record)
- Delete records — permanently delete assignment records (Administrator-only)
- Export CSV — download CSV files
- Print — print reports, the training matrix, sign-in sheets, transcripts and QR badges
- View audit log — see the immutable change history
- View email log — see the record of every email the organization has sent
The three delete capabilities are reserved for Administrators — they show as dashes for every other role and cannot be granted, only observed. The others can be switched off per role.
The grid shows each capability as a row and each role as a column:
- A switch means the role has that capability by default and you can turn it on or off.
- A dash means the role never has that capability.
- The Administrator column is always on and can't be changed.
To adjust permissions:
- Toggle the switches for the roles and capabilities you want to change.
- Select Save changes. To discard unsaved edits, select Reset.
Note: Toggles can only restrict a role — they can never grant access a role doesn't have by design. These limits are enforced behind the scenes, not just hidden in the interface, so a restricted role truly can't perform the action.
Locations, Departments, Positions, Course categories
These four pages define the structure your employees and courses hang off of. Administrators and Managers can manage all of them. Each works the same way: a table of existing items with buttons to add, edit, and remove.
Deleting several entries at once. An Administrator sees a checkbox on every row of these lists (and of Divisions, Task types, Training providers and Employment types). Tick the rows, click the red Delete N button in the selection bar, read the warning, enter your password (or type DELETE if you sign in with Microsoft and have no password) and confirm. The delete is all-or-nothing: every selected entry must pass the same rule as the single trash icon, and if even one is still in use the dialog lists it with the reason and deletes nothing until you remove it from the selection. Managers do not see the checkboxes.
Locations
Locations are your sites or divisions. Employees belong to a location, and member scopes reference them.
- Select New location.
- Enter a Name (e.g. Mississauga Plant) and, optionally, an Address.
- Select Create location. To change one later, select the pencil icon, edit, and select Save changes.
Each location has an Active switch. Turn it off to deactivate a location — it's hidden from pickers while its history is kept. To remove one permanently, select the trash icon. If any employees or departments still reference it, TrainGrid won't delete it and will offer to Deactivate it instead.
Departments
Departments group employees and appear on records and reports.
- Select New department.
- Enter a Name (e.g. Sanitation) and choose a Location, or leave it as All locations if the department isn't tied to one site.
- Select Create department.
As with locations, use the Active switch to deactivate a department that's in use, or the trash icon to delete one that no employees reference.
Note: Departments can also be created automatically when you import employees from a spreadsheet, so your imported structure appears here ready to tidy up.
Positions
Positions are job titles you can assign to employees so they can be classified and filtered.
- Select New position.
- Enter a Name (e.g. Machine Operator).
- Select Create position.
Renaming a position updates every employee record that holds it automatically. Deactivate a position that's in use with its Active switch, or delete one no employee holds with the trash icon.
Course categories
Categories (e.g. Safety, Quality, GMP) color-code your courses everywhere in the app.
- Select New category.
- Enter a Name, pick a Color from the palette, and set a Sort order.
- Select Create category.
The Sort order number controls where a category appears in lists — lower numbers appear first. To reorder your categories, edit them and change their sort numbers.
To remove a category, select the trash icon. If any courses use it, TrainGrid won't delete it; instead, Rename it or move those courses to another category first.
Custom fields
The Custom fields page lets you track information unique to your operation — badge numbers, union locals, contractor status, and the like — on every employee record. Administrators and Managers can manage custom fields.
Each field you create appears on the employee form, on each employee's profile, and as a column in CSV import and export.
To add a field:
- Under Add a field, enter a Label (e.g. Badge number).
- Choose a Type:
- Text — free-form words or codes
- Number — numeric values
- Date — a calendar date
- Dropdown — a fixed list of choices you define
- If you chose Dropdown, enter your Options, one per line.
- Select Add field.
To rename a field or change a dropdown's options, select Edit on that field, make your change, and select Save. To remove a field, select its trash icon and confirm with Remove field — the field disappears from profiles, imports, and exports, though any values already saved on employees are kept.
Note: There's a limit to how many custom fields you can have. If you reach it, remove one before adding another.
Settings
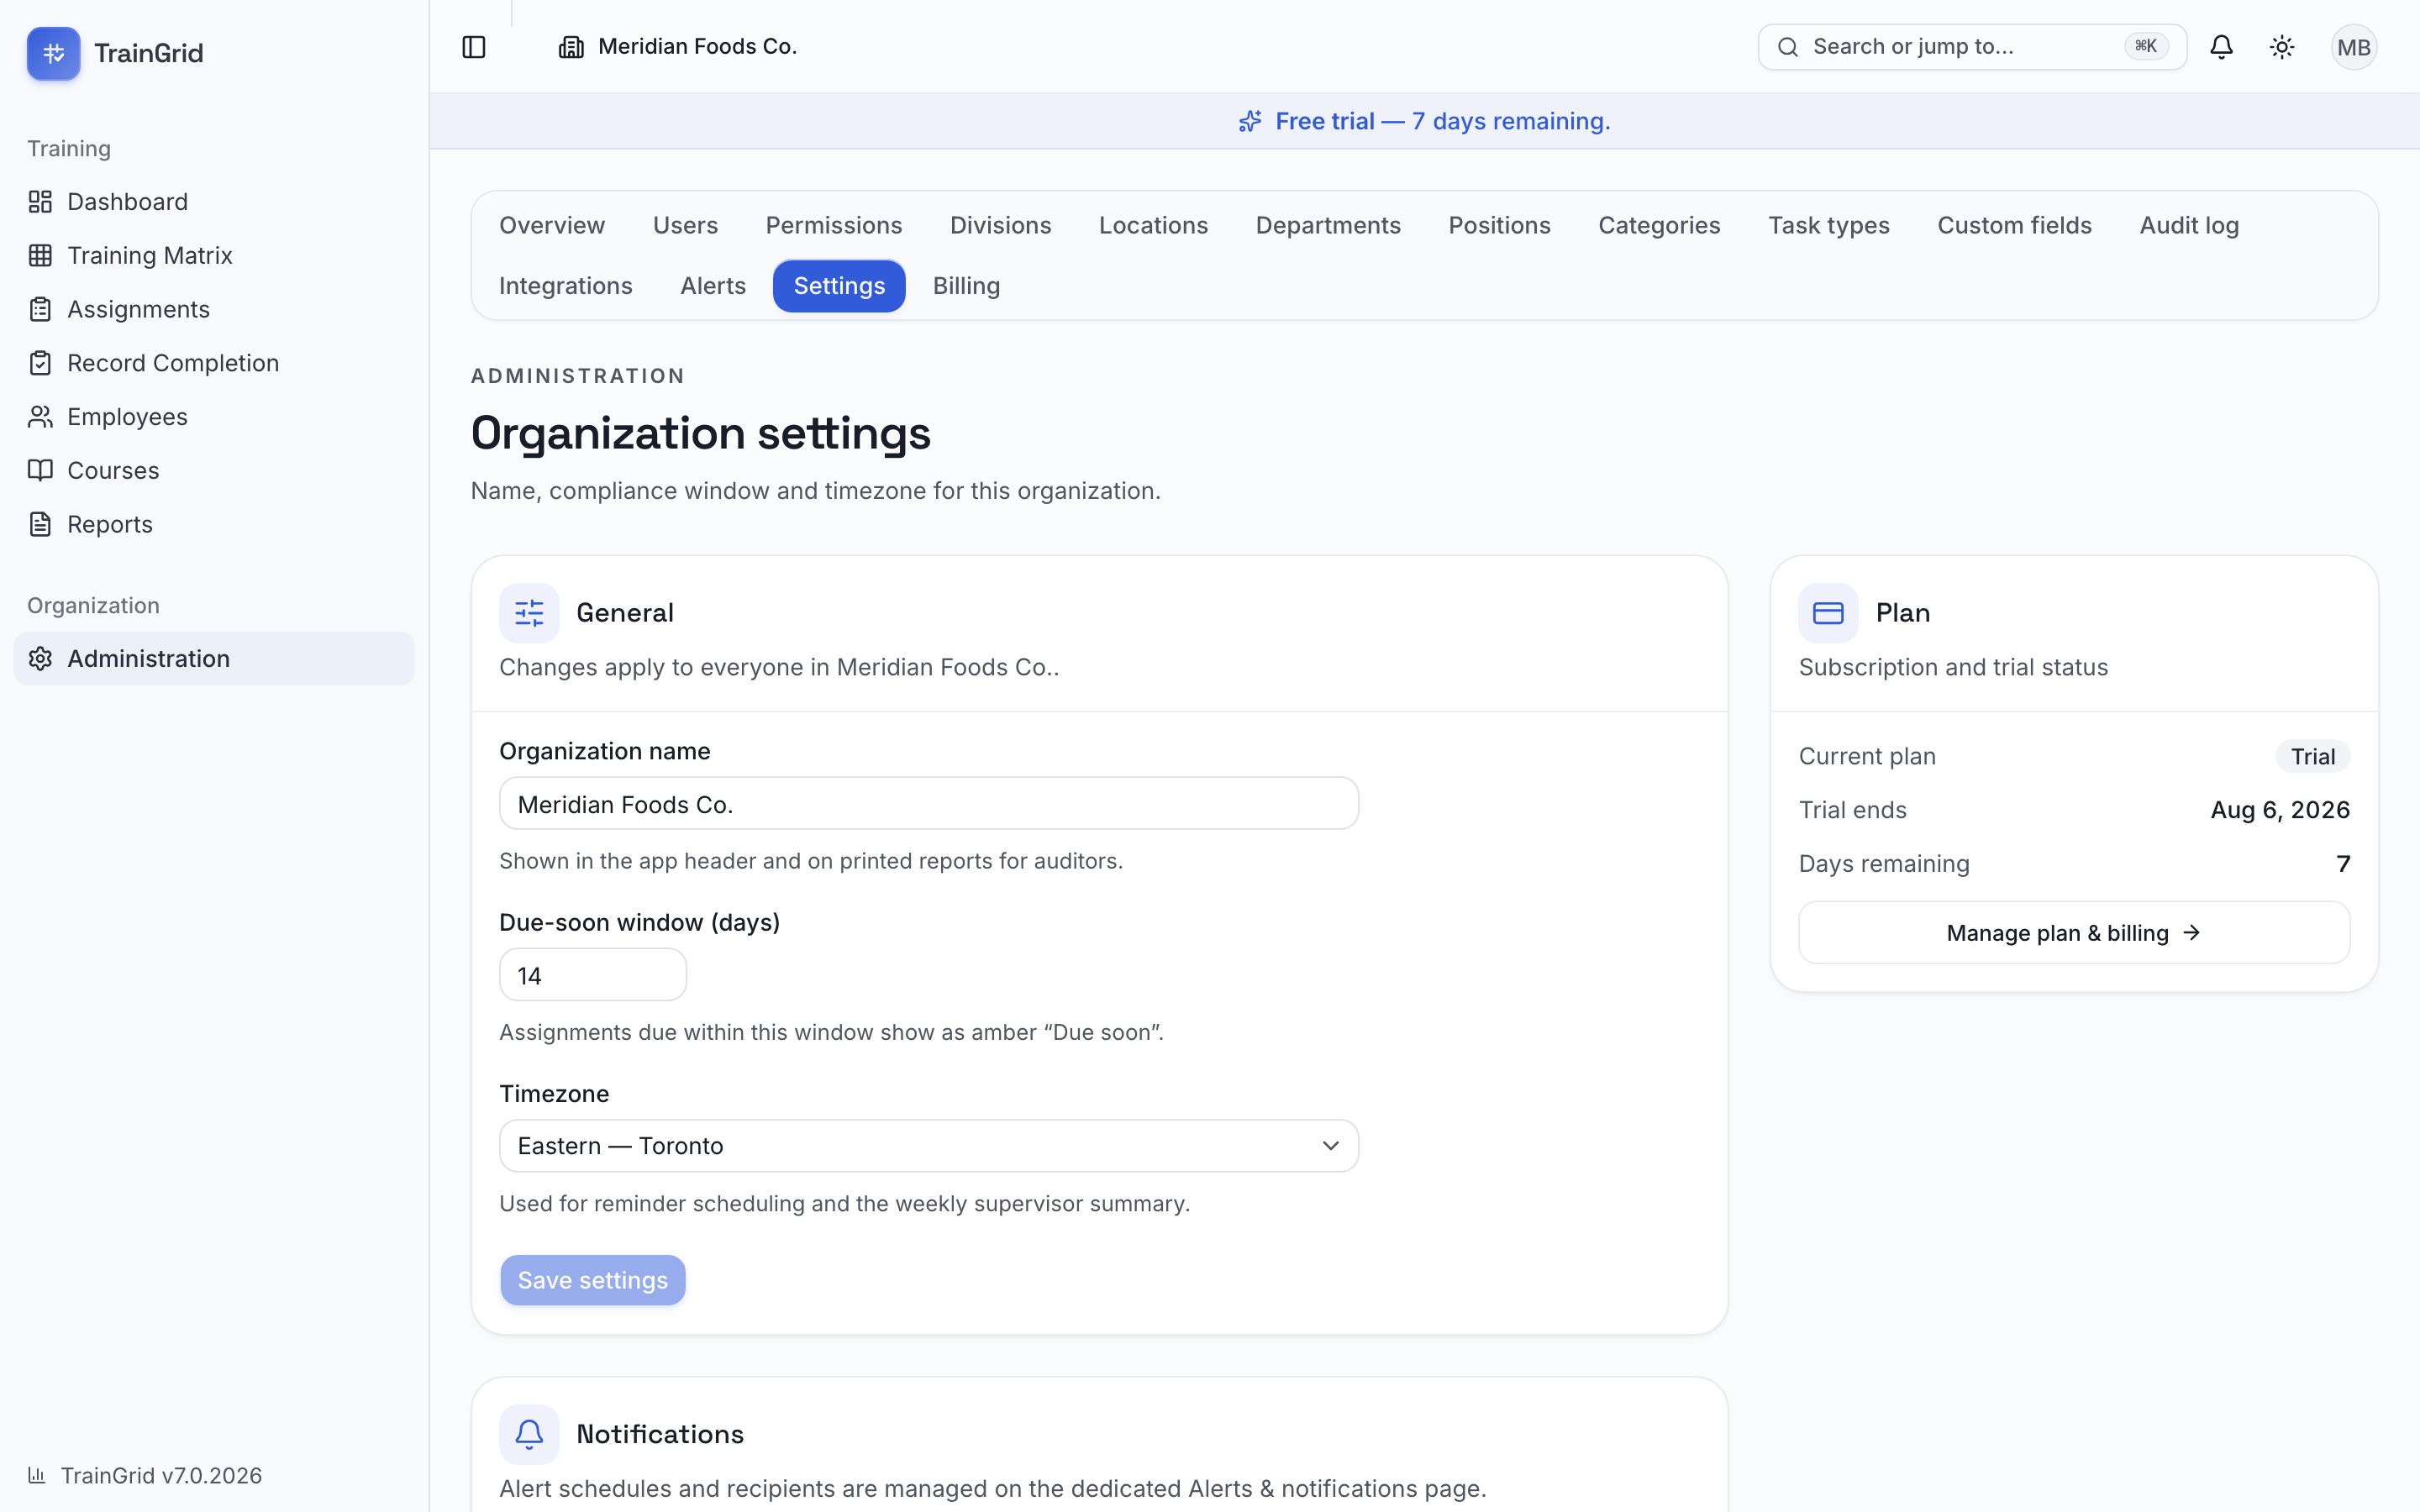
The Settings page (titled Organization settings) holds your organization-wide preferences. Administrators and Managers can manage them. Changes here apply to everyone in your organization.
General
- Organization name — shown in the app header and on printed reports for auditors.
- Due-soon window (days) — assignments coming due within this many days show as an amber Due soon. Choose a value between 1 and 90.
- Timezone — used for reminder scheduling and the weekly supervisor summary. Pick the zone your operation runs in.
Make your changes and select Save settings.
Notifications
Choose which reminder digests TrainGrid sends to your members. Turn each on or off with its switch:
- Due-soon reminders — a daily digest of training coming due within your due-soon window
- Overdue reminders — an alert the day after training becomes overdue, then a weekly follow-up until it's resolved
- Certificate expiry reminders — heads-up at 30, 14, 7, and 1 day before a certification expires
- Expired certificate alerts — a notice the day after a certification lapses, then a weekly follow-up while no renewal is scheduled
- Weekly supervisor summary — a Monday-morning overview to supervisors and coordinators of their team's overdue and upcoming training
- Competency reassessment reminders — a heads-up 90, 30 and 7 days before a competency assessment falls due, plus the day after it lapses
Select Save notification settings to apply. Individual members can still opt out of email from their own notifications page.
Where this lives now: each alert has its own card under Administration → Alerts, where you set whether it is on, how often it goes out (daily, weekly or monthly), and who receives it (Administrators, Managers, Training Coordinators, Supervisors). An alert that is switched on with nobody selected is refused rather than silently going nowhere.
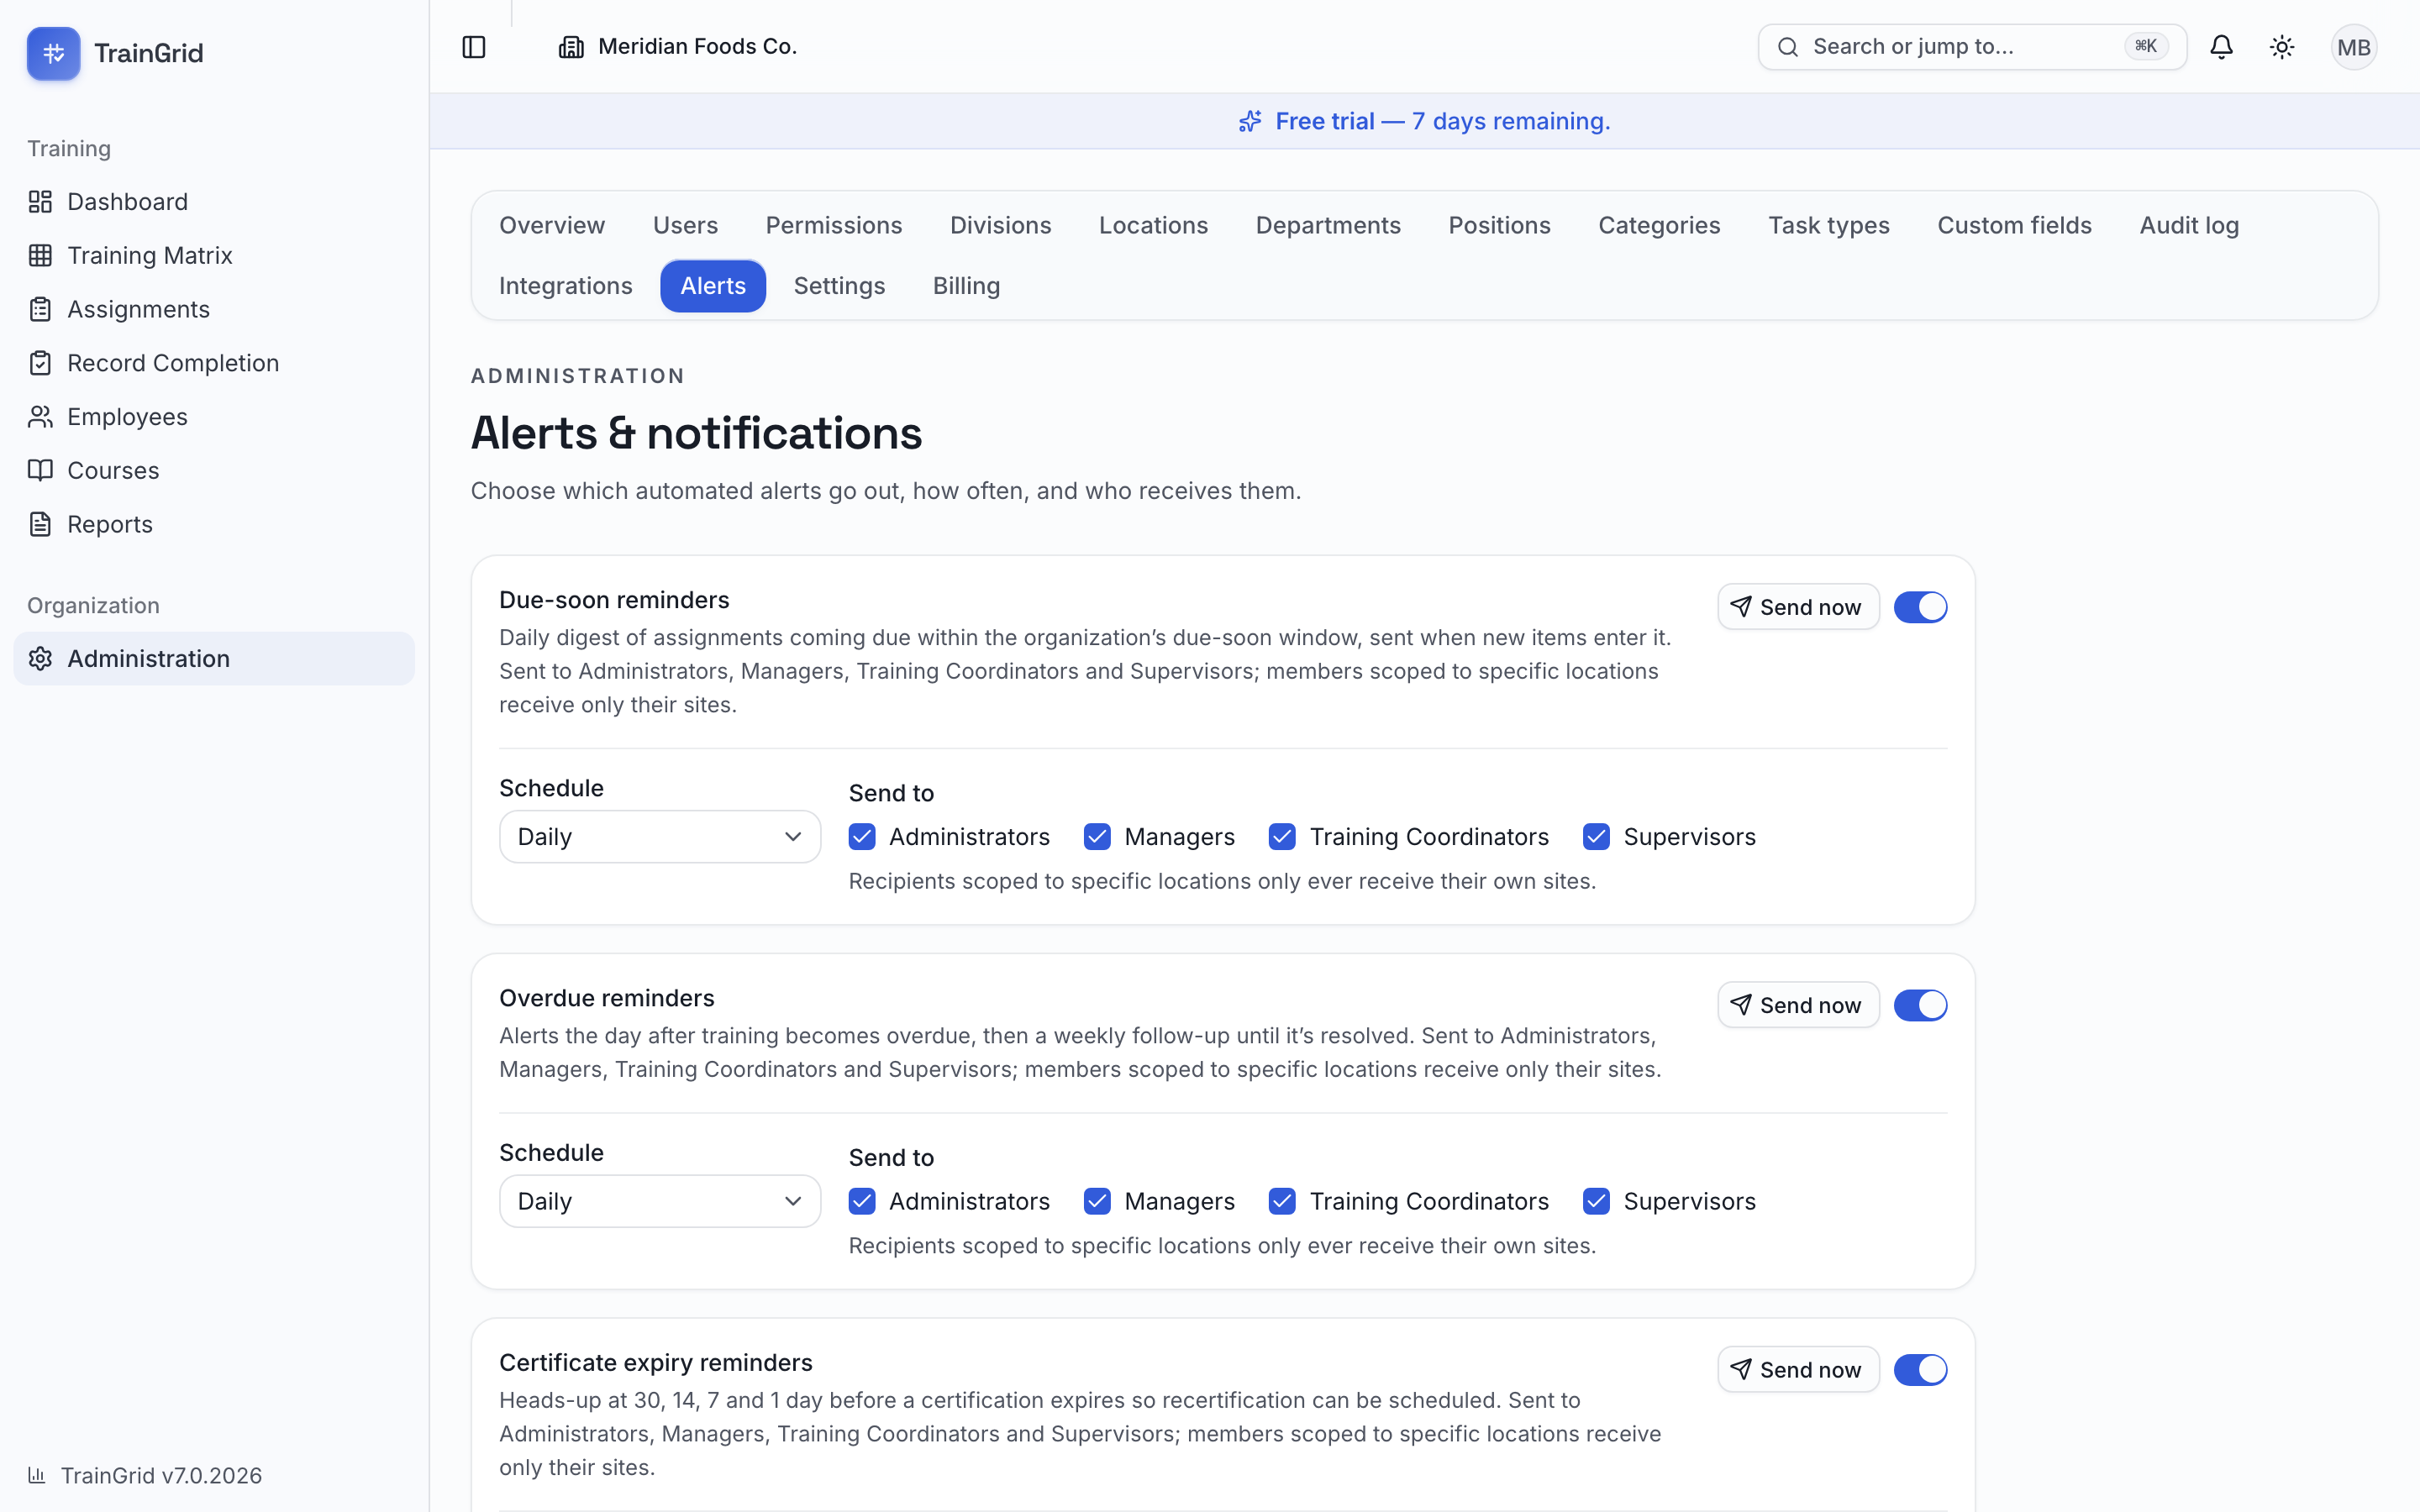
Send an alert now. Every alert card has a Send now button. It confirms first, then delivers that alert immediately — in-app and by email — to its saved recipients, using live data. It will not send an empty message when nothing currently matches. Each confirmed press sends a fresh copy, even when the scheduled alert or an earlier manual copy already went out today.
Roster status digest. Alongside the reminders there is a Roster status digest that names which employees are overdue, due soon, or holding an expired certificate — not just the counts. It is off by default; switch it on and pick a cadence and audience like any other alert.
Competency reassessment reminders. This alert watches the date each competency assessment falls due — its own expiry, or a reassessment somebody scheduled, whichever comes first — and gives a heads-up 90, 30 and 7 days before, plus a notice the day after one lapses. It is on by default, going to Administrators, Managers, Training Coordinators and Supervisors, and you change its cadence and audience like any other alert. It fires only when a date actually crosses one of those milestones, so it never turns into a daily nag.
Scheduled compliance report
Email a compliance summary — overall rate, overdue, due-soon, and expiring certificates — to your leaders on a schedule.
- Set the Frequency to Off, Weekly (emailed every Monday morning in your timezone), or Monthly (emailed on the 1st of each month).
- Under Recipients, type an email address and select Add (or press Enter). Add the people who should receive it — a QA lead or CFO, for example. Remove anyone with the small × on their chip.
- Select Save schedule.
Note: Delivery of the scheduled report depends on email being enabled for your deployment.
This card also holds Keep email log for — how long TrainGrid retains its record of every email it has sent (30, 60, 90 or 180 days; 90 by default). It saves as soon as you change it. See Email log for what that record contains.
Report branding (logo)
Upload your organization's logo so it appears in the header of printed reports and sign-in sheets — your brand in front of auditors.
- In the Report branding card, select Upload logo (or Replace logo if one exists).
- Choose a PNG, JPG, or WEBP image up to 2 MB.
To take the logo down, select Remove, then Remove logo — reports then show just your organization name.
Accent colour
Tint TrainGrid with your brand colour — buttons, links, and highlights across the whole workspace change to match.
- In the Accent colour card, pick one of the preset swatches, or set a Custom colour using the colour picker or by typing a hex value like
#4f46e5. - Changes preview instantly. Select Save accent to apply it for everyone.
To go back to TrainGrid's standard colour, select Use default, then Save accent.
Plan
A Plan panel on this page shows your current plan and trial status. Select Manage plan & billing to jump to the Billing page.
Billing & plans
The Billing & plan page shows your subscription and lets you change it. Administrators and Managers can open it.
At the top, the Current plan card shows your plan name, when it renews (or, on a trial, when the trial ends and how many days remain), and your subscription status. Below it you'll see how many staff logins and locations you're currently using.
To choose or change a plan:
- Use the Monthly / Annual toggle to see either price (annual includes two months free).
- On the plan you want, select Choose plan (from a trial) or Switch to this plan.
- You're taken to a secure checkout to enter payment details. When you're done, you return to TrainGrid and your plan updates shortly after.
If you already have a subscription, select Manage billing to open the secure billing portal, where you can update your payment method, download invoices, or cancel. Switching plans is prorated automatically.
Note: If a payment doesn't go through, a banner appears at the top of the page — open Manage billing to update your payment method and keep your subscription active. If self-serve billing isn't enabled on your deployment, the plans are shown for reference and you can Contact sales to activate one.
Audit log
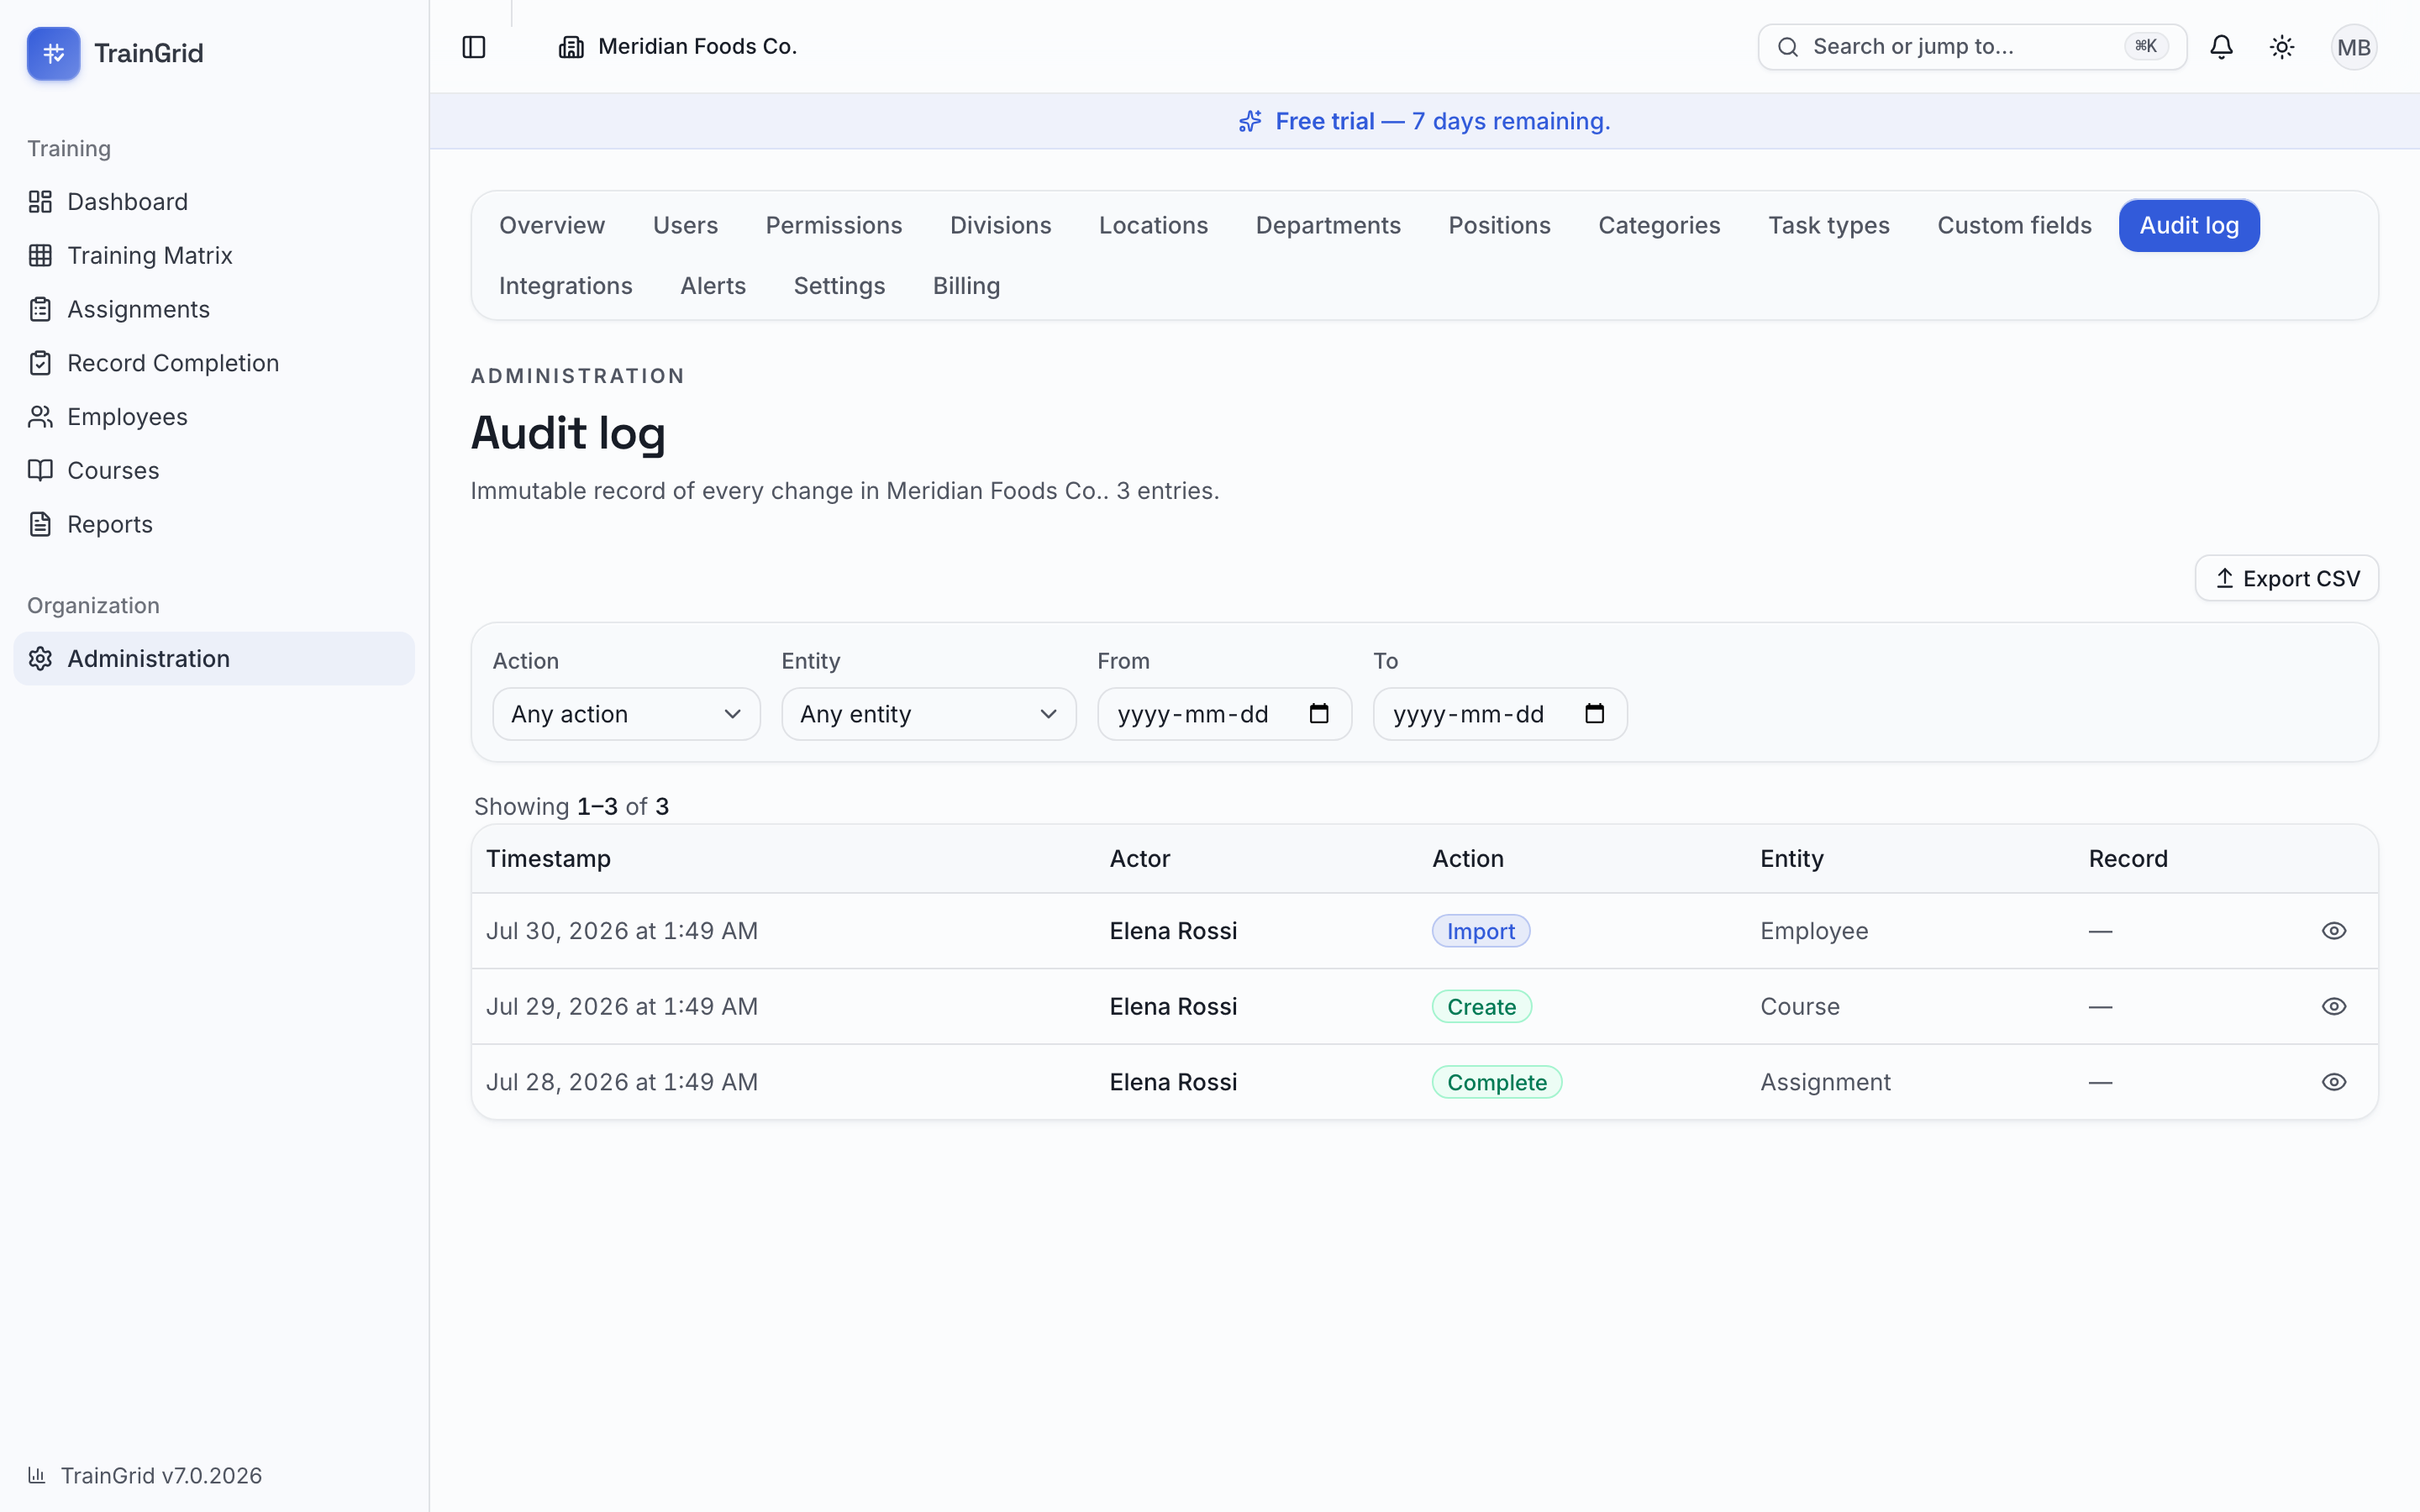
The Audit log records every change made in your organization, so you always have a defensible history for inspections and audits. Administrators, Managers, Training Coordinators, and Viewers (auditors) can view it.
Every create, update, delete, completion, waive, archive, import, and invitation is logged automatically. Each entry shows:
- Timestamp — when it happened
- Actor — who did it
- Action — what kind of change it was
- Entity — the type of thing that changed (e.g. Assignment, Employee, Course)
- Record — the specific item's name (for example, an employee and course for an assignment)
Filtering entries
Use the filter bar to narrow the list:
- Action — pick a single action type, or Any action
- Entity — pick a single record type, or Any entity
- From / To — set a date range
Select Clear filters to return to the full list.
Seeing before/after detail
Select any row (or the eye icon on it) to open a detail view. It shows who made the change and exactly when, alongside a side-by-side Before and After of the record's values — so you can see precisely what changed.
Exporting to CSV
Select Export CSV at the top right to download the currently filtered entries — including the before/after detail — as a spreadsheet file.
Tip: Set a From/To date range before exporting to pull just the slice an auditor asked for. Very large exports are capped at the most recent 5,000 entries; narrow the date range to reach an earlier period.
Email log
Where the Audit log answers “who changed this record?”, the Email log answers “did that reminder actually go out, and to whom?” — every email TrainGrid has sent on your organization's behalf, in one list. Administrators and Managers can open it, from Administration → Email log — and if you'd rather keep it to Administrators alone, switch View email log off for Managers under Roles & Permissions.
This is deliberately a tighter circle than the Audit log (which Training Coordinators and Viewers can also read), because the email log contains recipients' addresses.
Every email TrainGrid sends is recorded here, not just reminders:
| Type | What produced it |
|---|---|
| Alert | A reminder digest — due-soon, overdue, certificate expiry, expired, weekly summary or roster status — whether sent on schedule or with Send now |
| Scheduled report | The scheduled compliance report |
| Member invite | An invitation to join your workspace |
| Portal invite | An invitation to an employee's own training portal |
| Sign-in change | Notice to someone whose name or sign-in email an Administrator changed |
| Email employees | A one-off message you sent from the Employees page |
| Test send | A preview you sent to yourself |
Each row shows:
- Sent — the date and time, in your organization's timezone
- Type — which of the above produced it
- Recipient — the address it was sent to (one row per person, so a digest to five people is five rows)
- Subject — the exact subject line that went out
- Status — Sent or Failed. A failure shows the provider's reason underneath, so you can tell a wrong address from a service outage
Filtering the list
Use the filter bar to narrow things down:
- Type — pick one kind of email, or Any type
- Status — show only Sent or only Failed, or Any status
- From / To — set a date range
Select Clear filters to go back to the full list. Long lists are paged 50 at a time, newest first.
Tip: When someone says “I never got the overdue reminder”, filter Type = Alert and set From to that morning. If their address is listed as Sent, the message left TrainGrid and the question becomes one for their mail system — check spam and any filtering rules. If it says Failed, the reason is shown right there. If they aren't listed at all, they weren't in that alert's audience, or they've switched off their own email reminders, or their location scope had nothing to report.
How long entries are kept
The log keeps itself trimmed. Under Administration → Settings, in the Scheduled compliance report card, Keep email log for sets the window: 30, 60, 90 or 180 days (90 by default). Older entries are removed automatically once a day.
The choice saves as soon as you make it — there's no separate Save button. Retention only controls how long the record is kept; it never affects delivery of the emails themselves.
Note: Like the Audit log, the email log is append-only — entries are written by TrainGrid and can never be edited or deleted from within the app, by anyone. That's what makes it usable as evidence that a notice was issued.
Part 6 Reference & Help
Roles & Permissions at a glance
New in this release: Import CSV is a capability of its own (bulk import of employees, courses and the administration lists; Administrator only by default, and an Administrator can turn it on for Managers and Training Coordinators), Print can now be switched off per role, and Export data is now called Export CSV. Administrators also receive a daily email summarising every change to master data (see "Configure automated alerts & notifications").
Every person you invite to TrainGrid is given one of five roles. The role decides what they can see and do. The table below shows exactly what each role can do — a checkmark means yes, a dash means no.
| Capability | Administrator | Manager | Training Coordinator | Supervisor | Viewer (auditor) |
|---|---|---|---|---|---|
| Manage employees (add, edit, archive) | ✓ | ✓ | ✓ | — | — |
| Manage courses (create and edit the catalog) | ✓ | ✓ | ✓ | — | — |
| Import CSV (bulk-import employees, courses and administration lists from CSV files). Off by default; an Administrator can turn it on for Managers and Training Coordinators. | ✓ | — | — | — | — |
| Assign & schedule (assign, waive, reschedule; schedule training sessions and enrol employees on them) | ✓ | ✓ | ✓ | — | — |
| Record completions (mark training complete, record session attendance) | ✓ | ✓ | ✓ | ✓ | — |
| Delete employees (only with no training records) | ✓ | — | — | — | — |
| Delete courses (only with no assignments and no sessions) | ✓ | — | — | — | — |
| Delete records (permanently delete assignments) | ✓ | — | — | — | — |
| Export CSV (download CSV files of employees, courses, records and reports) | ✓ | ✓ | ✓ | ✓ | ✓ |
| Print (print reports, the training matrix, sign-in sheets and QR badges). On by default. | ✓ | ✓ | ✓ | ✓ | ✓ |
| View audit log (the change history) | ✓ | ✓ | ✓ | — | ✓ |
| View email log (outbound email record) | ✓ | ✓ | — | — | — |
| Manage members (invite people, set their roles) | ✓ | ✓ | — | — | — |
| Manage organization (settings, locations, branding) | ✓ | ✓ | — | — | — |
| Manage billing (plan and payment) | ✓ | — | — | — | — |
| View reports | ✓ | ✓ | ✓ | ✓ | ✓ |
A quick way to remember them: an Administrator can do everything, including billing. An Manager can do everything except billing and permanent deletes — deleting employees, courses or records is Administrator-only. A Training Coordinator runs the day-to-day (people, courses, assignments, completions, reports) but can't delete records or invite members. A Supervisor can view training and record completions for their team. A Viewer (auditor) has read-only access — perfect for inspectors and outside auditors who need to look but not touch.
Note: Any member — except an Administrator — can be limited to specific sites. A location-scoped member only sees and works with the employees at the location(s) you assign to them. For example, a supervisor limited to your West Plant sees only West Plant employees and compliance, not the rest of the company. This is enforced automatically everywhere in the app.
Tip: Administrators and Managers can also fine-tune roles for your organization — for instance, turning off "View email log" for a role, or making coordinators read-only. You can only remove abilities from a role, never add ones the role doesn't normally have, so it's always safe to experiment. The one exception is Import CSV: it is off for every role except the Administrator, and only an Administrator can turn it on for Managers and Training Coordinators.
Preparing your employee import file
You can add your whole roster at once by importing a CSV file (a spreadsheet saved as .csv). TrainGrid reads your column headers automatically, so in most cases you can export from your HR or payroll system and upload it as-is.
Accepted columns
Only First Name and Last Name are required. Everything else is optional but recommended. TrainGrid recognizes the common name each column goes by, so you don't have to rename your headers.
- First Name (required) — also reads: First, Given Name, Legal First Name
- Last Name (required) — also reads: Last, Surname, Family Name, Legal Last Name
- Employee Number — also reads: Emp No, Employee ID, Emp ID, Badge Number, Number
- Email — also reads: Email Address, Work Email
- Department — also reads: Dept, Home Department, Department Description
- Position — also reads: Job Title, Title, Job Description, Role
- Location — also reads: Site, Plant, Facility, Division (a "Division" column in your file is read as the site, not as a division short form — the short-form prefix is an import option, see the tips below)
- Shift — also reads: Shift Code, Assigned Shift
- Supervisor — also reads: Manager, Reports To, Supervisor Name
- Hire Date — also reads: Start Date, Date Hired, Date of Hire, Hire/Rehire Date
- Employment type — also reads: Employee Type, Worker Type, Staff Type, Internal/External, Contract Type, Agency, Contractor. Values are matched against the types defined under Administration → Employment types, by name or code and ignoring case; a blank cell takes the organization’s default type, and the legacy spellings “agency”, “contract”, “contractor”, “temp” or “supplier” still resolve to External while that type exists. Anything unrecognized is flagged for review with the list of accepted names rather than guessed.
- Notes — also reads: Comments, Remarks
Tip: Don't have a matching column? On the Map columns step you can point each TrainGrid field at any column in your file by hand. And if you'd rather start fresh, click Download template on the upload screen for a ready-made file with all the right headers.
Accepted date formats
For Hire Date, TrainGrid accepts the formats you're likely already using:
YYYY-MM-DD(for example,2024-03-18)M/D/YYYYorD/M/YYYY(for example,3/18/2024or18/3/2024)- Excel serial date numbers (what Excel sometimes stores dates as behind the scenes)
Leave the Hire Date blank if you don't have it — that's fine.
Tips for a clean import
- Employee numbers are optional, but helpful. If your people have unique employee or badge numbers, include them — TrainGrid uses them to recognize the same person on future imports. If you don't have them, just leave the column blank.
- Same names are never a problem. Two people named "John Smith" are kept as two separate employees. TrainGrid never merges people by name alone. If they're in different departments, they always stay distinct.
- Re-importing is safe. Uploading the same file again won't create duplicates. Rows that match an existing employee (by number, email, or name + department) are updated, not doubled.
- New departments and positions are created for you. If a department or position in your file doesn't exist yet, TrainGrid adds it automatically. Locations are created too when you are an Administrator or Manager and your plan has room for another site (Starter and Professional include one location); otherwise use a location name that already exists under Administration → Locations, or leave the cell blank, and the preview tells you before you import.
- Preview before you commit. The Preview & import step shows exactly what will be added, flags any rows with errors (which are skipped, never guessed at), and points out same-name employees so nothing surprises you.
- Prefix employee numbers with a division short form (optional). If your divisions have short forms (Administration → Divisions), the Preview & import step offers "Prefix employee numbers with a division short form", listing each active division as "SHORTFORM · Name". Leave it on "No prefix" to import the numbers exactly as they are in the file. Choose a division and its short form is added in front of every employee number in the file with nothing in between (MLT + 1234 = MLT1234); the Number column shows the final value before you import, and the duplicate check runs on the final numbers. Numbers that already start with that short form are left as they are, so re-importing a file you exported from TrainGrid never adds the prefix twice (the option tells you how many numbers were left unchanged, and each is marked "unchanged" in the Number column); blank numbers stay blank (the "Assign internal employee numbers" option, if ticked, still gives them a TG- number without the prefix); a number that would be longer than 50 characters is flagged as an error and skipped. If a row's original number already belongs to one of your employees (you loaded the roster without prefixes and are uploading the same file with one), the review step flags it with the existing person listed underneath and "Same person" pre-selected, so a re-upload never doubles your roster; choose "Different person" only when the row really is someone new. If you simply want those existing people to carry the new prefix, tick Renumber matching employees with the prefix (under the prefix option; needs the Manage employees permission): each matching row then changes the existing person's number on their own record (1001 becomes MLT1001, training history untouched, one audit entry per change) instead of asking; the row reads "Renumbers <name>: 1001 → MLT1001" before you import, and the Done screen counts them under Renumbered. A number that was taken by someone else between the preview and the import is reported as skipped, never forced. The prefix is an option on the import, not a column in your file — a "Division" column header is still read as the Location column.
Example file
| First Name | Last Name | Employee Number | Department | Location | Hire Date |
|---|---|---|---|---|---|
| Jane | Doe | 10245 | Packaging | Main Plant | 2024-03-18 |
| Amir | Khan | 10246 | Sanitation | Main Plant | 2023-11-02 |
| Rosa | Mendez | Shipping | West Plant | 5/9/2022 |
Note: Imports handle up to 2,000 rows at a time. If your roster is larger, split it into a few files — re-importing is safe, so there's no risk of overlap.
Exporting & printing
Almost everything in TrainGrid can leave the app as a spreadsheet or an audit-ready printout. Anyone who can Export CSV can download the spreadsheet, and anyone who can Print can print the document (both on for every role except where you've turned them off).
You can download a CSV or print a clean, audit-ready document from:
- Assignments — the full list of assigned training, with any filters you've applied.
- Reports — every report can be exported and printed, including your custom saved reports from the report builder.
- Matrix — the training matrix (both the by-course and by-week views), exported as a spreadsheet that mirrors what you see on screen.
- Sign-in sheet — the printable attendance sheet for a course (from Record Completion) or a scheduled session (printed from the session page on the Calendar, with the roster filled in).
- Employee transcript — one person's complete training history.
- Audit log — the immutable record of who changed what and when.
Tip: Printed documents come out in a clean, landscape layout with repeating column headers on every page — ready to hand to an inspector or drop into an audit binder.
Keyboard shortcuts
TrainGrid is built to be driven from the keyboard. Press these anywhere in the app:
| Shortcut | What it does |
|---|---|
| Ctrl / Cmd + K | Open the command palette — jump to any page or search |
| Ctrl / Cmd + B | Toggle the sidebar (collapse or expand) |
| ? | Show the keyboard shortcuts dialog |
Tip: The command palette (Ctrl / Cmd + K) is the fastest way to get around — start typing a page name, an employee, or a course and press Enter.
Glossary
- Organization — your company's private workspace in TrainGrid. All your people, courses, and records live inside it, walled off from every other company.
- Location — a physical site within your organization, such as a plant, facility, or branch. Users can be limited to specific locations.
- Department — a team or functional group an employee belongs to, such as Packaging or Sanitation.
- Position — a person's job title or role, such as Line Operator or Shift Lead.
- Employee — a person you track training for. Employees don't log in; they're records you manage.
- Course — a training topic or requirement in your catalog, such as "Forklift Certification" or a toolbox talk.
- Assignment — a specific course assigned to a specific employee, with a due date. This is the unit TrainGrid tracks completion against.
- Compliance — the share of required training that is completed and up to date. Your dashboard shows this as a percentage.
- Overdue — an assignment whose due date has passed and that hasn't been completed yet.
- Due soon — an assignment coming due shortly, so you can act before it slips overdue.
- Expired — a completed course whose certificate has passed its expiry date; the person needs to retrain.
- Failed — a completion recorded with a grade below the course's passing grade. The record stays on the person's history, but it does not count as compliant anywhere, and it cannot support a qualification.
- Waived — an assignment you've marked as not required for this person (for example, they already hold the qualification elsewhere). It's excluded from their compliance.
- Recurrence — a course that must be repeated on a schedule. When someone completes a recurring course, TrainGrid automatically creates the next one, due at the right time.
- Certificate — proof that a course was completed, optionally with an expiry date. Certificates with expiry dates drive the "expired" and "due soon" states.
- Toolbox talk — a short, informal safety or process briefing, often delivered to a group. You can filter the matrix to show toolbox talks on their own.
- Mandatory course — training that is required (not optional). Mandatory courses count toward compliance; optional ones don't.
- Audit log — the permanent, unchangeable record of every meaningful action in your organization — who did what, and when. It can be viewed and exported but never edited.
- Email log — the matching record for outbound email: every message TrainGrid sent on your behalf, with its recipient, subject and whether it was sent or failed. Also unchangeable, and kept for the retention window you choose (30–180 days).
Frequently asked questions & troubleshooting
Someone finished the training but still shows as not qualified. That course requires a competency assessment and it has not been recorded yet. Open the record and press Record assessment. Training completed and qualified are deliberately different states.
What is the difference between the sign-in sheet and scan check-in? The sign-in sheet is a printed list of who still needs the training — printing it changes nothing. Scan check-in is the live screen that actually records the completions when you press Mark complete. Most sites use both: the sheet for signatures, the scan for the records.
Can I scan the same badge twice by accident? Yes, and nothing bad happens — the person appears once on the roster, and re-running a session cannot double-record anyone.
An imported course was skipped. Its code already exists in your catalog. Imports never overwrite an existing course; the preview tells you which rows will be skipped and why before you commit.
Why can I not see a page a colleague mentioned? Search only offers destinations your role may open, and the same applies to the sidebar. Ask an Administrator to review your permissions.
Why is someone showing as overdue? An employee shows overdue when they have an assigned course whose due date has already passed without a recorded completion. Open their profile or the training matrix to see which course it is, then record the completion or reschedule the due date. If the training genuinely doesn't apply to them, you can waive it instead.
How do I retrain everyone on a topic? Assign the course to your whole roster at once. Go to the course (or use Assign & schedule), choose the group of employees, set a due date, and confirm. If the course is set to recur, TrainGrid will keep scheduling the next round automatically each time someone completes it — you won't have to reassign it by hand.
Can two people have the same name? Yes. TrainGrid never merges people by name. Two employees named "John Smith" stay completely separate, each with their own training history — even during imports. Employee numbers or departments help you tell them apart at a glance, but they aren't required for this to work.
How do I give my auditor read-only access? Invite them with the Viewer (auditor) role. They'll be able to see everything they need — the matrix, reports, and the audit log — and export it, but they can't change any data. It's the safest role to hand to an outside inspector.
A certificate is expiring — what happens? As a certificate nears its expiry date, that training moves to due soon, and once the date passes it becomes expired, so the person no longer counts as compliant on it. TrainGrid surfaces these on the dashboard and matrix ahead of time so you can schedule retraining before anyone lapses.
Can I limit a supervisor to one site? Yes. When you invite or edit a member (Administrators and Managers can do this), assign them to specific location(s). From then on they only see and work with employees and compliance at those sites — the rest of the company is hidden from them automatically.
How do I brand the app with our colours? Administrators and Managers can set your accent colour under Admin → Settings. Pick your colour, preview it live, and save — the app shell updates to match, including your dashboard. This applies only to your organization.
Someone I invited can't do what I expected. Check their role against the permissions table — most surprises come down to the role. Also check whether they're limited to certain locations: a location-scoped member only sees their assigned sites. Administrators and Managers can adjust both the role and the location scope from the members list at any time.
Someone says they never received a reminder.
Open Admin → Email log and filter by Type = Alert with a From date covering the day in question. If their address appears with a Sent status, the email left TrainGrid — check their spam folder and any mail rules on their side. If it shows Failed, the reason is listed beside it. If they don't appear at all, the likely causes are that they weren't in that alert's recipient list, that they switched off their own email reminders from their notifications page, or that their location scope had nothing to report that day.
A row didn't import — why? On the Preview & import step, any row with a problem (a missing first or last name, an invalid email, or an unreadable date) is flagged and skipped rather than guessed at. Fix the flagged rows in your file and re-import — re-importing is always safe and won't create duplicates.
Can we sign in with Microsoft (Entra ID / Azure AD)? Yes, where Microsoft sign-in has been switched on for your TrainGrid environment: a Continue with Microsoft button appears on the sign-in page and on invitation links, for staff and for employees using the portal. It is sign-in only. People still have to be invited in TrainGrid first, with the same email address as their work Microsoft account; nothing is provisioned, synchronised or removed from your directory, and accounts are still created and removed by invitation inside TrainGrid. Depending on your Microsoft 365 settings, an Entra administrator may need to approve TrainGrid for your organization before staff can sign in. To have Microsoft sign-in switched on, contact support.
Why did Microsoft sign-in say my account isn't linked? The message "This Microsoft account hasn't been invited to a TrainGrid workspace yet" means no invitation or account exists for the email address of the Microsoft account you picked. Ask your administrator (or, for the portal, your training coordinator) for an invitation to that exact address, open the invitation link and choose Continue with Microsoft there; Microsoft's account picker always appears, so pick the matching work account. If you already have a TrainGrid account under a different address, sign in with that email and password instead. If the invitation page says "Email address not verified", your directory did not confirm the address to TrainGrid: ask your IT team to confirm your email domain is verified in Microsoft Entra, or activate with an email and password.
Why can't an employee book a seat on a session? Check the session first: employees can only book sessions marked Employees can book themselves (otherwise the session page's Portal booking line reads "Staff enrol employees"), that have not started, are not cancelled and are not Full; a course that is only available at certain locations is offered only to employees at those locations, and a session held at a specific location is offered only to employees at that location — so an employee with no location on their profile sees only sessions scheduled with No specific location. Then check the employee: they need activated portal access and an active employee record, and booking is paused for everyone while a workspace is read-only ("Booking is paused for this workspace. Contact your training coordinator."). Staff can add the employee from the session page with Add employees if the course is offered at their location, the employee is active, a seat is free and the workspace is not paused; one ineligible employee refuses the whole Add, not just that person.
Getting help
Need a hand? We're here to help. Email us at support@solvesoftcorp.com and a real person will get back to you. You can also reach the shortcuts and reference dialogs any time from inside the app by pressing ?, or by opening the command palette with Ctrl / Cmd + K and searching for what you need. TrainGrid lives at https://traingrid.app.
Part 7 How To
How to perform key tasks
Short recipes for the jobs people actually do, each with the shape of the process first and the steps underneath. If you only read one part of this guide, read this one.
The big picture
Everything in TrainGrid follows the same spine: decide what training is required, give it to people, record what happened, and prove it later.
How to set up a new course
- Go to Courses → New course.
- Give it a code and title. The code is how people find it and must be unique.
- Set recurrence if it repeats (e.g. every 365 days) and certificate validity if it issues one.
- Tick Mandatory if everyone in scope must hold it — that is what the Missing Mandatory report reads.
- If the task needs a practical sign-off, tick Requires a competency assessment and describe what the assessor checks.
- Add topics — the agenda. They show on hover in the matrix and become the checklist when an assessor marks “needs improvement”.
How to import many courses at once
- Courses → Import, then Download template so your columns match.
- Upload the file. TrainGrid guesses which column is which; correct anything it got wrong.
- Read the preview. It tells you, row by row, what will be created, what already exists, and what cannot be read and why.
- Import. Existing course codes are skipped, never overwritten. New categories and task types are created for you.
Tip: The same shape works for employees (Employees → Import) and for the admin lists, each of which has its own Export and Import buttons.
How to run a group training session
- Before: print the sign-in sheet (who still needs this training) for wet signatures, and the QR badges for the people attending.
- During: deliver the session; pass the roll around for signatures.
- After: open Scan check-in, pick the course and date, scan each badge, then press Mark complete.
- Scan the signed sheet and attach it to the records as an attendance sheet.
- If the course needs competency, assess each person individually afterwards.
Tip: If the session was scheduled on the Calendar, the shape is shorter: print the sign-in sheet from the session page (the roster is already filled in from the bookings), deliver the class, then click Record attendance once. It completes every attendee's assignment, stamps the hours and marks the rest absent. See Training Calendar & Session Booking.
How to assess competency
- Open the person's completed record for that course.
- Press Record assessment and pick the outcome that matches what you saw. Use What do these mean? if you're unsure.
- For conditions, write the restriction. For needs improvement, tick the topics that need work. For exempt, give the reason and who approved it.
- Tick any follow-up actions, and set a reassessment date if one is needed.
- Attach the sign-off sheet as competency evidence.
How to get ready for an audit
- Reports → Competency Status, switch to Trained but not qualified. Close those gaps first — they are the ones an auditor finds.
- Switch to Reassessment scheduled and clear anything overdue.
- Reports → Missing Mandatory Training and Expiring Certificates for the training side.
- Open the Training Matrix, set the filters you want to evidence, and use the Qualification view. Print it — the printout states which view and filters produced it.
- Print an Employee Transcript for anyone the auditor picks; it carries training, competency and qualification together with a signature block.
How to find anything quickly
Press ⌘K (or Ctrl+K) and type what you're after — a person, a course, or the thing you want to do. Words like competency, categories, positions, alerts or email jump straight to the page that does it. You only ever see destinations your role can actually open.
Part 8 Function Reference
Functions: Workspace Setup & Organization
This area covers everything you do once, at the start: naming and configuring your workspace, applying your branding, and building the organizational taxonomies (divisions, locations, departments, positions, course categories, task types, training providers, custom fields) that every employee record, course and report will reference. You will return here occasionally to add a site, a job title or a provider, but the bulk of this work happens before you import employees and courses.
In this section: Recommended setup order · Configure organization settings · Set the email log retention window · Upload the organization logo · Set the accent colour · Create a location · Create a division · Create a department · Create a position and declare its required training · Create a course category · Create a task type · Add a training provider · Export, import and template for admin lists · Define custom employee fields · Create or edit an employment type
Recommended setup order
Sets up a new workspace in the order that avoids rework: each list is referenced by the ones that come after it, so building them top-down means every dropdown is already populated when you need it.
Where: Sidebar → Administration (under the Organization group) → the pill navigation across the top: Overview · Users · Roles & Permissions · Divisions · Locations · Departments · Positions · Employment types · Categories · Task types · Training providers · Custom fields · Audit log · Integrations · Alerts · Email log · Settings · Billing · Before you start: A role with organization-management access (the Administration entry only appears in the sidebar for such roles).
- Open Sidebar → Administration → Settings and set the organization name, timezone and due-soon window (see "Configure organization settings").
- On the same page, upload your logo and pick an accent colour (see "Upload the organization logo" and "Set the accent colour").
- Click Locations in the pill navigation and create each site (see "Create a location").
- If you operate regions, click Divisions, create them, then edit each location and set its "Division (optional)" — divisions are an optional layer and can be skipped.
- Click Departments and create departments, scoping each to a location where relevant (departments are also created automatically during employee CSV import, so this can be partial).
- Click Positions and add job titles; add "Required training" per position once courses exist.
- Click Categories and Task types and set up the two course groupings with colours and sort order.
- Click Training providers and add the external trainers, colleges and certification bodies you use.
- Click Custom fields and define any employee fields unique to your operation (badge numbers, union locals).
- Only now create courses (Sidebar → Courses) and import employees (Sidebar → Employees) — their forms will offer everything you just built. On success, every picker in the course and employee forms shows your own taxonomy instead of empty dropdowns.
Good to know:
- Divisions are optional; single-site organizations can ignore them entirely.
- Departments can be created implicitly by the employee CSV importer, so a complete department list is not a prerequisite for importing employees.
- Position "Required training" references courses, so that one sub-step waits until the course catalog exists.
- Deleting several entries at once (Administrator only): on Divisions, Locations, Departments, Positions, Employment types, Categories, Task types and Training providers, tick the rows (the header checkbox is "Select all <list>", each row "Select <name>"), then click "Delete N" in the selection bar ("N selected" · "Delete N" · "Clear selection"). The dialog "Delete N <entries>?" warns "This permanently deletes N <entries>. It cannot be undone.", checks every row ("Checking the selection…") and, if any is still in use, lists it as "N <entries> cannot be deleted:" with "<name>: <reason>" per row and the note "Remove the blocked <entry> from your selection to continue." (or "Remove the N blocked <entries> …"); the delete button stays disabled until you untick those rows. When every row can go, type your password under "Enter your password to confirm" (a Microsoft sign-in with no password sees "Type DELETE to confirm" instead) and click "Delete N <entries>". A wrong password shows "That password is not correct." and deletes nothing. Success: toast "Deleted N <entries>" and one audit entry per deleted row, exactly as the trash icon writes. The reason text for each list is given under that list below.
Configure organization settings
Sets the three workspace-wide basics: the organization name shown to your team and auditors, the timezone all scheduling runs on, and how many days before a due date an assignment turns amber "Due soon".
Where: Sidebar → Administration → Settings pill → "General" card (page title "Organization settings") · Before you start: Organization-management access; users without it are redirected to the dashboard.
| Option | What it does |
|---|---|
| Organization name | Shown in the app header and on printed reports for auditors; required, up to 120 characters. |
| Due-soon window (days) | Assignments due within this many days show as amber "Due soon" everywhere (matrix, lists, dashboard); must be 1–90, default 7. |
| Timezone | Used for reminder scheduling and the weekly supervisor summary; default America/Toronto. Individual locations can override it (see Create a location). |
- In the sidebar, click Administration.
- Click the Settings pill in the admin navigation. The page "Organization settings" opens.
- In the "General" card, edit "Organization name".
- Set "Due-soon window (days)" — a number from 1 to 90.
- Pick a "Timezone" from the dropdown (North American zones plus UTC).
- Click "Save settings". Success shows the toast "Organization settings saved." and the note under the card title reminds you the change applies to everyone in the organization.
Good to know:
- The "Save settings" button stays disabled until something actually changes.
- An out-of-range due-soon value is rejected client-side with "Due-soon window must be between 1 and 90 days."
- The right-hand "Plan" card on this page shows the current plan, trial end date and days remaining; the "Manage plan & billing" link appears only for users with billing access.
- The "Notifications" card here is a pointer only — alert schedules and recipients are configured on the Alerts page.
Set the email log retention window
Chooses how long the record of every email TrainGrid sends (invitations, alerts, digests) is kept in Administration → Email log before automatic purging.
Where: Sidebar → Administration → Settings pill → "Scheduled compliance report" card → the "Keep email log for" dropdown below the divider · Before you start: Organization-management access.
| Option | What it does |
|---|---|
| Keep email log for | Retention window for email-log entries: 30 / 60 / 90 / 180 days; default 90. Older entries are removed automatically by a daily purge. |
- Open Administration → Settings.
- Scroll to the "Scheduled compliance report" card and find the "Keep email log for" dropdown beneath the divider.
- Pick 30, 60, 90 or 180 days. There is no Save button — the choice saves immediately, and success shows a toast like "Email log kept for 90 days."
Good to know:
- Retention affects only the log, not delivery — emails still send regardless of the setting.
- A failed save reverts the dropdown to the last confirmed value, so the UI never claims a window that wasn't stored.
Upload the organization logo
Puts your company mark in the app sidebar and header and on printed reports and sign-in sheets — your brand in front of your team and auditors.
Where: Sidebar → Administration → Settings pill → "Branding" card · Before you start: Organization-management access; a PNG, JPG or WEBP file up to 2 MB.
| Option | What it does |
|---|---|
| Upload logo / Replace logo | Sets or swaps the logo; accepts PNG, JPG or WEBP up to 2 MB, displayed at roughly 48 px tall on reports. No logo by default — the TrainGrid mark is used instead. |
| Remove | Opens the "Remove report logo?" confirmation; confirming with "Remove logo" reverts printed reports to showing just the organization name. |
- Open Administration → Settings and scroll to the "Branding" card.
- Click "Upload logo" (reads "Replace logo" if one is already set) and choose your file.
- Wait for the preview tile to update. Success shows the toast "Logo updated. It now appears across the app and on reports." and the sidebar immediately shows your mark with the organization name.
Good to know:
- A wrong file type shows "Logo must be a PNG, JPG or WEBP image."; an oversized file names its size and the 2 MB maximum.
- One canonical logo file is kept per organization — replacing overwrites it, so old logo files never accumulate against your storage quota.
- The logo also appears on every email TrainGrid sends (digests, invitations).
Set the accent colour
Tints buttons, links and highlights across the whole workspace with your brand colour, with a live preview before you commit.
Where: Sidebar → Administration → Settings pill → "Accent colour" card · Before you start: Organization-management access.
| Option | What it does |
|---|---|
| Preset swatches | One-click brand colours; the selected swatch shows a check mark. |
| Custom colour | A native colour picker plus a hex text input; invalid hex text outlines the field red and blocks saving with "Enter a valid hex colour like #4f46e5." |
| Use default | Returns to TrainGrid's default indigo (#4f46e5); saving after this shows "Reset to the default accent." |
| Save accent | Commits the previewed colour for all users; disabled until the selection differs from what is saved. |
- Open Administration → Settings and scroll to the "Accent colour" card.
- Click one of the preset swatches, or use the "Custom colour" picker / type a hex value like #4f46e5 into the text box.
- Watch the whole page re-tint instantly — this is a preview only.
- Click "Save accent". Success shows the toast "Accent colour updated." and the colour now applies for everyone in the organization.
Good to know:
- Navigating away without saving reverts the preview — a stale tint is never left behind.
- Text contrast on tinted elements is computed automatically from the colour you pick.
Create a location
Adds a site (plant, warehouse, office) that employees are assigned to and users can be scoped to. Each location can carry its own timezone for reminder scheduling and can be grouped under a division.
Where: Sidebar → Administration → Locations pill → "New location" button (top right of the list) · Before you start: Organization-management access. Create divisions first if you want to group sites (optional).
| Option | What it does |
|---|---|
| Name | Required site name shown in every location picker and filter. |
| Address (optional) | Free-text address shown in the Locations table. |
| Division (optional) | Groups this site under a division; defaults to "No division". Inactive divisions remain selectable on a location that already uses them, marked "(inactive)". |
| Timezone | Defaults to "Same as organization"; a site-specific zone changes only which local day this site's reminder emails fire on. |
| Active (table switch) | Toggling off hides the location from pickers while keeping all history; the table shows an "Inactive" badge. |
- Open Administration → Locations.
- Click "New location". The "New location" dialog opens.
- Enter a "Name" (e.g. Main Plant).
- Optionally fill "Address (optional)" (street, city, province).
- Optionally pick a "Division (optional)" — defaults to "No division".
- Leave "Timezone" as "Same as organization (…)" unless this site is in a different zone, in which case pick one.
- Click "Create location". Success shows the toast "<name> created." and the site appears in the table with columns Name · Division · Address · Timezone · Employees · Active.
Good to know:
- When divisions exist, the table groups locations under their division (ungrouped sites sink to the bottom); a location whose Timezone column reads "Same as organization" inherits the org zone.
- Delete (trash icon) is blocked while employees or departments reference the location: the dialog "<name> is in use" states the counts and offers "Deactivate" instead. Only an unreferenced location can be permanently deleted via "Delete location".
- Several at once: tick rows (header checkbox "Select all locations"), click "Delete N", confirm in "Delete N locations?" (see "Recommended setup order" for the dialog). A location still in use is listed as "<name>" is referenced by N employee(s) and N department(s). Deactivate it instead to keep history intact. (or, when it is the only location left on a course's location restriction, This location is the only location restriction for one or more courses. Update those courses first, or deactivate the location.) and blocks the whole delete until it is unticked.
- Editing (pencil icon) opens the same dialog titled "Edit <name>" with "Save changes".
Create a division
Adds an optional layer above locations — group sites into regions (e.g. "West Region") so a user can be scoped to a whole division at once.
Where: Sidebar → Administration → Divisions pill → "New division" button · Before you start: Organization-management access. Entirely optional — skip for single-region organizations.
| Option | What it does |
|---|---|
| Name | Required division name. |
| Short form (optional) | A code of up to 10 letters, numbers and dashes (e.g. MLT for Milton Plant), stored in capitals and unique within your organization. The employee import offers it as a prefix for employee numbers (MLT + 1234 = MLT1234); see "Preparing your employee import file". Leave blank if you don't need one. |
| Active (table switch) | Toggling off hides the division from pickers (and from the import's prefix list) while keeping history; an "Inactive" badge shows in the table. The switch changes only the active state — the name and short form are kept. |
- Open Administration → Divisions.
- Click "New division".
- Enter a "Name" (e.g. West Region) and, if you want an employee-number prefix, a "Short form" (e.g. WEST). The field shows capitals as you type.
- Click "Create division". Success shows the toast "<name> created." and the division appears in the table with columns Name · Short form · Locations · Active.
- Attach sites to it by editing each location and setting its "Division (optional)" field.
Good to know:
- A division with locations cannot be deleted: the dialog "<name> is in use" tells you to move the locations to another division (or "No division") first, or offers "Deactivate". An empty division deletes permanently via "Delete division".
- Several at once: tick rows (header checkbox "Select all divisions"), click "Delete N", confirm in "Delete N divisions?". A division that still groups sites is listed as "<name>" groups N location(s). Move them to another division (or "No division") first, or deactivate this one to keep it out of pickers. and blocks the whole delete until it is unticked.
- The Locations column counts how many sites belong to each division.
- Short forms must be unique: saving one that another division already uses shows "A division with this short form already exists." Export, Template and Import on this page carry the short form as a
short_formcolumn; an import skips rows whose name or short form already exists and rejects the whole file if a short form is not valid; it never changes an existing division, so a short form typed into the file for a division you already have is not applied (set it on the division's own row).
Create a department
Adds a department that appears on employee records, the training matrix and compliance reports. A department can be tied to one location or span all of them.
Where: Sidebar → Administration → Departments pill → "New department" button · Before you start: Organization-management access. Create locations first if you want site-scoped departments.
| Option | What it does |
|---|---|
| Name | Required department name. |
| Location | Scopes the department to one site; default "All locations" leaves it unscoped. Only active locations are offered (plus the department's current one when editing). |
| Active (table switch) | Toggling off hides the department from pickers while keeping history. |
- Open Administration → Departments.
- Click "New department".
- Enter a "Name" (e.g. Sanitation).
- Pick a "Location" — defaults to "All locations", meaning the department isn't tied to a single site.
- Click "Create department". Success shows the toast "<name> created." and the department appears in the table with columns Name · Location · Employees · Active.
Good to know:
- Departments are also created automatically during employee CSV import, so the list can grow without visiting this page.
- A department with employees cannot be deleted — the "is in use" dialog offers "Deactivate" instead; an empty one deletes permanently via "Delete department".
- Several at once: tick rows (header checkbox "Select all departments"), click "Delete N", confirm in "Delete N departments?". A department with people is listed as "<name>" is referenced by N employee(s). Deactivate it instead to keep history intact. and blocks the whole delete until it is unticked.
Create a position and declare its required training
Adds job titles employees can hold, and — per position — declares which courses that role requires. The requirements drive the Workforce Competency report, which buckets every employee in the role by whether they meet them.
Where: Sidebar → Administration → Positions pill → "New position" button; requirements live in each row's "Required training" column · Before you start: Organization-management access. Courses must exist before requirements can be added (the picker lists the active course catalog).
| Option | What it does |
|---|---|
| Name | Required job title; renaming updates employee records automatically. |
| Required training (Add / ×) | Course requirements for the role; courses whose assessments are competency-required carry a small "competency" tag on their badge. Empty by default. |
| Active (table switch) | Toggling off hides the position from pickers while keeping history. |
- Open Administration → Positions.
- Click "New position", enter a "Name" (e.g. Machine Operator), and click "Create position". Success shows the toast "<name> created."
- In the new row's "Required training" column (reads "No requirements" at first), click "Add".
- In the "Choose a course" dropdown, pick a course (pickers read "CODE — Title") and click "Add". Success shows the toast "Requirement added." and a course-code badge appears in the column.
- Repeat for each required course; click the × on a badge to remove one (toast "Requirement removed.").
- Verify the result under Sidebar → Reports → "Workforce Competency", which checks every employee in the role against these requirements.
Good to know:
- Requirements are stored against the course family, so activating a new course version never drops what the role requires.
- In the Workforce Competency report a waived required course counts as met — a documented waiver is a decision, not a gap.
- A position held by employees cannot be deleted — the "is in use" dialog offers "Deactivate"; an empty one deletes permanently via "Delete position".
- Several at once: tick rows (header checkbox "Select all positions"), click "Delete N", confirm in "Delete N positions?". A position someone holds is listed as "<name>" is referenced by N employee(s). Deactivate it instead to keep history intact. and blocks the whole delete until it is unticked.
Create a course category
Adds a colour-coded category (e.g. Safety, Quality, GMP) that groups courses across the catalog, matrix and dashboard.
Where: Sidebar → Administration → Categories pill → "New category" button · Before you start: Organization-management access.
| Option | What it does |
|---|---|
| Name | Required category name. |
| Color | One of eight preset swatches used to colour-code courses everywhere in the app; defaults to Red (the first preset). |
| Sort order | Non-negative number (0–999) controlling ordering in category lists; defaults to one past the current highest. |
- Open Administration → Categories.
- Click "New category".
- Enter a "Name" (e.g. Food Safety).
- Click a "Color" swatch — eight presets: Red, Blue, Purple, Teal, Amber, Green, Pink, Gray.
- Adjust "Sort order" if needed (pre-filled with the next number; lower numbers appear first in category lists).
- Click "Create category". Success shows the toast "<name> created." and the row appears with columns Order · Name · Color · Courses.
Good to know:
- A category used by courses cannot be deleted — the "is in use" dialog offers "Rename" (or move the courses first); an unused one deletes permanently via "Delete category".
- Several at once: tick rows (header checkbox "Select all categories"), click "Delete N", confirm in "Delete N categories?". A category in use is listed as "<name>" is used by N course(s) and can't be deleted. Rename it instead, or move those courses to another category first. and blocks the whole delete until it is unticked.
- Categories and Task types are deliberately distinct groupings: categories are subject areas, task types are training methods.
Create a task type
Adds a colour-coded task type (e.g. Toolbox Talk, Practical, Assessment) that organizes courses by training method or subject — a second axis, distinct from categories.
Where: Sidebar → Administration → Task types pill → "New task type" button · Before you start: Organization-management access.
| Option | What it does |
|---|---|
| Name | Required task type name. |
| Color | One of eight preset swatches (Red, Blue, Purple, Teal, Amber, Green, Pink, Gray); defaults to Red. |
| Sort order | Non-negative number (0–999); lower numbers appear first in task type lists; defaults to one past the current highest. |
- Open Administration → Task types.
- Click "New task type".
- Enter a "Name" (e.g. Toolbox Talk).
- Click a "Color" swatch (same eight presets as categories).
- Adjust "Sort order" if needed.
- Click "Create task type". Success shows the toast "<name> created." and the row appears with columns Order · Name · Color · Courses.
Good to know:
- A task type used by courses cannot be deleted — the "is in use" dialog offers "Rename" or asks you to move the courses first; an unused one deletes permanently via "Delete task type".
- Several at once: tick rows (header checkbox "Select all task types"), click "Delete N", confirm in "Delete N task types?". A task type in use is listed as "<name>" is used by N course(s) and can't be deleted. Rename it instead, or move those courses to another task type first. and blocks the whole delete until it is unticked.
- Task types also power the task-type filter in the training list (e.g. filtering to toolbox talks).
Add a training provider
Builds the directory of external trainers, colleges and certification bodies, so external training records can name who delivered them. The Records column shows how many training records reference each provider.
Where: Sidebar → Administration → Training providers pill → "New provider" button · Before you start: Organization-management access.
| Option | What it does |
|---|---|
| Name | Required provider name shown in the Provider picker on training records. |
| Type | Free-text classification (e.g. Certification body); optional. |
| Contact | Free-text contact person/details; optional. |
| Website | Optional URL; rendered as a clickable link in the table when it parses as an http(s) address. |
| Active | Available when editing (and as the table switch): inactive providers stay on existing records but are hidden from pickers. New providers start active. |
- Open Administration → Training providers.
- Click "New provider". The "New training provider" dialog opens.
- Enter a "Name" (e.g. Ontario Safety Council) — the only required field.
- Optionally fill "Type" (free text — training company, college, certification body), "Contact" and "Website".
- Click "Create provider". Success shows the toast "<name> created."; new providers start active and immediately appear in the record-level Provider picker. The table shows Name · Type · Contact · Website · Records · Active.
Good to know:
- Deactivating never strips a provider from history — records that already name it keep displaying it.
- A provider named by training records cannot be deleted — the "is in use" dialog states the record count and offers "Deactivate"; an unreferenced one deletes permanently via "Delete provider".
- Several at once: tick rows (header checkbox "Select all training providers"), click "Delete N", confirm in "Delete N training providers?". A provider named by records is listed as "<name>" is referenced by N training record(s). Deactivate it instead to keep history intact. and blocks the whole delete until it is unticked.
Export, import and template for admin lists
Every admin list (Divisions, Locations, Departments, Positions, Employment types, Course categories, Task types, Training providers) has Export / Template / Import buttons in the page header, so a taxonomy can be moved between workspaces or bulk-loaded from a spreadsheet. Import is deliberately additive-only: it can never rename or delete what you already have.
Where: Sidebar → Administration → any of the eight list pills → "Export", "Template" and "Import" buttons beside the page title · Before you start: Import requires the Import CSV capability (Administrator by default; an Administrator can turn it on for Managers in Roles & Permissions) together with organization-management access; Export requires the export-data capability. A CSV with a "name" header column (exactly what Export and Template produce).
| Option | What it does |
|---|---|
| Export | Downloads the list as CSV including every extra column (e.g. providers: contact, website, provider_type, active; locations: address, timezone, active; categories/task types: color, sort; employment types: code, active, is_default, sort). Shows an info toast when the list is empty. |
| Template | Downloads a starter CSV with the header row and one example row for that list's accepted columns. |
| Import | Insert-only CSV upload, deduplicated by name (case-insensitive header matching); always preceded by the "Import N entries?" confirmation dialog. |
- Open the list you want to fill (e.g. Administration → Locations).
- Click "Template" to download a ready-made CSV: a header row plus one example row covering every accepted column for that list.
- Fill the CSV — one row per entry; only the name column is mandatory.
- Click "Import" and choose your file.
- Read the confirmation dialog "Import N entries?" — it names the file, previews up to 12 names, and states: names that already exist are skipped; this only adds entries, never renames or deletes, and there is no bulk undo.
- Click "Import" in the dialog. Success shows a toast like "5 added, 2 already existed." (or "Everything in that file already exists.") and the list refreshes.
- To back up or move a list, click "Export" — it downloads a CSV with full-field parity (a provider's contact/website/type survives the round trip).
Good to know:
- A file without a "name" column is rejected with an error naming the columns it did find — export first to see the expected format.
- Optional cells are forgiving: an unrecognized colour, sort or boolean value is simply dropped, never a reason to reject the row. A bad or missing location timezone is dropped and the site uses the organization default.
- Boolean columns accept true/yes/1/active and false/no/0/inactive; colours must be 6-digit hex like #4f7fd9; text extras are capped (e.g. 300 characters).
- Department exports include the location as a readable name for context only — importing does not resolve it, so an imported department lands unscoped ("All locations"). Location exports treat the division name the same way.
- An accidental import is cleaned up with the Administrator-only bulk delete (tick the rows, "Delete N", confirm with your password; see "Recommended setup order"); entries that are already referenced are listed with the reason and stay — hence the confirmation dialog before importing.
Define custom employee fields
Adds up to 20 organization-specific fields (badge numbers, union locals, contractor status) that appear on every employee's profile and in employee import and export.
Where: Sidebar → Administration → Custom fields pill (page title "Custom fields") → "Add a field" panel · Before you start: Organization-management access.
| Option | What it does |
|---|---|
| Label | The field name shown on employee profiles; required, up to 40 characters. |
| Type | Text, Number, Date or Dropdown; the type is fixed once created (editing offers only label and, for Dropdown, options). |
| Options (one per line) | Dropdown choices; shown only when Type is Dropdown, editable later via Edit. |
- Open Administration → Custom fields.
- In the "Add a field" panel, enter a "Label" (e.g. Badge number, up to 40 characters).
- Pick a "Type": Text, Number, Date or Dropdown.
- If you chose Dropdown, fill "Options (one per line)" (e.g. Full-time / Part-time / Contractor).
- Click "Add field". Success shows the toast "Custom field added." and the field is listed above with a type badge — it now appears on every employee profile, import and export.
Good to know:
- Maximum 20 custom fields; at the limit the add panel says so and asks you to remove one first.
- Existing fields can be edited inline ("Edit" → change the label or dropdown options → "Save") or removed via the trash button.
- Removing a field asks "Remove \"<label>\"?" and warns: values already saved on employees are kept but no longer shown — deletion hides data, it does not destroy it.
Create or edit an employment type
Maintains the list of employment types an employee can be classified as. Every workspace starts with "Internal" (the default) and "External (agency / contract)"; add your own — Hourly, Salary, Seasonal, Co-op — and the new type appears at once in the employee form's "Employment type" dropdown, the roster's "All employment types" filter, the CSV import and the employee export.
Where: Sidebar → Administration → Employment types pill → "Add employment type" button (opens the "Add employment type" dialog) · Before you start: Organization-management access.
| Option | What it does |
|---|---|
| Name | The label shown on the employee form, profile, roster and exports; required, up to 60 characters, unique within the organization. A short code is derived from the name when the type is created (e.g. Hourly → hourly) and never changes afterwards — it is the value the CSV importer accepts and the API returns, so a later rename changes the label everywhere without touching stored data. |
| Code | Read-only. Previews the code the name will produce while you type; shown unchanged in the Edit dialog. |
| Sort order | Whole number, 0 or more; lower numbers appear first in the employee form's dropdown and the roster filter. Pre-filled with the next free number, so leave it unless you want the type higher in the list. |
| Make default | Marks the type new employees start with and that a blank Employment type resolves to in a CSV import or a BambooHR sync. Exactly one type is the default at a time; making another type the default clears the previous one. The default must be active and cannot be deactivated or deleted. |
| Active (switch) | The switch in the row's Active column. Turn it off to hide the type from the employee form's choices while employees already classified with it keep displaying it; the roster filter still offers it so those employees stay findable. Turn it back on to reactivate. The switch is disabled on the default type. |
| Delete | The trash button at the end of the row removes an unused type permanently after you confirm "Delete employment type". A type set on any employee (active or archived) cannot be deleted — the button is disabled and the reason shows on hover — so reassign those employees first or turn the type off instead. The default type cannot be deleted either. |
- Open Administration → Employment types. The table lists each type with its Name · Code · Status · Default · Sort · Employees · Active, with a pencil (Edit) and a trash (Delete) button at the end of each row.
- Click "Add employment type". The "Add employment type" dialog opens.
- Enter a "Name" (e.g. Hourly). The "Code" field is read-only and previews the code derived from the name (Hourly → hourly); it never changes afterwards. "Sort order" is pre-filled with the next number; change it only if you want the type higher in the list. Click "Create employment type". The toast reads "\"Hourly\" created." and the new type appears in the table, active and not the default.
- To rename a type or change its sort order, click the pencil button on its row (labelled "Edit <name>"). The "Edit <name>" dialog shows the code read-only; change the "Name" and/or "Sort order" and click "Save changes". The code stays as it was, and every employee carrying that type shows the new name immediately.
- To change which type new employees start with, click "Make default" in the Default column of an active type's row.
- To retire a type without losing history, turn off the switch in its row's Active column (it is disabled on the default type); turn it on again to reactivate. To remove an unused type, click the trash button at the end of its row, then "Delete employment type" in the confirmation. The trash button is disabled, with the reason on hover, while the type is the default or any employee record uses it.
- To remove several unused types at once, tick their rows (header checkbox "Select all employment types"), click "Delete N" in the selection bar and confirm in the "Delete N employment types?" dialog with your password (or the word DELETE; see "Recommended setup order"). The default type is listed as "<name>" is the default employment type and can't be deleted. Make another type the default first. and a type in use as "<name>" is set on N employee record(s). Deactivate it instead, or move those employees to another type first. (archived employees count too); nothing is deleted until those rows are unticked. The default type's checkbox is disabled (labelled "<name> is the default employment type and can't be selected for deletion") and the header checkbox skips it.
Good to know:
- A type that is deactivated after being set on an employee still shows on that employee's profile and roster row, and that employee's edit form keeps it selectable so an unrelated edit never silently reclassifies them.
- The CSV importer matches the Employment type column by name or code, ignoring case; a blank cell takes the default type; the legacy spellings agency, contract, contractor, temp, temporary, third party and supplier still resolve to External while that type exists; anything else is flagged with the list of accepted names (see "Import employees from a spreadsheet").
- Export / Template / Import work on this list exactly as on the other admin lists (see "Export, import and template for admin lists"); an imported row's code is derived from its name, and an import never creates a second default.
- Renaming the seeded "Internal" or "External (agency / contract)" is allowed — the codes internal and external keep working for existing imports and API consumers.
Functions: Users, Roles & Permissions
This area covers everyone who signs in to run TrainGrid — inviting staff users, deciding what each role is allowed to do, tailoring permissions with toggles and custom roles, and the two administrative records that prove what happened: the Audit log and the Email log. Use it when you onboard a teammate, restrict or expand what a role can do, or need an immutable trail for an auditor. All of it lives in the sidebar under Organization → Administration, spread across the Users, Roles & Permissions, Audit log and Email log pills of the admin navigation.
In this section: Invite a user · The five built-in roles · Turn a capability off for a built-in role · Create a custom role · Edit a user (role, locations, name, sign-in email) · Manage pending invitations (copy link, resend, revoke) · Deactivate or reactivate a user's login · Remove a user · Transfer ownership · Send a password reset · Employee portal access roster · View and export the audit log · View the email log
Invite a user
Creates a personal invite link that lets a teammate create an account (or sign in) and join your organization with a chosen role and, optionally, a limited set of locations they can see.
Where: Sidebar → Administration → Users → "Invite user" button (top right of the page header) · Before you start: Administrator or Manager (the Users page requires the manage-members permission). The Administrator role itself cannot be granted at invite time — invite the person at a lower role, then promote them via Edit user.
| Option | What it does |
|---|---|
| The address the invitation is for; required. The account they create or sign in with must use this address. | |
| Role | The role they will join as: Manager, Training Coordinator (default), Supervisor, or Viewer (auditor). Administrator is deliberately not offered at invite time. |
| Location scope (optional) | Checkboxes, one per active location. Leave all unchecked (default) for access to all locations; check some to restrict the user to only those locations' employees, assignments and reports. |
- In the sidebar, open "Administration", then click the "Users" pill.
- Click "Invite user". A dialog titled "Invite a user" opens; it explains: "Creates an invite link you can send them. It expires in 7 days."
- Type the person's address in "Email".
- Open the "Role" dropdown and pick one of: Manager, Training Coordinator, Supervisor, Viewer (auditor). The default is Training Coordinator, and a one-line description of the selected role appears under the dropdown.
- Optionally, under "Location scope (optional)", tick the locations they should be limited to. The helper text confirms your choice: "No locations checked — they'll see all locations." or "They'll only see N location(s)."
- Click "Create invite".
- The dialog switches to "Invitation ready" and shows the personal link. Click the copy button ("Copy invite link") and send the link to the person yourself — the invitation email is also sent automatically where email is configured.
- Click "Done" (or "Invite another" to send more). Success: the invitation now appears in the "Pending invitations" section of the Users page, showing its role, location scope and "Expires" date.
Good to know:
- Every invite link expires in 7 days. After that the "Pending invitations" row shows an "Expired" badge and the link stops working — use "Resend" to issue a fresh one.
- The person sets their own name and password on the invite-accept page; no password is ever assigned or emailed.
- Invitations count toward the plan's seat limit alongside active users.
- Invitation creation and acceptance are recorded in the Audit log (actions "Invite" and "Invite accepted").
The five built-in roles
TrainGrid ships five fixed role tiers that act as the security floor — every permission decision starts from one of them, and the tiers are enforced in the database, not just the interface.
Where: Sidebar → Administration → Roles & Permissions (page title "Roles & Permissions") — the "Built-in roles" grid shows exactly what each role holds
| Option | What it does |
|---|---|
| Administrator | "Full control, including billing and organization ownership." Holds every capability, including the three Administrator-only deletes (employees, courses, records) and Billing. Cannot be restricted. |
| Manager | "Manages the whole workspace — everything except billing." Manages users, organization settings, employees, courses, assignments, completions, competency, email, exports, audit log and email log. Cannot permanently delete employees, courses or records. |
| Training Coordinator | "Manage employees, courses, assignments, completions and reports." Also imports/archives employees, imports courses, assesses competency, emails employees, exports data and views the audit log. No user management, no email log, no deletes. |
| Supervisor | "View and record training completions for their assigned location(s)." Records completions, assesses competency and exports data — typically combined with a location scope. |
| Viewer (auditor) | "Read-only access for audits and inspections." Can export data and view the audit log; changes nothing. |
- In the sidebar, open "Administration" and click the "Roles & Permissions" pill.
- Scroll to the "Built-in roles" grid. Columns are: Capability, Administrator (with a lock icon — always full, never editable), Manager, Training Coordinator, Supervisor, Viewer (auditor).
- Read a row: a switch means the role holds that capability (and you may turn it off); a dash means the role never has it. Success: you can see, per role, exactly which of the 15 capabilities it carries.
Good to know:
- Governance permissions are fixed and never configurable, to prevent lockout: managing the organization and users = Administrator + Manager; billing = Administrator only; reports are visible to every role.
- Permanent deletes (employees, courses, records) are Administrator-only by design — the grid shows them as dashes for every other role, so no toggle can grant them.
- An organization can have multiple Administrators, but it can never lose its last active one — the database blocks removing, demoting or deactivating the only remaining Administrator.
- In this product, "Administrator" is the ownership tier and "Manager" is the admin tier — the words on screen are always Administrator and Manager.
Turn a capability off for a built-in role
Restricts what a built-in role can do organization-wide — for example, making Training Coordinators read-only or hiding the email log from Managers. Toggles can only restrict within a role's tier, never grant beyond it.
Where: Sidebar → Administration → Roles & Permissions → "Built-in roles" grid · Before you start: Administrator or Manager (manage-organization permission).
| Option | What it does |
|---|---|
| Manage employees | Add and edit employee records. Default on for Manager and Training Coordinator. |
| Archive employees | Archive and restore employees (needs Manage employees). Default on for Manager and Training Coordinator. |
| Delete employees | Permanently delete employees with no training records (needs Manage employees). Administrator only — a dash for every other role. |
| Manage courses | Create and edit the course catalog. Default on for Manager and Training Coordinator. |
| Delete courses | Permanently delete courses (needs Manage courses). Administrator only. |
| Import CSV | Bulk-import employees, courses and the administration lists from CSV files (also needs the matching Manage capability). Off for every role except the Administrator; only an Administrator can switch it on, for Manager and Training Coordinator, and a Manager can switch it back off but never on. |
| Assign & schedule | Assign training, waive and reschedule. Default on for Manager and Training Coordinator. |
| Record completions | Mark training complete (bulk and per-cell). Default on for Manager, Training Coordinator and Supervisor. |
| Assess competency | Record competency assessment outcomes on completed training (needs Record completions). Default on for Manager, Training Coordinator and Supervisor. |
| Delete records | Permanently delete assignment records. Administrator only. |
| Email employees | Send ad-hoc email messages to selected employees. Default on for Manager and Training Coordinator. |
| Export CSV | Download CSV files. Default on for every role. |
| Print reports, the training matrix, sign-in sheets, transcripts and QR badges. Default on for every role; a role without it sees no Print buttons and the print pages redirect. A role without Print still files a signed sign-in sheet from the course's Materials tab, and still records attendance from Record Completion. | |
| View audit log | See the immutable change history. Default on for Manager, Training Coordinator and Viewer (auditor). |
| View email log | See the record of every email the organization has sent. Default on for Manager only (plus Administrator). |
- In the sidebar, open "Administration" and click the "Roles & Permissions" pill.
- In the "Built-in roles" grid, find the row for the capability (e.g. "Record completions") and the column for the role (e.g. Supervisor).
- Click the switch to turn it off. Repeat for any other role/capability pairs — nothing saves yet.
- Click "Save changes" (use "Reset" to discard unsaved edits). Success: the toast "Role permissions updated." appears, and every user holding that role immediately loses the capability — the related buttons and pages disappear for them, and the database refuses the underlying writes.
Good to know:
- Turning off a parent capability also disables its indented children: switching off Manage employees disables Import/Archive/Delete employees; Manage courses gates Import/Delete courses; Record completions gates Assess competency.
- The Administrator column is always fully on and shows a lock — it cannot be edited.
- The footer states the contract: "Toggles only restrict within a role — they can't grant access a role doesn't have. Enforced on the server, not just the interface."
- Restrictions apply to everyone holding the role, and also cap any custom role built on that base tier's users indirectly (a custom role reads its own restriction map, but the base tier remains the enforced ceiling).
Create a custom role
Builds a named, reusable role (e.g. "Shift Lead") based on one of the four non-Administrator tiers, with selected capabilities switched off. Use it when several people need the same tailored permission set without editing the built-in roles for everyone.
Where: Sidebar → Administration → Roles & Permissions → "New role" button (top of the page, above "Built-in roles") · Before you start: Administrator or Manager.
| Option | What it does |
|---|---|
| Role name | Display name shown on user rows and pickers; up to 60 characters; required. |
| Base tier | The built-in tier the role is capped by — Manager, Training Coordinator (default), Supervisor or Viewer (auditor). Cannot be changed after creation (it would alter the security of everyone already assigned the role). |
| Capabilities | One switch per capability the base tier holds, all on by default; "n/a" marks capabilities outside the tier. You can only switch OFF — a custom role never exceeds its base tier. |
- In the sidebar, open "Administration" and click the "Roles & Permissions" pill.
- Click "New role". A dialog titled "New custom role" opens: "Pick a base tier (its security ceiling) and switch off any capabilities this role shouldn't have."
- Type a "Role name" (e.g. "Shift Lead").
- Pick the "Base tier": Manager, Training Coordinator (default), Supervisor, or Viewer (auditor). The tier's description appears below the dropdown.
- Under "Capabilities", switch off anything this role should not have. Capabilities the base tier never holds show "n/a" instead of a switch — pick a higher tier if you need one of those.
- Click "Create role". Success: toast "Role \"<name>\" created." — the role now lists at the top of the Roles & Permissions page (showing "Based on <tier> · N capabilities restricted" or "· full tier access") and appears under "Custom roles" in every user's role picker.
Good to know:
- A custom role is restrictive only: its base tier is the enforced security ceiling, in the database as well as the interface.
- Administrator cannot be a base tier — it is reserved and always full.
- Editing a role later (pencil icon) can change its name and capability switches, but never its base tier.
- Deleting a role (trash icon → "Delete role") reverts everyone assigned to it to the default permissions of its base tier; this cannot be undone.
- Custom roles can also be selected as alert audiences under Administration → Alerts.
Edit a user (role, locations, name, sign-in email)
One dialog changes everything about a user: their role (built-in or custom), which locations they can see, and — for an Administrator — their display name and sign-in email. Nothing saves until you press Save changes.
Where: Sidebar → Administration → Users → "Edit" button on the user's row (also in the row's ⋯ menu as "Edit user") · Before you start: Administrator or Manager. Only an Administrator can grant/revoke the Administrator role or change a user's name and sign-in email. You cannot edit your own row.
| Option | What it does |
|---|---|
| Name | The user's display name (Administrator-only field; up to 120 characters). |
| Sign-in email | The address they log in with (Administrator-only). Takes effect immediately; their password is unchanged, and the previous address is notified of the change. |
| Role | Administrator, Manager, Training Coordinator, Supervisor, Viewer (auditor), or any custom role. The Administrator option is only grantable by an Administrator. |
| Location scope | Per-location checkboxes; unchecked everywhere = All locations. Scoped users only see employees, assignments and reports for the checked locations. |
| Quick-select a division | One button per division (with its location count) that checks/unchecks all of that division's locations at once; you can still fine-tune individual locations below. |
- In the sidebar, open "Administration" and click the "Users" pill.
- On the user's row, click "Edit". The dialog "Edit user — <name>" opens; everything in it is a draft.
- (Administrator only) Change "Name" and/or "Sign-in email". Changing the email shows: "They'll sign in with the new address from now on. Their password stays the same."
- Open the "Role" dropdown and pick a built-in role or, under the "Custom roles" group, a custom role.
- Under "Location scope", tick the locations they may see, or use the "Quick-select a division" buttons to check a whole division's locations at once. Leave everything unchecked for "All locations"; the line below confirms "Currently: all locations." or "Currently: N of M locations."
- Click "Save changes" (Cancel or the X discards the draft).
- If you are promoting someone to Administrator, a confirmation appears — "Make <name> an Administrator?" — click "Make Administrator" to proceed. Success: toast "<name>'s settings were saved." (with "— they are now <role>." when the role changed).
Good to know:
- You cannot change your own role — ask another Administrator or Manager.
- A Manager cannot edit an Administrator's role, nor grant the Administrator tier.
- Granting Administrator always shows a confirmation dialog, and the change is recorded in the audit log.
- A partial failure keeps the dialog open with your draft intact so the failed part can be corrected.
Manage pending invitations (copy link, resend, revoke)
The Pending invitations table tracks every invite that has not been accepted, so you can re-share a link, reissue an expired one, or cancel an invite that should never be used.
Where: Sidebar → Administration → Users → "Pending invitations" section (below the users table) · Before you start: Administrator or Manager.
- In the sidebar, open "Administration" and click the "Users" pill, then scroll to "Pending invitations".
- Read the row: Email, Role, Location scope, and "Expires" (an "Expired" badge appears once the 7 days have passed).
- To re-share a live invite: click "Copy link" — toast "Invite link copied to clipboard."
- To reissue an expired invite: click "Resend" — a fresh link is generated and copied; toast "New invite link for <email> copied."
- To cancel an invite: click the X on the row, then confirm "Revoke invitation" in the dialog ("The invite link they received will stop working immediately. You can always send a new one."). Success: toast "Invitation for <email> revoked." and the row disappears.
Good to know:
- "Copy link" shows only on unexpired invitations; "Resend" replaces it once the invite has expired.
- Accepted invitations leave this table automatically — the person appears in the users table above instead.
- Revoking is immediate and safe to redo — send a new invitation any time.
Deactivate or reactivate a user's login
Temporarily blocks a user from signing in — for a leave of absence or a departure under review — without deleting their role, location scope or history. Reactivation restores access instantly, with no re-invite.
Where: Sidebar → Administration → Users → ⋯ menu on the user's row → "Deactivate login" / "Reactivate login" · Before you start: Administrator or Manager. Only an Administrator can deactivate another Administrator; the last active Administrator can never be deactivated.
- In the sidebar, open "Administration" and click the "Users" pill.
- Click the ⋯ button on the user's row ("More actions for <name>").
- Choose "Deactivate login".
- In the dialog "Deactivate <name>'s login?" — "They will be signed out and can no longer access this organization, but their role, location scope and history are kept. You can reactivate them at any time — no re-invite needed. While deactivated, this email address can't start a workspace of its own; to free the address for good, remove the member instead." — click "Deactivate login".
- Success: toast "<name>'s login was deactivated." and a red "Deactivated" badge appears beside their name. To restore access later, open the same ⋯ menu and choose "Reactivate login" — toast "<name>'s login was reactivated."
Good to know:
- Deactivation signs the user out immediately; nothing about their record is lost.
- Reactivation is one click — no new invitation is required.
Remove a user
Permanently removes a user's membership from the organization. Their access ends immediately, but the training records they created are kept, and they can be invited again later.
Where: Sidebar → Administration → Users → ⋯ menu on the user's row → "Remove from organization" · Before you start: Administrator or Manager. Only an Administrator can remove another Administrator; the organization's only Administrator cannot be removed.
- In the sidebar, open "Administration" and click the "Users" pill.
- Click the ⋯ button on the user's row and choose "Remove from organization".
- In the dialog "Remove <name>?" — "They will immediately lose access to this organization. Training records they created are kept. You can invite them again later." — click "Remove user".
- Success: toast "<name> was removed from the organization." and the row disappears from the users table.
Good to know:
- This removes membership, not history — audit entries and training records created by the user remain, attributed to them.
- If they hold the only Administrator seat, promote someone else to Administrator first (the system refuses otherwise: "This member is the organization's only Administrator. Promote another member to Administrator first.").
- You cannot remove yourself — the ⋯ menu is hidden on your own row.
Transfer ownership
Hands your Administrator seat to another user in one step: they become an Administrator with full control (including billing) and you are demoted to Manager. Use when the primary account owner changes.
Where: Sidebar → Administration → Users → ⋯ menu on the target user's row → "Transfer ownership" · Before you start: Administrator only, on an active non-Administrator user.
- In the sidebar, open "Administration" and click the "Users" pill.
- Click the ⋯ button on the row of the person receiving ownership and choose "Transfer ownership".
- In the dialog "Transfer ownership to <name>?" — "<name> will become an Administrator with full control, and you will be demoted to Manager. Only an Administrator can transfer ownership back. This is recorded in the audit log." — click "Transfer ownership".
- Success: toast "<name> is now an Administrator. You are now a Manager." — your own row now shows Manager, theirs Administrator.
Good to know:
- The alternative to a full transfer is simply granting the Administrator role via Edit user — an organization can have several Administrators; Transfer ownership is the swap that also demotes you.
- The transfer is recorded in the audit log.
- The option is hidden for deactivated users and users who are already Administrators.
Send a password reset
Emails a user a password-reset link so they can regain access without you ever seeing or setting a password.
Where: Sidebar → Administration → Users → ⋯ menu on the user's row → "Send password reset" · Before you start: Administrator or Manager; the user must have a sign-in email on file.
- In the sidebar, open "Administration" and click the "Users" pill.
- Click the ⋯ button on the user's row and choose "Send password reset".
- Success: toast "Password reset email sent to <email>." — the user follows the emailed link to choose a new password.
Good to know:
- Passwords are never visible or assignable by an admin — reset links are the only recovery path.
Employee portal access roster
Shows every employee who has been invited to, or has activated, the employee portal: a login that shows only their own training record and lets them book a seat on scheduled sessions. Portal users are not staff users, so this roster is the only place that answers "who has registered?" at a glance.
Where: Sidebar → Administration → Users → "Employee portal access" section (below Pending invitations) · Before you start: Administrator or Manager to open the Users page; the Manage employees permission is additionally required to see pending/expired portal invitations (without it, only activated users are listed and a note explains why).
- In the sidebar, open "Administration" and click the "Users" pill.
- Scroll past "Pending invitations" to the "Employee portal access" heading. The note under it answers the password question: "Employees who have registered to view their own training record. Portal users set their own password when they activate their invitation — passwords are never stored in a viewable form."
- Read the table — columns Employee, Employee #, Email, Status, Invited. Status badges: "Active" (with "Activated <date>"), "Invited" (with "Expires <date>"), "Expired" (with "Expired <date>"). Rows sort active-first, most recent activity first.
- For a lapsed or pending invite, click "Re-invite" (expired) or "Manage invite" (invited) — either opens the employee's profile, where the "Invite to portal" action lives.
- Success: you can tell for any employee whether they are active on the portal, still invited, or need re-inviting — and jump straight to the profile to act.
Good to know:
- The roster is deliberately read-only: sending or re-sending a portal invitation happens on the employee's profile ("Invite to portal"), not here.
- Portal users never appear in the staff users table; they see only their own record, and the one thing they can change is their own seat on a scheduled session.
- No password is ever assigned: the invitation link takes the employee to a page where they choose their own password.
- Clicking an employee's name opens their profile.
View and export the audit log
The audit log is the immutable, append-only record of every change in the organization — who did what, to which record, when, with the before and after values. It is your evidence trail for audits and for answering "who changed this?".
Where: Sidebar → Administration → Audit log · Before you start: View audit log capability — by default Administrator, Manager, Training Coordinator and Viewer (auditor).
| Option | What it does |
|---|---|
| Action | Filter to one action: Create, Update, Delete, Archive, Unarchive, Complete, Supersede, Waive, Import, Invite, Invite accepted. Default "Any action". |
| Entity | Filter to one record type: API key, Assignment, Course, Course category, Course group, Custom field, Department, Division, Employee, HR connection, Invitation, Location, User, Organization, Position, Task type, Webhook. Default "Any entity". |
| From / To | Calendar-date bounds on when the change happened; either side optional. |
- In the sidebar, open "Administration" and click the "Audit log" pill. The header reads "Immutable record of every change in <organization>" with the total entry count.
- Narrow the list with the filter bar: pick an "Action", an "Entity", and/or a "From"/"To" date. The table updates immediately; "Clear filters" resets everything.
- Read the columns: Timestamp (org timezone), Actor, Action (colour-coded badge), Entity, Record (hover a record name to see its ID).
- Click any row (or its eye button, "View change detail") to open the detail dialog — it names the actor, exact timestamp and record, and shows the before/after values of the change.
- To export, click the export button above the filters; a CSV named audit-log downloads with columns Timestamp, Actor, Action, Entity, Record, Record ID, Before, After. Success: the file matches the on-screen filters exactly; if more than 5,000 entries match, a warning notes only the most recent 5,000 were exported — narrow the date range for earlier slices.
Good to know:
- The log is append-only — entries can never be edited or deleted, by anyone.
- Entries record automatically: "Every create, update, delete, completion and waive will be recorded here automatically." User-management events (invites, role changes, ownership transfers) are included.
- Pages show 50 entries; the pager appears above and below the table.
- Timestamps display and export in the organization's timezone.
- CSV export caps at the most recent 5,000 matching entries per download.
View the email log
A per-organization record of every email TrainGrid has sent on your behalf — invitations, alert digests, reports and more — with delivery status, so you can prove a notification went out or diagnose one that failed.
Where: Sidebar → Administration → Email log · Before you start: View email log capability — by default Administrator and Manager only (toggleable for Manager in the Permissions grid).
Set up (one time):
- Optionally set how long entries are kept: Sidebar → Administration → Settings → "Keep email log for" — choose 30, 60, 90 or 180 days (default 90). The change saves immediately; older entries are then removed automatically. Delivery itself is unaffected — this only controls how long the record is retained.
| Option | What it does |
|---|---|
| Type | Filter to one email kind: Alert, Scheduled report, Member invite, Portal invite, Sign-in change, Email employees, Contact form, Signup notice, Trial onboarding, Test send. Default "Any type". |
| Status | Sent or Failed. Default "Any status". |
| From / To | Calendar-date bounds, interpreted in the organization's timezone. |
| Keep email log for (Settings) | Retention window: 30, 60, 90 (default) or 180 days; older entries purge automatically. |
- In the sidebar, open "Administration" and click the "Email log" pill. The header reads "Every email <organization> has sent — invitations, alerts, reports and more" with the recorded count.
- Narrow the list with the filter bar: "Type", "Status", and "From"/"To" dates.
- Read the columns: Sent (org-timezone timestamp), Type, Recipient, Subject, Status. Success: you can see per-recipient whether each email was Sent or Failed (failed rows carry the error).
Good to know:
- Access is capability-gated: without View email log the page redirects away rather than rendering empty.
- Pages show 50 entries with a pager top and bottom.
- The log records the send attempt and outcome — it does not store the email body.
Functions: Employees
The Employees area is your training roster: every person who receives training, whether or not they ever log in. Here you add people one at a time or import your HR roster from CSV, keep profiles current, archive leavers, print scannable QR badges, invite employees to the employee portal, and pull a per-person audit transcript. Open it from the sidebar: Employees.
In this section: Create an employee · Edit an employee · Archive or unarchive an employee · Delete an employee (Administrator only) · Import employees from CSV · Use the employee page tabs (Training · History · Certificates · Notes) · Print an Employee Transcript · Print QR badges · Invite an employee to the training portal · Email employees (ad-hoc message) · Find, filter and export the employee list
Create an employee
Add one person to the training roster so training can be assigned and tracked for them. Only first and last name are required — everything else can be filled in later.
Where: Sidebar → Employees → "New employee" button (top right) · Before you start: "Manage employees" capability — Administrator, Manager and Coordinator by default (togglable per role in the Permissions grid).
| Option | What it does |
|---|---|
| First name / Last name | Required; each up to 100 characters. |
| Employee number | Optional unique identifier (e.g. from HR); shown monospaced, used for badge printing, check-in and import matching. Up to 50 characters. |
| Optional; must be a valid address. Required before "Invite to portal" or ad-hoc email can reach this person. | |
| Department / Position / Location | Dropdowns of the org's active departments, positions and locations; each offers "None". Position drives the Workforce Competency report's required-training check. |
| Employment type | Dropdown of the organization's active employment types, maintained under Administration → Employment types (every workspace starts with "Internal" and "External (agency / contract)"; administrators add Hourly, Salary or any other). New employees start with the organization's default type. Filterable on the roster and included in its CSV export. |
| Shift | Free text, e.g. A, D or N. Up to 30 characters. |
| Supervisor | Searchable picker writing a plain name; free-text escape hatch via the Use "…" entry. Up to 150 characters. |
| Hire date | Date picker; must be a real date between 1950-01-01 and 30 days from today (rejects Excel-serial garbage and typos like 1899/2099). |
| Custom fields | Any org-defined fields (text, number, date or select) appear in their own "Custom fields" section; a select value whose option was later removed shows as "(removed)" rather than being dropped. |
| Notes | Free text up to 5,000 characters; also editable later on the profile's Notes tab. |
- In the sidebar, click "Employees".
- Click "New employee" (top right). The "New employee" form opens.
- Enter "First name" and "Last name" (both marked *, the only required fields).
- Optionally fill "Employee number" (and, when a division has a short form, the "Division prefix for the employee number" picker beside it, "No prefix" by default), "Email" (needed later for portal invites and ad-hoc emails), "Department", "Position", "Location", "Employment type", "Shift", "Supervisor", "Hire date", any custom fields, "Tags" and "Notes".
- For "Supervisor", click the field and either pick from "Current supervisors" (names already in use, listed first so formats stay consistent) or "People" (roster employees), or type any name and click the Use "…" entry — supervisors do not have to be roster employees. Pick "None" to clear it.
- Click "Create employee".
- Success: a toast reads "Employee created" and you land on the new employee's profile page.
Good to know:
- Employees are training subjects, not logins — creating one grants no access. Portal access is a separate invitation.
- Employment type is an attribute, not a separate workflow: the seeded "External (agency / contract)" is the umbrella for agency-supplied and contract workers, and administrators add further types under Administration → Employment types (see "Create or edit an employment type"). A type deactivated after being set on an employee still shows on that employee.
Edit an employee
Update a person's profile details — same form as creation, pre-filled.
Where: Sidebar → Employees → click the employee → "Edit" button on the profile card · Before you start: "Manage employees" capability.
- In the sidebar, click "Employees" and open the person (click their row or name).
- On the profile card, click "Edit". The "Edit employee" form opens with current values.
- Change any fields (same fields and rules as "Create an employee").
- Click "Save changes" (or "Cancel" to discard).
- Success: toast "Employee updated" and you return to the profile with the new values shown.
Good to know:
- The profile card shows every stored fact in one place: Employee #, Email, Department, Position, Location, Employment type, Shift, Supervisor, Hire date, Portal access (managers only), archive details when archived, plus any filled custom fields.
- Notes can also be edited directly on the profile's "Notes" tab without opening the full form; the tab shows "Last edited by … on …" attribution from the audit log.
- Files (acknowledgements, licences, clearances) attach to the person via the Files card on the profile — separate from per-training-record attachments.
Archive or unarchive an employee
Take a leaver out of active lists and compliance calculations without losing anything. Archiving is the normal way to handle departures; unarchive on rehire and their full history is intact.
Where: Single person: employee profile → "Archive" / "Unarchive" button. In bulk: Sidebar → Employees → tick rows → "Archive N" / "Unarchive N" in the selection bar · Before you start: "Archive employees" capability — Administrator, Manager and Coordinator by default (a sub-capability of Manage employees).
| Option | What it does |
|---|---|
| Reason (optional) | Free text up to 500 characters, stored and displayed on the profile as "Archive reason". |
- Open the employee's profile and click "Archive".
- In the dialog "Archive <name>?", optionally type a "Reason (optional)" (e.g. "Left the company").
- Click "Archive". Success: toast "<name> archived"; the profile badge flips to "Archived" and "Archived on" / "Archive reason" rows appear.
- In bulk instead: on the Employees list, tick the checkboxes on the rows, click "Archive N" in the selection bar, add an optional reason, confirm — toast "Archived N employees".
- To see archived people, set the list's status dropdown (defaults to "Active") to "Archived" or "All statuses".
- To restore: open the archived person and click "Unarchive" (or bulk "Unarchive N"), then confirm. Success toast advises reviewing their training — stale due dates can be rescheduled from each record.
Good to know:
- Archived employees are removed from active lists and compliance calculations; their full training history is preserved and they can be unarchived at any time.
- The CSV import can archive in bulk too — the "Archive active employees who aren't in this file" option treats the file as your current roster.
- Archive is the answer for anyone who might return or who has any training history; permanent Delete exists only for zero-history profiles.
Delete an employee (Administrator only)
Permanently remove a profile created by mistake. Deliberately narrow: only an Administrator sees it, and only on an employee with zero training records — everyone else gets archived instead.
Where: Employee profile → red "Delete" button beside Archive (appears only when the conditions below are met) · Before you start: "Delete employees" capability — Administrator (owner) only. The employee must have no assignment history at all, org-wide.
- As an Administrator, open the profile of an employee with no training records.
- Click "Delete" (it renders only when both conditions hold — on anyone with history the button simply is not there).
- Read the dialog "Delete this employee?": it confirms the person has no training records and that attached files and portal access are removed with the profile.
- Click "Delete permanently".
- Success: toast "<name> deleted." and you are returned to the Employees list, where the person no longer appears.
Delete several employees at once. Same role, same rule, and all-or-nothing: either everyone selected is deleted or nobody is.
- On the Employees list, narrow the list first (search, department, location, status) and tick the rows to delete. The header checkbox "Select all on this page" ticks the current page only (up to 50 people); each row's checkbox is "Select <name>". The selection does not carry across pages.
- In the selection bar ("N selected") click the red "Delete N" button. Only an Administrator sees it; Managers and Training Coordinators see "Archive N" alone.
- Read the dialog "Delete N employees?": "This permanently deletes N employees. It cannot be undone." While every row is checked it shows "Checking the selection…".
- If anyone selected has training records, the dialog lists "N employees cannot be deleted:" (or "1 employee cannot be deleted:") with "<name>: has training records" per row and the note "Remove the blocked employee from your selection to continue." (or "Remove the N blocked employees from your selection to continue."); the delete button stays disabled. Click "Cancel", untick those people and open the dialog again.
- When every row can go, type your password under "Enter your password to confirm" (if you sign in with Microsoft and have no password, the prompt reads "Type DELETE to confirm" and you type DELETE) and click "Delete N employees". A wrong password shows "That password is not correct." and nothing is deleted.
- Success: toast "Deleted N employees"; the rows disappear, the selection is cleared, and one audit entry is written per person, exactly as for a single delete.
Good to know:
- Zero-history guard: the delete is re-verified transactionally in the database (role and history), so a stale page can never delete a person who has since been assigned training.
- Fail-closed UI: if the history check cannot complete, the button is withheld rather than shown on a guess.
- Deleting removes the profile, its attached files and any portal access in one transaction, and writes an audit entry. It cannot be undone — the dialog itself says: if they might return, archive them instead.
- Managers and Coordinators never see Delete; that is by design, not a bug.
- "Training records" means exactly what blocks the single Delete: an assignment, or a session booking with attendance recorded (attended or absent). Attached files, tags, portal invitations and bookings with no attendance recorded go with the person, as with the single Delete.
- The bulk delete re-checks every selected person in the database in one transaction, so if even one has gained a training record since the page loaded, nothing is deleted and the dialog re-checks the selection and lists who. At most 500 rows per delete. Your password is checked against your sign-in and never stored or logged; five wrong passwords within fifteen minutes answer "Too many attempts. Try again in a few minutes." until the window passes (a correct password never counts), and each wrong attempt is written to the audit log without the password.
Import employees from CSV
Load your whole roster from a spreadsheet in minutes — a guided four-step wizard (Upload → Map columns → Preview & import → Done) that recognizes common HR-system exports, never merges anyone silently, and hands you a per-row report of exactly what happened.
Where: Sidebar → Employees → "Import CSV" button (or /employees/import) · Before you start: the "Import CSV" capability together with Manage employees. Import CSV is held by the Administrator by default; an Administrator can turn it on for Managers and Training Coordinators under Administration → Roles & Permissions.
Set up (one time):
- Optional: on step 1, click "Download template" to get a CSV with the exact expected headers (First Name, Last Name, Employee Number, Email, Department, Position, Location, Shift, Employment type, Supervisor, Hire Date, Notes) and one sample row.
| Option | What it does |
|---|---|
| Default location | Applied to rows whose Location cell is blank. Default: "No default location". |
| Assign internal employee numbers (TG-0001, TG-0002…) to rows without one | Opt-in, default OFF. Gives numberless new people an exact identifier so future imports, badges and check-in are unambiguous; assigned numbers are listed in the import report. Leave off if HR sheets are your number source. |
| Archive active employees who aren't in this file | Opt-in, default OFF. Re-sync mode: anyone active today but absent from the file is archived (history preserved, restorable on rehire). Off = only add new people. |
- In the sidebar, click "Employees", then "Import CSV".
- Step 1 — Upload: click "Click to choose a .csv file" and pick your file (up to 2,000 rows per import). Both the template and common HR exports ("Legal First Name", "Home Department Description", "Hire/Rehire Date"…) are recognized; Excel-serial and ISO dates both work.
- Step 2 — Map columns: check the automatic mapping of each employee field to a file column; fix any via the dropdowns ("Not mapped" to skip a field). First and last name are required. Click "Continue".
- Step 3 — Preview & import: review the badges "N ready to import" and "N with errors (will be skipped)", and the row table (first 300 shown) where each row reads Ready, Needs review, or lists its exact issue.
- If rows are flagged "needs review" (same name + department as an existing person or another row, with no number or email), decide each one: "Same person — skip" or "Different person — create new" (or use "Mark all as same person" / "Mark all as new people"). The Import button stays disabled until every flagged row has a decision.
- Optionally set "Default location" (used when a row's Location cell is blank), tick "Assign internal employee numbers (TG-0001, TG-0002…) to rows without one", and/or tick "Archive active employees who aren't in this file" to treat the file as your current roster.
- Click "Import N employees".
- Step 4 — Done: read the tiles Created / Skipped (duplicates) / Skipped (errors) (plus Renumbered, Restored and Archived matches when relevant) and the per-row detail sections; click "Download import report" for a CSV of every row's outcome and reason, then "View employees". It opens the Employees list filtered to exactly the people this import created, renumbered or restored, under the banner "Showing the N employees from your import" with a "Show all employees" link back to the full roster (the list opens on all statuses, so a restored person appears too; "Clear filters" also drops the import filter). People the import skipped as duplicates are not shown. If the import created, renumbered or restored nobody, the button opens the full list, and imports made before this view existed cannot be filtered this way.
- Success: toast "Imported N employees" and the new people appear on the roster; the import is recorded in the audit log.
Good to know:
- Create-only by default: the import never changes an existing employee's details. Rows matching an existing employee number or email are skipped automatically as duplicates; re-importing the same file will not create duplicates. The only changes it can make to existing people are the two options you tick yourself: the prefix renumber (number only) and the restore (status only).
- Rows with neither number nor email are matched by name + department; ambiguous matches are held for your explicit review — no one is merged or dropped silently.
- Missing departments and positions named in the file are created automatically and counted on the Done screen. Missing locations are created only when the importer is an Administrator or Manager and the plan has room for them (Starter and Professional include one location); otherwise the import stops before writing anything and names the first row whose location is not set up (use an existing name, leave the cell blank, ask an Administrator or Manager to add it, or upgrade in Billing), and the Import button stays disabled until those rows are fixed. A location-scoped member can only import people into their own locations: a row that would add a new employee into a location outside them, or a blank cell falling back to such a Default location, stops the import the same way, before anything is written (rows that match an existing employee are skipped as usual and do not count).
- Per-row validation mirrors the server exactly (required names, valid email, hire-date window, field length caps, Employment type must match one of the organization's types by name or code, or a known alias of External, and a blank cell takes the default type) — a bad cell skips that row, never the whole import.
- Matching archived employees are found and left unchanged; the Done screen links "View archived employees" so you can unarchive them to restore their history. If you want them back, tick Restore archived employees found in this file (shown on the Preview step when at least one row matches an archived person; needs the Archive employees permission): each matching person is made active again with their existing record and training history (nothing in the file overwrites them), the row reads "Restores <name> (archived)", and the Done screen counts them under Restored. A row that matches two archived people by name and department is never restored automatically. With the prefix option, a row whose original number belongs to an archived person is renumbered too when the renumber option is ticked ("Renumbers <name>: 1001 → MLT1001 and restores (archived)").
- Values exported from TrainGrid round-trip cleanly (the formula-injection escape is reversed on read).
Use the employee page tabs (Training · History · Certificates · Notes)
One page answering four different questions about a person: what is their current standing per course, what is their complete audit trail, what credentials do they hold, and what should we remember about them.
Where: Sidebar → Employees → open an employee → tab strip below the profile card: "Training", "History", "Certificates", "Notes" · Before you start: Any role that can view employees; Notes editing needs "Manage employees". Location-scoped members see only employees in their locations.
- Open an employee from the Employees list. The page opens on the "Training" tab.
- Training: read one row per course — Course, Status, Due date, Completed on, Expires, Grade — the person's CURRENT standing (latest record per course; expiry dates colour red when past, amber within 30 days). "Assign training" sits on the profile card for active employees.
- Click "History": every assignment ever, newest first — Course, Version, Status, Due date, Completed on, Grade, Instructor, Expiry, Competency. The Version column shows which course revision each record was earned against ("v1.0 Superseded" vs "v2.0 Current") — the complete per-employee audit trail. Click any row to open the full record sheet.
- Click "Certificates": cards for completed certificate-bearing courses, each with Completed and Expires dates and a colour-coded chip ("Nd left", "Expired Nd ago", "No expiry") plus any attached certificate files, downloadable.
- Click "Notes": read or (with Manage employees) edit the free-text notes; a "Last edited by … on …" caption shows attribution.
- Success looks like: each tab loads its table/cards; other screens (e.g. a Training Matrix cell's "View training history" button) deep-link straight to the History tab.
Good to know:
- Failed completions never appear on the Certificates tab — a completion below the passing grade is not a held credential.
- History is capped at the most recent 500 assignments on screen; the Employee Transcript report carries the full set for print/export.
- The tabs honour a ?tab= link (training, history, certificates, notes) so other surfaces can land you on the right one.
Print an Employee Transcript
Generate the printable, auditor-ready document of one person's complete training history — every record with the course version it was earned against, plus competency and qualification, ending in a signature footer.
Where: Sidebar → Reports → "Employee Transcript" card → pick an employee · Before you start: Access to Reports; "Export CSV" capability gates the CSV button (on by default for all staff roles).
- In the sidebar, click "Reports" and open the "Employee Transcript" card.
- Use the employee picker to search and select any employee — archived staff included.
- Read the report: an identity block (name, #, Department, Position, Location, Shift, Supervisor, Hire date), a summary line ("N training records" with completed / pending / overdue / expired / failed / waived counts), and the full table — Course (with "vN" and "(superseded)" where a newer version is current), Category, Status, Due date, Completed on, Grade, Instructor, Recorded by, Cert. expires, Competency.
- Click Print for the paper copy — the print layout includes a signature footer for auditor sign-off — or Export CSV for the file (adds Version, Qualification, Assessor and Assessed on columns).
- Success: a one-page-per-person document an auditor can sign, with no version or competency ambiguity.
Good to know:
- The transcript is the document handed to an auditor: every record permanently shows the version it was completed against — a version bump never rewrites history.
- Competency and Qualification are shown separately from training status, so "trained" is never silently read as "qualified".
- Portal users have their own self-serve copy: the portal's "My transcript" page with its own print button.
Print QR badges
Produce a printable A4 sheet of scannable QR badges — one per employee — used with the Scan check-in page to mark attendance at group training sessions.
Where: Sidebar → Employees → "Print badges" button (top right; page title "Print QR badges") · Before you start: "Manage employees" capability (same gate as adding employees) and the Print capability (on for every role by default). Location-scoped members get badges only for their locations.
| Option | What it does |
|---|---|
| Department | Filters the sheet to one department; default "All departments". |
| Training course | Filters to people assigned that course (any version of its family); default "All courses". |
| Per-badge include checkbox | On by default for everyone; unticking removes that badge from the printed sheet only — the card stays on screen, dimmed. |
- In the sidebar, click "Employees", then "Print badges".
- Narrow the sheet with the "Department" dropdown (default "All departments") and/or the "Training course" dropdown (default "All courses") — the course filter lists "CODE — Title" and includes everyone assigned any version of that course.
- Untick the checkbox on any badge you don't need ("Include <name> in the printed sheet") — excluded badges dim on screen but stay visible so you can re-tick them; the count line reads "N of M badges selected to print".
- Wait for the "Print badges" button to enable — it shows "Preparing n/N…" until every QR code has generated and loaded. If any fail, a "QR unavailable" card and a "Retry" button appear.
- Click "Print badges" and print the browser dialog's output.
- Success: an A4 portrait sheet, four badges per row, headed with your organization name and the badge count; each badge shows the QR, the person's name and their employee number (or department when they have no number). Use "Scan check-in" (button on the same toolbar) to scan them at the session.
Good to know:
- Only active employees appear — archived people get no badge.
- Each QR encodes the employee's identifier token, not personal data; it is read by the Scan check-in page.
- Printing works from dark mode too — badges force black-on-white ink.
- The button refuses to print until every QR is ready, so a half-rendered sheet can't be produced.
Invite an employee to the training portal
Give an employee self-service access to their own training: a "My training" page, a printable transcript, and a "Calendar" of scheduled sessions where they can book a seat. They activate via a personal link and set their own password — no password is ever assigned or stored in a viewable form.
Where: Employee profile → "Invite to portal" button (appears only for an active employee with an email who isn't already linked) · Before you start: "Manage employees" capability. The employee must be active and have an "Email" on their profile — add one via Edit first if missing.
- Open the employee's profile and click "Invite to portal".
- A dialog "Portal invitation sent" opens: if email is configured the invitation has been emailed, and a copyable activation link (/portal-accept/<token>) is shown either way — use the copy button if a spam filter might eat the email.
- Click "Done". The profile's "Portal access" field now reads "Invited" and the button relabels "Resend portal invite" while an invite is pending.
- The employee opens their link, signs in or creates an account with the email on their profile — choosing their own password at that point — and lands in the portal: "My training" (their assignments with status, due dates, grades and expiries), a printable transcript, and "Calendar" (sessions open for booking, and their own bookings).
- Success: the profile's "Portal access" field reads "Active". The org-wide roster of who is Invited/Active/Expired lives under Administration → Users → "Employee portal access".
Good to know:
- The training record is read-only in the portal: employees can view and print, never record or edit a record. The one action they have is booking or cancelling their own seat on a scheduled session (Calendar).
- They must use the email on their profile; the invitation is personal and expires (an expired one can simply be re-sent).
- Portal users set their own password at activation; passwords are never assigned by an admin nor recoverable anywhere in the system.
- Archiving or deleting the employee removes portal access with the profile.
Email employees (ad-hoc message)
Send a one-off email — e.g. "Reminder: forklift refresher this Friday" — to the employees behind selected training rows, without leaving the app. Every send is recorded in the Email log as "Email employees".
Where: Sidebar → Record Completion → tick rows → "Email" button in the selection bar → "Email selected employees" dialog · Before you start: "Send email" capability — Administrator, Manager and Coordinator by default. Recipients need an email on their employee profile.
| Option | What it does |
|---|---|
| Subject | Required, max 200 characters. |
| Message | Required plain text, max 5,000 characters. |
- In the sidebar, click "Record Completion".
- Filter to the audience (e.g. click "Overdue" in the status button row, or filter by course), then tick the checkboxes on the rows whose employees you want to reach.
- In the selection bar that appears, click "Email".
- In the "Email selected employees" dialog, enter a "Subject" (up to 200 characters) and "Message" (up to 5,000).
- Click "Send email".
- Success: a toast like "Emailed N employees", with "· N failed" / "· N without an email" appended when applicable. If nobody could be reached, the dialog stays open with your draft intact and explains why.
Good to know:
- Anyone without an email on file is skipped — and counted honestly in the result toast.
- Employees who share an email address receive the message once.
- The message is sent from TrainGrid on behalf of your organization, with your org logo, and every send is logged under Administration → Email log as type "Email employees".
- Selection is by training row, but the recipients are the distinct employees behind those rows.
Find, filter and export the employee list
Work the roster at scale: search, slice by department/location/tag/status/employment type, sort, choose visible columns, and export exactly what you're looking at (or a ticked selection) to CSV.
Where: Sidebar → Employees — toolbar above the table · Before you start: Any staff role; the "Export CSV" button requires the "Export CSV" capability.
- In the sidebar, click "Employees".
- Type in "Search name or number…" (matches first name, last name or employee number; results update as you type).
- Narrow with the dropdowns: "All departments", "All locations" (shown when the org has more than one), "All tags" (when tags exist), the status filter ("Active" by default, "Archived", "All statuses") and "All employment types". "Clear filters" resets everything.
- Click column headers (Name, Employee #, Department, Position, Employment type, Hire date, Status) to sort — ascending → descending → cleared.
- Click "Columns" → "Show columns" to toggle base columns; org custom fields appear under "Custom fields" and are hidden by default. Choices persist in your browser.
- To export: click "Export CSV" for everything matching the current filters, or tick rows first — the button relabels "Export N selected". Success: a toast "Exported N employees" and the file downloads with all profile columns, Notes and every custom field.
Good to know:
- Exports cap at 5,000 rows; past that the file is named employees-partial and a warning asks you to filter down for the rest.
- The CSV preserves the exact on-screen order and includes Employment type, Status, Notes and all custom fields — one file that mirrors the roster.
- A paperclip beside a name means the employee has attached files; the count shows on hover.
- Location-scoped members see and export only employees within their locations (rows with no location included, matching the dashboard).
Functions: Courses & Versioning
The course catalog is the foundation of TrainGrid: every assignment, matrix column, certificate and compliance percentage traces back to a course definition. This area covers building the catalog (creating, importing and grouping courses, attaching materials, setting competency requirements and topics) and governing change over time through course versions — drafting, activating, retraining fan-out, and the read-only archived history that auditors see.
In this section: Browse and search the course catalog · Create a course · Set the competency requirement and topics · Attach materials and SOPs · Manage course groups · Import courses · Create a new course version · Activate a draft version · What activating a version does · Version history and provenance · Deactivate or reactivate a course · Delete a course · Copy a course
Browse and search the course catalog
Find any course by search, filters or sorting, see its version and status at a glance, and export the filtered catalog to CSV for audits.
Where: Sidebar → Courses · Before you start: Any signed-in user can browse; the Export CSV button appears only for roles with the Export CSV capability.
| Option | What it does |
|---|---|
| Search title or code… | Live text filter matching course title or code. |
| Filter by status | Defaults to "Active". "Inactive" = a current version someone deactivated; "Archived versions" = superseded versions retired by a version bump — deliberately kept separate so an old v1.0 never looks like it was switched off; "All statuses" shows everything. |
| Filter by category / type / mandatory / tag | Each defaults to All; the tag filter appears only when tags are configured. |
| Export CSV | Exports the on-screen (filtered + sorted) rows with columns Code, Title, Category, Type, Duration (min), Recurrence, Certificate validity, Passing grade (%), Mandatory, Status, Default instructor, Available at locations. |
- In the sidebar, click Courses. The page opens under the "Catalog" eyebrow with the title "Courses".
- Type in the "Search title or code…" box to narrow by title or course code; click the × inside the box to clear it.
- Use the filter dropdowns in the toolbar: category ("All categories" / a category / "Uncategorized"), type ("All types" / In-person / Online / Video / External / Practical), mandatory ("All courses" / "Mandatory only" / "Optional only"), and status.
- The status dropdown defaults to "Active". Its options are "Active", "Inactive", "Archived versions" and "All statuses" — choose "Archived versions" to see superseded course versions kept for audits.
- Read each row: the course title with its code and a version chip (e.g. "v2.0") underneath, then Category, Task type, Type, Locations (multi-site orgs only), Duration, Recurrence, Certificate, Mandatory, Status and Instructor columns. Click a column header to sort (ascending → descending → cleared).
- Click "Clear filters" to reset everything; the counter on the right always shows "N of M courses".
- Click "Export CSV" to download the catalog exactly as filtered and sorted — the Status column reads Active, Inactive or Archived.
- Click any row to open that course's page. Success: you land on the course detail page with its title, version badge and Properties card.
Good to know:
- Empty-catalog state offers "Add starter courses" (loads a set of common courses you can edit or remove) beside "New course".
- Filter choices are written into the URL, so a filtered view can be shared as a link.
- Archived versions remain searchable and exportable but are read-only — see "What activating a version does".
Create a course
Define a training course — its identity, delivery type, scheduling, certificate and passing-grade rules — which then drives assignments, the matrix and compliance reporting.
Where: Sidebar → Courses → New course · Before you start: Manage courses capability (Manager/Administrator by default).
| Option | What it does |
|---|---|
| Code | Unique course code within the org; a next free code in your org's dominant pattern (e.g. TR-1001) is suggested and editable. |
| Title | The course name shown everywhere; required. |
| Description | Free text — what the training covers and who it's for; optional. |
| Category | Org-defined catalog grouping with a colour dot; defaults to "No category". |
| Task type (optional) | Your organization's own labels for the kind of task covered (e.g. Sanitation, Safety), filterable in reports; managed under Administration → Task types; defaults to "No task type". |
| Type | Delivery type: In-person (default), Online, Video, External or Practical. This also sets the record's default training source: In-person, Video and Practical count as Internal; Online and External map to their own buckets — individual records can override it. |
| Default instructor | Pre-filled when recording completions; can be overridden per record. Optional. |
| Duration (minutes) | Length of the training, 1–6000 minutes; optional. Feeds the training-hours default. |
| Available at locations | Shown only in multi-site orgs. Empty = available at all locations; ticking locations limits the course to employees there. Inactive locations can be retained or cleared but never newly added. |
| Tags | Shown only when tags are configured; labels for filtering this course in the catalog. |
| Repeats | Off by default. On, completing an assignment automatically schedules the next one "Repeat every (days)" after the completion date (1–3650 days; presets Weekly/Monthly/Quarterly/Annual). |
| Requires certificate | Off by default. On, each passing completion issues a certificate expiring "Valid for (days)" after completion (1–7300 days; presets 1/2/3/5 yr). |
| Valid for (days) | Certificate lifetime. On a recurring certificate course, the next assignment is due on the certificate expiry date (completion + validity) instead of completion + repeat interval. When editing: the change applies to certificates issued from now on — already-issued certificates keep the validity they were issued under (no backfill). |
| Passing grade (%) | Optional, 0–100. Completions below this grade are still recorded but flagged — they display as the Failed status and count as non-compliant. |
| Mandatory course | Off by default. On, the course counts toward compliance for every employee and appears in the Missing Mandatory Training report. |
- In the sidebar, click Courses, then click "New course" (top right).
- In the "Course details" card, accept or edit the "Code" (a next free code like TR-1001 is pre-suggested and editable; codes must be unique within your organization) and type the "Title".
- Optionally fill "Description", pick a "Category" and a "Task type (optional)" (both managed under Administration), and set "Type" — In-person, Online, Video, External or Practical (default In-person).
- Optionally set "Default instructor" (pre-filled when recording completions; can be overridden) and "Duration (minutes)".
- If your organization has locations, use "Available at locations": leave every box unticked to make the course available everywhere, or tick specific locations to limit it.
- In the "Scheduling & certificates" card, tick "Repeats" if the training recurs, then set "Repeat every (days)" — type a number or click a preset (Weekly 7, Monthly 30, Quarterly 90, Annual 365).
- Tick "Requires certificate" if completion issues a certificate, then set "Valid for (days)" — type a number or click a preset (1 yr, 2 yr, 3 yr, 5 yr).
- Optionally set "Passing grade (%)" (0–100). Completions recorded below this grade are flagged — they become the red "Failed" status across the app.
- Toggle "Mandatory course" on if the course counts toward compliance for every employee.
- Click "Create course". Success: toast "Course "<title>" created." and you land on the new course's page, badged v1.0. If your workspace has no assignments yet and your role can assign training, TrainGrid opens Assign training with the new course already selected instead. This shortcut is available only to members with access to all workspace locations.
Good to know:
- Certificate + recurrence interact deliberately: on a certificate-issuing recurring course the next assignment lands on the certificate expiry date, not completion + interval — the course page repeats this note in its Properties card.
- Changing "Valid for (days)" later never re-dates already-issued certificates; there is no bulk re-issue — re-issuing means completing the training again.
- A failed completion (below the passing grade) does not issue a certificate.
- Editing uses the same form via the course page's "Edit" button and ends with "Save changes"; retired (superseded) versions have no Edit button at all.
Set the competency requirement and topics
Mark a course as requiring an internal competency assessment (training alone is not competence) and maintain the ordered list of topics the course covers.
Where: Sidebar → Courses → open a course → "Competency & topics" card (right column) · Before you start: Manage courses capability; the card is editable only on the current (active) version of a course.
| Option | What it does |
|---|---|
| Competency assessment required | Off by default. On, a completed record stays "Assessment pending" (and the employee Not qualified) until an assessor records the practical assessment. |
| What must be demonstrated (optional) | Free-text assessment description shown to assessors at the top of the record's Competency section. |
| Reassess every (days) | Blank by default (= no expiry). Set, competency expires this many days after each assessment, feeding the 90/30/7-day reassessment reminders. |
| Topics covered / Add a topic | Ordered list of the course's agenda; add via the field + "Add", remove via ×. |
- Open the course page and find the "Competency & topics" card.
- Tick "Competency assessment required". The helper explains: completion records "trained"; an assessor must also record a demonstrated pass before the employee reads as competent.
- Optionally fill "What must be demonstrated (optional)" — this description is shown to assessors on the record's assessment form.
- Optionally set "Reassess every (days)" (blank = no expiry) — each assessment then derives a competency expiry this many days out, which drives reassessment reminders.
- Click "Save competency settings" (the button appears once you change something). Success: toast "Competency settings saved."
- Under "Topics covered", type into "Add a topic" and click "Add" (or press Enter). Topics list numbered in order; click the × beside a topic to remove it.
- Success: records of this course now carry a Competency section, the course appears in the Competency Status report, and the topics show on the Training Matrix column-header tooltip.
Good to know:
- Competency is strictly per-course opt-in — courses without it show no Competency section anywhere and never appear in competency reports.
- Topics surface in two places: the Training Matrix column-header tooltip (the version's agenda at a glance) and as the tick-list for "Areas requiring improvement" in a Needs-improvement assessment.
- On retired/draft versions the card is replaced by a read-only "Topics covered" card (when topics exist).
- The "This revision affects competency or qualification" question in version dialogs only appears on courses with this requirement switched on.
Attach materials and SOPs
Keep the talk sheet, SOP or handout for a course (including translated versions) one click from the catalog.
Where: Sidebar → Courses → open a course → "Materials & SOPs" card (bottom of the right column) · Before you start: Manage courses capability to add or remove; anyone who can view the course can open the files. Not editable on archived (superseded) versions.
- Open the course page and scroll to the "Materials & SOPs" card.
- Click "Add material" and choose a file. Success: toast "Material added." and the file lists in the card.
- Alternatively use the link-existing control beside it to attach a file already uploaded elsewhere in your workspace, instead of uploading a duplicate.
- Click a file's name to open it in a new tab (via a time-limited signed link).
- To remove a file, click the trash icon on its row. Success: toast "Material removed." — this detaches it from the course.
Good to know:
- On a retired (superseded) version the materials still render for audits but cannot be added, linked or removed.
- The empty state suggests attaching talk sheets, SOPs or handouts — including translated versions.
Manage course groups
Bundle related courses — like a new-hire onboarding set — into a named group so the whole set can be assigned in one action from the assign flow.
Where: Sidebar → Courses → Groups (opens the "Course groups" page) · Before you start: Manage courses capability (the page redirects to Courses otherwise).
| Option | What it does |
|---|---|
| Name | Required, up to 120 characters. |
| Description (optional) | What the bundle is for; up to 500 characters. |
| Courses | Multi-select picker with search; archived courses are labelled "(archived)" in the list. |
- In the sidebar, click Courses, then click "Groups" in the page header.
- Click "New group".
- In the dialog, type the "Name" (e.g. New Hire Onboarding) and optionally a "Description (optional)".
- Under "Courses", click "Add courses…" to open the picker; type in "Search courses…" and click courses to tick them. Each selected course shows as a removable "CODE — Title" chip, and the label counts "(N selected)".
- Click "Create group". Success: toast ""<name>" created." and the group appears in the table with Name, Description and a Courses count.
- To change a group later, click the pencil (Edit) icon on its row, adjust, and click "Save changes".
- To delete, click the trash icon, then confirm "Delete group" in the "Delete "<name>"?" dialog. Success: toast ""<name>" deleted."
Good to know:
- Deleting a group removes the group only — the courses in it are not affected; the deletion itself is permanent.
- Groups exist to be assigned: in the assign flow you can select a whole group in one action.
Import courses
Load a whole catalog from a CSV in one pass — parse, map columns, preview against the live catalog, then commit. Create-only by design: existing codes are skipped, never overwritten.
Where: Sidebar → Courses → Import (opens the "Import courses" page) · Before you start: the "Import CSV" capability together with Manage courses (Import CSV is held by the Administrator by default and can be turned on for Managers and Training Coordinators under Administration → Roles & Permissions; the page redirects to Courses otherwise).
Set up (one time):
- On the upload step, click "Download template" to get a CSV with every supported column and one example row — the fastest way to build a correct file.
| Option | What it does |
|---|---|
| Course code / Title | The two required columns; a row missing either cannot import. |
| Category / Task type | Created automatically if they don't exist yet. |
| Delivery | Accepts in_person, online, external, video or practical (and the friendly labels an export produces). |
| Repeat every (days) | Leave blank for one-off training; a value makes the course recurring. |
| Certificate valid (days) / Passing grade % / Duration (minutes) / Mandatory | Optional numeric/yes-no columns matching the course form's fields (Mandatory accepts yes/no). |
- In the sidebar, click Courses, then click "Import" in the page header.
- Click "Choose file" and select your CSV (up to 2,000 rows per import). Course code and title are required; categories and task types are created automatically when they're new.
- On the mapping step, check the column matches — TrainGrid guesses from your headings. For each target field (Course code*, Title*, Description, Category, Task type, Delivery, Default instructor, Duration (minutes), Repeat every (days), Certificate valid (days), Passing grade %, Mandatory) pick the matching CSV header or "— Not in file —".
- Click "Preview". Badges summarize "N to create", "N already exist" and "N cannot import"; the table shows each row's Outcome (Create / Skip / Cannot import) with the reason.
- Click "Import N courses" to commit only the creatable rows.
- On the done step, read the result ("N courses imported", plus any new categories/task types created and any rows that could not be created). Click "Download full report" for a per-row CSV of every outcome and reason, then "Go to courses".
- Success: the new courses appear in the catalog, each starting at v1.0.
Good to know:
- Create-only: rows whose code already exists in the catalog are skipped, never overwritten — safe to re-run the same file.
- The preview verdict is re-derived at commit on the server, so a stale approval cannot insert a duplicate.
- An exported catalog CSV round-trips: the import reverses the export's formula-injection escaping.
- The on-screen failure list caps at 10; "Download full report" always carries every row and reason.
Create a new course version
Revise a course without rewriting history: copy the current definition into a new version with its own number, effective date and revision description, decide whether the change invalidates existing training, and either save it as a draft or make it current immediately.
Where: Sidebar → Courses → open a course → "New version" button (top right; shown only on the current version) · Before you start: Manage courses capability. Only the current (active) version of a family offers the button — drafts and superseded versions don't.
| Option | What it does |
|---|---|
| Version | Free-text version label; the next major (e.g. "2.0") is pre-suggested and editable. Must be unique in the family. |
| Effective date (optional) | The revision's effective date, shown in the Version history card. |
| Change / revision description | What changed in this revision, and why — displayed under the version in the history card. |
| This revision requires retraining | Unchecked by default. Checked, activation creates a pending assignment on the new version for every active employee who completed a previous version, due on the Retraining due date. Unchecked, existing training remains valid. |
| Retraining due date | Appears when retraining is ticked and activating now; cannot be in the past (org today is the minimum). |
| This revision affects competency or qualification | Competency-required courses only. Checked, current competency records of previously-trained employees are stamped with a reassessment-due date; existing qualifications are kept until each person is actually reassessed. |
| Reassessment due date | Appears when the Change Impact box is ticked; minimum is today. |
| Make it current now | Ticked by default. Ticked = activate immediately (retires the current version, read-only, kept for audits). Unticked = save as a draft; the retraining/Change Impact questions are then asked at activation instead. |
- Open the course's page and click "New version". A dialog titled "New version of "<title>"" opens, explaining it copies the current definition and that completed records keep pointing at the version they were completed against.
- Accept or edit "Version" — the next major number is pre-suggested (e.g. 1.0 → "2.0").
- Optionally set "Effective date (optional)" and type the "Change / revision description" — what changed and why.
- Read the helper under "This revision requires retraining": before anything is committed it shows the live count, e.g. "N active employees completed a previous version and will be assigned the new one. If unchecked, their existing records are left as they are." Tick the box if the change invalidates existing training.
- If retraining is ticked (and "Make it current now" is on), set the "Retraining due date" that appears.
- On competency-required courses only, the Change Impact question appears: tick "This revision affects competency or qualification" if trained employees must be reassessed, then set the "Reassessment due date". The helper states qualifications are KEPT until each person is reassessed — this schedules, it does not revoke.
- Decide with "Make it current now" (ticked by default): ticked, the button reads "Create & make current" and activating retires the current version; unticked, it reads "Save draft" and nothing changes for anyone yet.
- Click the button. Success: toast "Version <n> is now current." (with "— N retraining assignments created." and/or "N marked for competency reassessment." when applicable), or "Version <n> saved as a draft." The Version history card now lists both versions.
Good to know:
- The retraining count is previewed live before you commit anything — the number covers active employees only.
- On the draft path the Change Impact question is deliberately deferred to activation, so a choice made at draft time can't be silently discarded.
- Version numbering is free-form but suggested as the next major; a taken label is rejected with a field error.
- Completed records are never rewritten to the new version — the dialog and the Version history footnote both state it.
Activate a draft version
Make a saved draft the current version — from the draft's own page or straight from the Version history card — with the same impact preview and Change Impact question as the create dialog.
Where: Sidebar → Courses → open the draft version (badge "Draft") → "Activate version" button; or on the current version's page, the Version history card's compact "Activate" button beside the draft row · Before you start: Manage courses capability; a version in Draft status.
| Option | What it does |
|---|---|
| Retraining due date | Asked only when the draft was created with "requires retraining" (that decision lives on the draft; only the date is asked here). Minimum today; required to activate. |
| This revision affects competency or qualification / Reassessment due date | Same Change Impact pair as the create dialog; offered on competency-required courses at activation time. |
- Open the draft (from the catalog with status filter "All statuses", or by clicking its "vN" link in the Version history card) and click "Activate version" — or click "Activate" directly on the draft's row in the Version history card.
- A dialog opens: "Make v<N> of "<title>" current?". It states whether the draft was marked as requiring retraining, and shows the live count of active employees who completed a previous version.
- If the draft requires retraining, set the "Retraining due date" (required before the button enables).
- On competency-required courses, answer "This revision affects competency or qualification" and, if ticked, set the "Reassessment due date".
- Click "Make it current". Success: toast "Version <N> is now current." (plus retraining/reassessment counts when applicable); in the Version history card the draft now shows "Current" and the previous version "Superseded".
Good to know:
- The impact count is shown before you commit — this path used to fan out with no number at all and now previews exactly like the create dialog.
- Drafts are editable (Edit button available) but activate only through this dialog, never through the Deactivate/Reactivate toggle.
What activating a version does
Understand the exact consequences of making a version current — who gets retrained, what happens to old records, and what the retired version can and cannot do afterwards.
Where: Effects visible across: the course page (badges, Version history), Courses catalog ("Archived versions" filter), Record Completion (new Pending retraining rows), Training Matrix and employee History (version markers)
- Activate a version (see "Create a new course version" or "Activate a draft version").
- If retraining was required: in the sidebar click Record Completion, click "Pending" in the status button row and search the course — each previously-trained active employee now carries a pending assignment on the new version, due on the date you set.
- Open the old version (Courses → status filter "Archived versions"): its title carries a "Superseded" badge and there is no Edit, no Deactivate and no "New version" button; materials are read-only.
- Start assigning training: only the current version is offered in pickers — archived versions are excluded from new assignments.
- Click a completed matrix cell or an employee's History tab: records completed before the bump still show their earned version marked "Superseded" — nothing was rewritten. Success: history intact, obligations moved forward.
Good to know:
- Retraining fan-out targets active employees who completed a previous version; their historical completions are untouched and the toast reports the exact count created.
- Completed records permanently keep the version they were completed against — the Version history card states this rule verbatim.
- One state, two words by design: the catalog calls a retired version "Archived"; record surfaces (History, record sheet, matrix panel) call it "Superseded". Distinct from "Inactive", which is a current version someone deactivated.
- Archived versions stay searchable, viewable and exportable for audits, but are read-only and excluded from assignment pickers.
- Change Impact (competency courses) schedules reassessments by stamping due dates on current competency records; it never revokes an existing qualification by itself.
Version history and provenance
See every version of a course — status, effective date, revision note, and who created and approved each — the audit trail behind the catalog.
Where: Sidebar → Courses → open any version of the course → "Version history" card (right column; appears once the course has more than one version) and the "Properties" card
- Open the course page and find the "Version history" card.
- Read the list, newest first: each row shows the "vN" number (a link — click it to open that version's page), the revision note, and a "Created by <name> · Approved by <name>" line.
- Read the status badge per row: "Current", "Superseded" or "Draft", with the effective date underneath when set. Draft rows also carry the compact "Activate" button.
- In the "Properties" card of the version you're viewing, read the provenance rows: "Version created by", "Approved by" and "Approval date" (shown in the organization's timezone).
- Success: a complete who-did-what-when trail per version, with the footnote "Completed records always keep the version they were completed against."
Good to know:
- The approver and approval timestamp are stamped automatically at activation — approval is the act of making it current, not a separate signature step.
- Provenance rows render only when the fact exists: original v1.0 courses created through the plain form predate versioning and legitimately have no author/approver, and an unactivated draft has no approval — a missing row there is deliberate, not a gap.
- A removed member displays as "Former member" rather than a blank.
Deactivate or reactivate a course
Take a course out of circulation without touching history — a deactivated course stops being available for new assignments but keeps every existing assignment and completion, and can be switched back on at any time.
Where: Sidebar → Courses → open the course → "Deactivate" (or "Reactivate") button beside Edit · Before you start: Manage courses capability. Only offered on a current version — retired (superseded) versions and drafts have no archive toggle.
- Open the course's page and click "Deactivate".
- Read the confirmation "Deactivate this course?": the course will no longer be available for new assignments; existing assignments and completion history are kept and you can reactivate at any time. Mandatory courses get an extra bolded warning that deactivating stops future assignments while history is preserved.
- Click "Deactivate" to confirm. Success: toast ""<title>" deactivated." and the status badge reads "Inactive"; the course now sits under the catalog's "Inactive" filter.
- To bring it back, open it (status filter "Inactive") and click "Reactivate", then confirm in the "Reactivate this course?" dialog. Success: toast ""<title>" reactivated." and it is assignable again.
Good to know:
- Deactivation is fully reversible and touches no records — it only removes the course from assignment pickers.
- "Inactive" (deactivated current version) and "Archived" (superseded version) are different states with different catalog filters; a superseded version cannot be reactivated.
Delete a course
Permanently remove a course that has never been used. Deliberately narrow: it exists to clean up mistakes, not to erase history — a course with any training records, or any session on the training calendar, cannot be deleted at all.
Where: Sidebar → Courses → open the course → red "Delete" button (appears only when the conditions below are met) · Before you start: Administrator role (permanent deletes are Administrator-only across TrainGrid), and the course must have no assignments of any status and no sessions on the training calendar.
- Open the course's page. If a red "Delete" button shows beside Deactivate, the course qualifies; if not, it has assignments, it has sessions on the training calendar, or you lack the Administrator role, and the button is correctly hidden.
- Click "Delete".
- Read the confirmation "Delete this course?": it states the course has no assignments, so it can be permanently deleted, and that this cannot be undone.
- Click "Delete permanently". Success: toast ""<title>" deleted." and you are returned to the Courses catalog.
Delete several courses at once. Same role, same three rules, all-or-nothing.
- In the Courses catalog, an Administrator sees a checkbox on every row (header "Select all courses shown", each row "Select <title>"). Filter first, then tick the courses to delete.
- In the selection bar ("N selected") click the red "Delete N" button ("Clear selection" empties it).
- Read the dialog "Delete N courses?": "This permanently deletes N courses. It cannot be undone." If any course is blocked it is listed under "N courses cannot be deleted:" with its reason, word for word as on the course page: "This is the current version of a course with version history. Create a new version instead, or delete the superseded versions first.", "This course has training records — deactivate it instead." or "This course has scheduled or past sessions on the training calendar — deactivate it instead."; the note "Remove the blocked course from your selection to continue." (or "Remove the N blocked courses …") appears and the delete button stays disabled until you untick them.
- Type your password under "Enter your password to confirm" (or the word DELETE when prompted "Type DELETE to confirm") and click "Delete N courses". A wrong password shows "That password is not correct." and nothing is deleted.
- Success: toast "Deleted N courses"; one audit entry per course, as for a single delete.
Good to know:
- The button only renders at zero assignments and zero sessions — a course with any training history, or any session on the calendar, offers Deactivate instead; that is the supported way to retire a used course.
- Sessions count even when they are over or cancelled: a cancelled session keeps its row as history and the calendar has no way to remove one, so a course that was ever scheduled can be deactivated but never deleted. If you reach Delete anyway, it stops with "This course has scheduled or past sessions on the training calendar — deactivate it instead."
- The current version of a family with version history cannot be deleted either (it would strand the family with no active member) — the button is hidden and the database refuses as a second line of defense.
- Delete is governed by the Administrator-only delete-courses permission in the Permissions grid; Managers do not see the button by default.
Copy a course
Create a new, independent course from the current version of an existing one, under a fresh code: the same definition, competency settings, locations, tags, topics and material links, with no records, no version history and no group membership. Use it when the same training must exist as a separate course; to revise content, create a new version instead.
Where: Sidebar → Courses → open the course → "Copy" button (beside Edit; shown on the current version only, not on a draft or an archived version) · Before you start: Manage courses capability. Have a code ready that no course in your catalog has ever used, including archived versions.
| Field | What it does |
|---|---|
| Course code | Required, up to 30 characters; pre-filled with a suggested next code. Must be unused by any course or version in the organization. |
| Title | Required, up to 200 characters; pre-filled with the original's title. |
- Open the course's page and click "Copy". The dialog "Copy this course" opens: "Creates a new, independent course from the current version of "<title>" (<code>). Pick a code no course in your catalog has ever used."
- Accept or edit the "Course code" and "Title".
- Read the summary. Copied: "settings, locations, tags, topics, materials, competency settings." Not copied: "training records, versions, task-group membership."
- Click "Create copy". Success: toast ""<new title>" created as a copy of "<original title>"." and the new course's detail page opens, showing v1.0, Active, zero assignments and no Version history card.
Good to know:
- The code rule is stricter than for editing: a code that belongs to any row in the catalog, including a superseded version, is refused with "Course code "<code>" is already in use. Pick another code." under the field.
- Copies are made from the current (active) version only; a draft or archived version cannot be a source.
- Materials are linked, not duplicated: the copy points at the same uploaded files.
- The copy is not part of the original's version history and does not inherit its course-group membership; add it to groups yourself.
- The creation is written to the audit log together with the course it was copied from.
Functions: Assigning & Recording
This area covers the daily training workflow: creating assignments with the Assign training wizard, running the Record Completion list (the master training report), marking training complete, waiving, rescheduling, editing completions, attaching evidence, and running in-room sessions with the printed Sign-in sheet, the badge-scanning Scan check-in or a session scheduled on the Calendar. Everything a coordinator does between "these people need this course" and "the record is complete and audit-ready" happens here.
In this section: Assign training (set a due date) · Record a past or impromptu session · Find records in the Record Completion list · Customize columns, sorting and saved views · Mark training complete · Waive an assignment (N/A) · Reschedule a due date · View a record's details · Edit a completion · Set the training source on a record · Attach files to a record · Export and print the training list · Print a sign-in sheet and record the session · Run a Scan check-in session · Recurring courses and the next occurrence · Delete an assignment record · Schedule a training session · Book employees onto a session · Record session attendance · Cancel a session · Correct attendance (Administrator)
Assign training (set a due date)
Create pending training assignments for one or more courses and any set of people, all in one submission. This is how future training obligations enter the system.
Where: Sidebar → Assignments (opens the "Assign training" page with three numbered step cards: Pick courses · Pick people · Schedule) · Before you start: Requires the assign-training permission (Training Coordinator or Manager and above; the page itself says "Ask a Training Coordinator or Manager to assign courses" if you lack it). At least one active course and one employee must exist.
| Option | What it does |
|---|---|
| Search courses… | Multi-select course picker; rows are code-prefixed and searchable. Only active course versions at the target's locations are offered. |
| Add a group… | Adds every course in a saved course group to the selection (union — never removes anything already picked). |
| New course | Course managers can create a course inline; it is added to the list and selected immediately. |
| Individuals / Department / Location / Everyone | The four targeting tabs. Individuals defaults; Everyone targets all active employees. Archived employees are never included. |
| Already completed (impromptu / past training) | Switch that flips the wizard into past-session recording (see the next function). Off by default; only shown to users who can record completions. |
| Due date | Required for a scheduled assignment; every created record carries it. |
| Notes (optional) | Free text up to 1000 characters, shown on each created assignment record. |
- In the sidebar, click Assignments.
- In step 1, "Pick courses", click the "Search courses…" button and tick one or more courses — each row shows the course code as a prefix before the full title. A badge counts your selection.
- Optional: click "Add a group…" to add every course in a course group at once, or "New course" to create a course inline without leaving the wizard (visible to course managers only).
- Selected courses appear as removable "CODE — Title" chips under the picker; click the × on a chip to drop one.
- In step 2, "Pick people", choose a tab: Individuals (search and tick people — "Select all shown" and "Clear" links are above the list), Department ("Choose a department…"), Location ("Choose a location…"), or Everyone (all active employees). A "N targets" badge and, on wide screens, a "Who will be assigned" side panel show exactly who is included.
- Read any amber hints: courses not available at the target's location will be skipped, and "N of these already have this training assigned and will be skipped" warns about duplicates before you submit.
- In step 3, "Schedule", set the "Due date". Optionally add "Notes" — they are visible on each assignment record.
- Check the sticky footer math — "N courses × N people = N assignments" — then click "Assign training".
- Success: the wizard is replaced by a "Training assigned" card stating how many records were created and their due date, listing any duplicates skipped or location-ineligible pairs excluded, with buttons "View these records" (opens the Record Completion list filtered to exactly these records), "Print the sign-in sheet" (single scheduled course only), "Assign more training", and — when you arrived from an employee page — "Back to <name>".
Good to know:
- People who already hold an open assignment for a selected course are skipped automatically — assigning is idempotent and never creates duplicates.
- Course/employee pairs where the course is restricted to locations the employee is not at are excluded, and the success card reports the count.
- Deep link: clicking "Assign training" on an employee's page opens the wizard with that person pre-selected.
- The success card's "View these records" opens the Record Completion list on the All view filtered to the course and due date — records that already matched that filter appear there too; the card's counts are what this submission created.
Record a past or impromptu session
Enter training that already happened — a toolbox talk held this morning, or a new hire's existing external certificate — creating one already-completed record per attendee in a single step, with no pending assignment ever existing.
Where: Sidebar → Assignments → step 3 "Schedule" → turn on the "Already completed (impromptu / past training)" switch · Before you start: Requires the record-completions permission (the switch is hidden without it) in addition to being able to open the wizard.
| Option | What it does |
|---|---|
| Completion date | Required; defaults to today in the organization's timezone and cannot be later than today. Impromptu records carry it as their due date too. |
| Grade (optional) | 0–100, decimal allowed. Below a course's passing grade the completion records as Failed (with a warning shown first). |
| Hours (session) | Decimal training hours 0–24 in 0.25 steps; stamped on every attendee's record — record the session once for the whole class. |
| Instructor (optional) | Free text up to 200 characters; blank falls back to the course's default instructor. |
- In the sidebar, click Assignments and complete steps 1 and 2 (pick the course(s) and the attendees) as usual.
- In step 3, "Schedule", turn on "Already completed (impromptu / past training)". The due-date field is replaced by session fields.
- Set "Completion date" (defaults to today; cannot be in the future).
- Optionally enter "Grade" (0–100; the placeholder shows "Pass ≥ N" when a selected course has a passing grade), "Hours (session)" (0–24, quarter-hour steps — every attendee's record receives these hours), and "Instructor" (blank uses the course default).
- If the grade is below the strictest passing grade among the selected courses, an amber notice appears: "Below the passing grade of N% — the completion will be recorded and flagged." You can still save; the record will carry the Failed status.
- Click "Assign & record completion".
- Success: a toast reports "Assigned N · N completed" (plus any next occurrences scheduled), and the success card offers "View these records" — the completed records now exist, one per attendee, dated in the past.
Good to know:
- Records are created and completed immediately; recurring courses schedule their next occurrence from the completion date (the form says so in-line).
- For an evidence-only external record (e.g. a valid WHMIS certificate from a previous employer): record it here, then open the record's View details to set the Training source to External with provider and certificate number, and upload the certificate under Attachments with type "Certificate".
- Impromptu recording has its own date-specific duplicate handling, so the wizard's pre-submit duplicate hint is not shown in this mode.
Find records in the Record Completion list
The master training report — one list of every assignment record, filterable by status, employee, course, dates, location, department and delivery source. This is where daily completion work happens.
Where: Sidebar → Record Completion (page title "Record Completion", eyebrow "Records") · Before you start: Any signed-in staff member can view the list within their location scope; the actions it offers depend on your role's capabilities.
| Option | What it does |
|---|---|
| Status filter (button row) | Incomplete (default — pending work), Overdue, Due soon, Pending, Completed, Expired, Failed (completions below the passing grade), All, N/A (waived). |
| Search employee, number or course… | One search box covering employee name, employee number and course; up to 200 characters. |
| Due … to … | Inclusive due-date range filter. |
| All courses | Course filter listing each course's active version as "CODE — Title (vN)"; matching is by course family, so records earned on earlier versions still show. |
| Location / Department filters | Narrow by employee location (only offered when the org has 2+ locations) or department; default all. |
| All sources | Training-source filter: Internal, External or Online. A record's own source override wins over its course default. |
| Group by | No grouping (default), Group by employee, or Group by course — grouped rows get a header with a per-group count. Grouping and column sorting are mutually exclusive. |
| Show archived employees | Off by default; on, archived employees' records appear (marked with a crossed-eye icon). |
- In the sidebar, click Record Completion.
- Pick a status in the button row at the top (labelled "Status filter"): Incomplete · Overdue · Due soon · Pending · Completed · Expired · Failed · All · N/A (waived). The list opens on Incomplete.
- Type in "Search employee, number or course…" — matching is live with a short delay; a spinner replaces the magnifier while it searches.
- Narrow further with the filter bar: the "Due … to …" date range, the course dropdown (defaults "All courses"), Location (shown only when the org has more than one), Department, the training-source dropdown ("All sources" / Internal / External / Online), and the grouping dropdown (No grouping / Group by employee / Group by course).
- Toggle "Show archived employees" to include records belonging to archived people.
- Click "Clear filters" (appears only when something is active) to reset everything at once.
- Success: the count line reads "Showing X–Y of Z records", with a pager at both top and bottom (50 records per page).
Good to know:
- A dismissible hint under the toolbar teaches the core interaction: "Select rows to mark complete, reschedule, waive or email — or use the ⋯ menu on any row."
- Only pending rows are selectable — completed, waived, expired or failed rows cannot be bulk-actioned (use the row's ⋯ menu → View details instead).
- The floating selection bar (bottom of the screen) shows "N selected" with Mark complete, Waive, Reschedule, Email and Clear — each button appears only if your role holds that capability.
- Rows with a paperclip icon carry attachments.
- Page-header shortcuts sit beside the title: "Sign-in sheet", "Print badges" (employee managers) and "Scan check-in" (completion recorders).
Customize columns, sorting and saved views
Shape the Record Completion table to your job: hide columns you never read, sort by any column, and save filter combinations you use daily as named views.
Where: Sidebar → Record Completion → "Columns" and "Views" buttons (top right), and the column headers themselves · Before you start: None beyond viewing the list. Column choices and saved views are stored in your browser, per device.
| Option | What it does |
|---|---|
| Visible columns | Per-column show/hide checkboxes; choices persist in the browser (localStorage) and default to all visible. |
| Saved views | Named filter presets (status view + search + filters + sort, page excluded). Saving under an existing name replaces it. |
- Open Record Completion.
- Click "Columns" and tick or untick entries under "Visible columns": Employee, Employee #, Course, Department, Due date, Status, Completed on, Grade, Training hours, Instructor, Cert. expiry, Competency. All are on by default.
- Click any column header to sort: first click ascending, second descending, third clears back to the default order. (Hours and Competency are derived values and are not sortable.) Applying a sort flattens any grouping.
- To save the current combination of status view, search, filters and sort: click "Views" → "Save current filters…", type a name in the prompt, and confirm.
- Re-apply a saved view any time from "Views" → "Saved views"; the active one shows a check mark. Delete one with its trash button (or the Delete key while it is focused).
- Success: the table immediately reflects your columns/sort, and your saved view reappears in the menu on every visit from this browser.
Good to know:
- Sorting is server-side, so it orders the entire result set, not just the current page — and the CSV export carries the active sort so the file matches the table.
- Grade values below the course's passing grade render red; the Failed status has its own badge and its own view in the status row.
Mark training complete
Record completions for one row or a whole class at once, capturing date, grade, session hours, instructor and a shared attendance sheet in a single dialog.
Where: Sidebar → Record Completion → tick pending rows → "Mark complete" in the floating selection bar (or a single row's ⋯ menu → "Mark complete") · Before you start: Requires the record-completions permission. Only rows still in Pending status can be completed.
| Option | What it does |
|---|---|
| Completion date | Required; defaults to today in the org timezone, max today. |
| Grade (optional) | 0–100 decimal; below the passing grade the record becomes Failed (warned, never blocked). |
| Hours (this session) | Decimal 0–24 in 0.25 steps, written to every selected record; feeds the Training Hours report. |
| Instructor (override) | Up to 200 characters; blank uses the course's default instructor. |
| Attendance sheet / shared attachment (optional) | One file, uploaded once and linked to all selected records; each row then shows a paperclip and the file appears under View details → Attachments and on each employee's profile. |
- Open Record Completion (the default Incomplete view shows outstanding work; the header checkbox selects all selectable rows on the page).
- Tick the attendees' rows. The floating bar appears showing "N selected".
- Click "Mark complete". The dialog reads "Record a completion for N assignments. Recurring courses automatically schedule their next occurrence."
- Set "Completion date" (defaults to today; cannot be in the future).
- Optionally fill "Grade (optional)" (placeholder shows "Pass ≥ N" when a selected course has a passing grade), "Hours (this session)" (0–24, 0.25 steps — applied to every selected record), and "Instructor (override)" (blank keeps the course default).
- If the grade is below the strictest passing grade among the selected rows, the amber warning "Below the passing grade of N% — the completion will be recorded and flagged." appears; saving records the rows as Failed.
- Optionally click "Choose file…" under "Attendance sheet / shared attachment (optional)" — the file is uploaded once and linked to every selected record.
- Click "Mark N complete".
- Success: a toast such as "N completed · N next occurrences scheduled · attendance sheet attached to N records", with a "View records" action that re-opens the same filters on the All view (completed rows leave the Incomplete view immediately, so this is how you see what you just did).
Good to know:
- Completing a recurring course automatically creates the next pending occurrence (see "Recurring courses and the next occurrence").
- A completion recorded below the passing grade does not issue a certificate and counts as non-compliant everywhere (its own Failed view, matrix colour and report treatment).
- For certificate courses, certificate expiry is derived once at completion from the course's certificate settings.
Waive an assignment (N/A)
Mark a pending assignment as not applicable with a documented reason — the compliant way to say "this person doesn't need this training" while keeping the record for audit.
Where: Sidebar → Record Completion → tick pending rows → "Waive" in the selection bar (or a row's ⋯ menu → "Waive (N/A)") · Before you start: Requires the assign-training permission. Pending rows only.
| Option | What it does |
|---|---|
| Reason | Required free text (3–500 characters), stored on the record and written to the audit log. |
- Open Record Completion and select the pending row(s) to waive.
- Click "Waive" in the floating bar (or ⋯ → "Waive (N/A)" on one row).
- The dialog "Waive assignment(s)" explains: "Mark N pending assignment(s) as not applicable (N/A). The record is kept for audit purposes."
- Type a "Reason" (at least 3 characters, up to 500 — e.g. "Role does not require this training").
- Click "Waive N".
- Success: toast "N assignments waived (N/A)"; the rows move to the "N/A (waived)" view, and the reason is visible on each record's details and in the audit log.
Good to know:
- Waived records are excluded from compliance percentages as not-applicable rather than counted against the employee.
- In the Workforce Competency report a waived required course counts as MET — a documented waiver is a decision, not a gap.
- The waive reason shows in the record's detail sheet ("Waive reason" row) and in the Waive reason column of the CSV export.
Reschedule a due date
Move the due date of pending assignments — a postponed session, a rehire's stale training — without deleting and recreating anything.
Where: Sidebar → Record Completion → tick pending rows → "Reschedule" in the selection bar (or ⋯ menu → "Reschedule"; also available inside View details for a pending record) · Before you start: Requires the assign-training permission. Pending rows only — completed or waived records cannot be rescheduled.
| Option | What it does |
|---|---|
| New due date | Required; minimum is today in the org timezone. Bulk selections default to today rather than any one row's date. |
- Select the pending row(s) and click "Reschedule".
- The dialog ("Reschedule assignment" or "Reschedule N assignments") states the current due date for a single row.
- Pick a "New due date" — today or later; the field pre-fills with the row's current due date, or today if that date is already past.
- Click "Reschedule".
- Success: toast "Due date moved to <date>." (bulk: "N assignments rescheduled to <date>." plus any "skipped (already completed or waived)"). The date change is recorded in the audit log.
Good to know:
- The dialog states it plainly: "The date change is recorded in the audit log. Completed or waived records can't be rescheduled."
- Rescheduling changes the row's sort position but keeps your selection intact.
View a record's details
Open the full record sheet for any assignment — every fact an auditor asks for on one panel: dates, grade, instructor, certificate expiry, course version, competency, training source, attachments, notes and who recorded it.
Where: Sidebar → Record Completion → any row's ⋯ button ("Row actions") → "View details" (a side panel opens) · Before you start: Any list viewer can open details; the editing sections inside are gated by role.
- In Record Completion, click the ⋯ button at the right end of a row and choose "View details".
- Read the header: course code, status badge, course title and the employee's name.
- Review the fact rows: Employee (linked, with # and an Archived badge where relevant), Department, Location, Due date, Completed on, Recorded by, Grade (with a "below N%" chip on failed grades), Instructor, Certificate expires (certificate courses), "Recurs every N days" (recurring courses), Waive reason (waived records), Notes.
- Below the facts: the "Course version" line (with a "Superseded" badge when a newer version is now current), the "Competency" section (competency-required courses only), and the "Training source" panel (Delivery / Provider / Certificate # / Location).
- Further down: Attachments, then role-gated sections — Reschedule (pending), Edit completion (completed), and Delete record (Administrators).
- Success: close the panel with the × or by clicking outside; nothing is changed by viewing.
Good to know:
- Records permanently keep the course version they were completed against — a version bump never rewrites history; the sheet shows the earned version with its Superseded/Current state.
- On competency courses a completed-but-unassessed record reads "Assessment pending — training is complete, competency has not been demonstrated yet."
- "Recorded by" names the member who recorded the completion — blank on pending or legacy rows.
Edit a completion
Correct the date, grade, hours or instructor on an already-completed record — including deliberately re-grading below the pass mark, which flags the record as Failed.
Where: Sidebar → Record Completion → ⋯ → View details → "Edit completion" section (completed records only) · Before you start: Requires the assign-training permission; the section only renders on records in Completed status.
| Option | What it does |
|---|---|
| Completion date | Required; max today in the org timezone. |
| Grade | 0–100 decimal; clearing it removes the grade. Below the passing grade the record flags as Failed. |
| Hours | Decimal training hours 0–24 in 0.25 steps; feeds the hours reporting. |
| Instructor | Up to 200 characters; blank falls back to the course default. |
- Open the completed record via ⋯ → "View details" and scroll to "Edit completion".
- Adjust "Completion date" (max today), "Grade" (0–100), "Hours" (0–24, 0.25 steps) and/or "Instructor" (blank = course default).
- If the new grade is below the course's passing grade, an amber line warns: "Below the N% passing grade — this will flag as failed."
- Click "Save changes".
- Success: toast "Completion record updated." and the panel closes; the list refreshes with the corrected values (and the Failed status where applicable).
Good to know:
- Certificates keep their issued term: correcting the completion date re-anchors an already-issued certificate at the validity it was issued under — it is never re-issued under the course's current policy, and editing a course's "Valid for (days)" never back-fills existing records. Re-issuing under a new policy means completing the training again.
- If the record's completion had scheduled a recurring follow-up, correcting the completion date moves the follow-up's due date to match (certificate expiry wins; otherwise completion + interval).
- Re-grading below the pass mark makes the record Failed everywhere — list view, matrix, compliance percentages — and a failed completion carries no certificate.
Set the training source on a record
Classify who delivered a specific training record — Internal, External or Online — and, for external training, capture the provider, certificate number and training location. One workflow covers internal and external training; these are attributes of the record, not separate modules.
Where: Sidebar → Record Completion → ⋯ → View details → "Training source" panel → "Edit" · Before you start: Requires the record-completions permission to edit. External providers are picked from the Training providers directory (Administration → Training providers).
| Option | What it does |
|---|---|
| Delivery | Course default (inherit — the default), Internal, External, or Online / self-serve; drives the list's "All sources" filter, the CSV "Training source" column and the Internal vs External Training report. |
| Provider | Picker over active entries in the Training providers directory; deactivated providers stay displayed on records that already name them but leave the picker. |
| Certificate # | The provider's certificate number for this record (optional). |
| Location (optional) | Free-text training location for this record. |
- Open the record via ⋯ → "View details" and scroll to "Training source". Untouched records show their course's default, e.g. "Internal (course default)".
- Click "Edit".
- Set "Delivery" — Course default, Internal, External or "Online / self-serve".
- For external training, pick the "Provider" from the directory, and fill "Certificate #" and "Location" (both optional).
- Click "Save".
- Success: toast "Training source updated."; the panel lists Delivery, Provider, Certificate # and Location — only the fields you filled in are displayed.
Good to know:
- A record with no override inherits its course's delivery classification (In-person/Video/Practical courses fold to Internal; Online and External map to their own buckets).
- External training never automatically makes anyone competent or qualified — competency assessment is a separate internal step on competency-required courses.
Attach files to a record
File certificates, signed sheets, photos and assessment evidence directly on the training record they prove — each under its correct type, so audit evidence is one click from the record.
Where: Sidebar → Record Completion → ⋯ → View details → "Attachments" section · Before you start: Uploading requires the record-completions permission; removing an attachment requires the assign-training permission.
| Option | What it does |
|---|---|
| Attachment type | Certificate (default), Competency evidence, Attendance sheet, or Other — the label the file is stored and displayed under. |
- Open the record via ⋯ → "View details" and scroll to "Attachments".
- In the "Attachment type" dropdown choose Certificate, Competency evidence, Attendance sheet, or Other.
- Click "Upload" and pick the file.
- Success: toast "<Type> uploaded."; the file lists on the record with its type and size, downloadable via the download button, and the row in the training list gains a paperclip icon.
- To remove one (managers): click the trash button on the attachment and confirm "Remove \"file\" from this record?".
Good to know:
- Attachments are optional — nothing about a completion or an assessment requires a file.
- A shared attendance sheet uploaded in the Mark-complete dialog lands here on every completed record automatically; a signed sign-in sheet attached from the Sign-in sheet page instead files under the course's Materials & SOPs.
- Attached files also appear on the employee's profile.
Export and print the training list
Take the filtered training list off-screen — a CSV that matches the table exactly (filters, source filter and sort included) or a printer-friendly report.
Where: Sidebar → Record Completion → "Export CSV" and "Print report" buttons (top right) · Before you start: "Export CSV" requires the export-data permission (the button is hidden without it); "Print report" requires the Print capability (on for every role by default).
- Set the status view, search, filters and sort you want in the file.
- Click "Export CSV".
- Success: the file downloads as assignments-<view>_<date>_<time>.csv and a toast confirms "Exported N records." Its columns are: Employee, Employee #, Course, Course code, Version, Department, Location, Due date, Status, Completed on, Grade, Training hours, Instructor, Certificate expiry, Competency, Qualification, Training source, Waive reason, Notes.
- For paper: click "Print report" — a print-formatted page opens carrying the exact same filters; print from the browser.
Good to know:
- The export always honours every active filter and the active column sort — a filtered screen never produces an unfiltered file.
- Exports are capped at 5,000 rows: a larger result downloads the first 5,000, the filename gains "-partial", and a warning toast tells you to narrow the filters for the full set.
- Competency and Qualification cells are blank for courses with no competency requirement, and derive identically to the on-screen column.
Print a sign-in sheet and record the session
Run a classroom session on paper: print a sign-in sheet for everyone with a pending assignment on a course, have attendees sign it, then bulk-complete from the signed copy and file the scan.
Where: Sidebar → Record Completion → "Sign-in sheet" button in the page header (page title "Sign-in sheet") · Before you start: Anyone who can view the list and holds the Print capability (on for every role by default) can print; "Attach signed sheet" requires the manage-courses permission; the follow-up bulk-complete requires record-completions.
| Option | What it does |
|---|---|
| Course | Required; "CODE — Title" picker. Nothing renders until a course is chosen. |
| Due from / Due to | Optional due-date window narrowing who appears on the sheet. |
| Print orientation | Portrait (default) or Landscape — set in-app because the page's print rule overrides the browser dialog's own orientation picker. |
- From Record Completion, click "Sign-in sheet" in the header.
- Pick the "Course" ("Choose a course…") and optionally a "Due from" / "Due to" range — the sheet lists everyone with a pending assignment matching them.
- The actions sit in the row above the filters, the same toolbar as a session's sign-in sheet: "Back" (to Record Completion) on the left; "Attach signed sheet", "Record completions", the Portrait / Landscape toggle and "Print sign-in sheet" on the right.
- Choose the print orientation with the Portrait / Landscape toggle (portrait is the default for the sign-in layout).
- Click "Print sign-in sheet" and print the browser dialog.
- Run the session; attendees sign the sheet.
- Back on the page, click "Record completions" — it jumps to Record Completion pre-filtered to this course and date range, ready to tick attendees and use "Mark complete".
- Optionally scan the signed sheet and click "Attach signed sheet" to upload it.
- Success: toast "Signed sign-in sheet attached — it's now under the course's Materials & SOPs." (To file the sheet on each attendee's record instead, attach it in the Mark-complete dialog.)
Good to know:
- "Attach signed sheet" files the scan under the course's Materials & SOPs (one copy per course); attaching in the Mark-complete dialog files it on each employee's record instead — the page header states this distinction.
- The wizard's success card offers "Print the sign-in sheet" pre-filtered to the course and due date you just assigned.
Run a Scan check-in session
Record attendance for a live group session by scanning employee QR badges (or typing names/numbers) — every checked-in person gets a completed record in one tap, walk-ins included.
Where: Sidebar → Record Completion → "Scan check-in" button in the page header (page title "Scan check-in", eyebrow "Attendance") · Before you start: Requires the record-completions permission (the header button is gated on it). Badges are printed via "Print badges" beside it (employee managers with the Print capability). Camera use needs browser permission; manual entry needs neither.
| Option | What it does |
|---|---|
| Course | Required; changing course mid-session asks to confirm and clears the checked-in roster. |
| Completion date | Defaults to today in the org timezone; cannot be future. |
| Instructor (optional) | Up to 200 characters; blank uses the course default. |
- From Record Completion, click "Scan check-in".
- Pick the "Course" ("Choose a course…"), confirm the "Completion date" (defaults to today, max today) and optionally the "Instructor (optional)" (blank = course default).
- In the "Scan badges" card, click "Start camera" and point the camera at each employee badge — each scan toasts "Checked in <name>" and adds the person to the "Checked in" roster on the right.
- No camera or an unreadable badge? Use "Manual entry — type an employee number or name" (e.g. "1042 or Jane Doe"), pick from the type-ahead or press "Add".
- Remove a mistaken check-in with the × on their roster row.
- When the room is done, click "Mark N complete".
- Success: toast such as "N marked complete · N newly assigned · N next occurrences scheduled"; the roster clears for the next session while course, date and instructor stay set.
Good to know:
- Anyone checked in without an open assignment for the course is assigned one automatically, then completed — recurrence and certificate expiry are handled the same as everywhere else (the page says so under the button).
- If your account cannot assign training, walk-ins are not silently dropped: a toast reports "N not assigned this course yet — a coordinator needs to assign it first."
- Check-in deliberately captures no training hours — the kiosk stays a fast tap-through by design; add hours afterwards via Edit completion if needed.
- Duplicate scans are ignored (a badge held in frame doesn't double-check anyone in), and already-checked-in people are filtered out of the type-ahead.
Recurring courses and the next occurrence
Understand what happens automatically when a recurring course is completed: TrainGrid spawns the next pending occurrence itself, so refresher cycles never depend on someone remembering to re-assign.
Where: Automatic — visible in the Mark-complete toast ("N next occurrences scheduled"), the wizard success card, and a record's View details ("Recurs every N days") · Before you start: The course must have recurrence configured (its recurrence interval, and certificate settings if it issues one) on the course form.
- Complete any assignment of a recurring course (Mark complete, check-in, or an impromptu recording).
- Read the success toast: it includes "N next occurrence(s) scheduled".
- Open Record Completion on the Pending view and find the employee's new row for the same course — that is the spawned next occurrence.
- Success: the completed record and its future follow-up both exist; the derived states (Due soon, Overdue, Expired) then track the new due date automatically.
Good to know:
- The next occurrence's due date is the certificate's stored expiry when the course issues one — the refresher comes due exactly when the certificate lapses; otherwise it is the completion date plus the recurrence interval.
- Correcting a completion date later moves the follow-up's due date to match (using the certificate expiry as stored, never recomputed from the course's current settings).
- Statuses like Overdue, Due soon and Expired are always computed from dates — never stored — so they update by themselves as the calendar advances.
- Deleting a completed parent record also removes the follow-up occurrence it had scheduled, and the delete confirmation says so.
Delete an assignment record
Permanently remove a single assignment record — a data-entry mistake, a duplicate created outside the wizard — with the deletion written to the audit log. This is deliberately rare and restricted.
Where: Sidebar → Record Completion → ⋯ → View details → "Delete record" (red button at the bottom of the panel) · Before you start: Administrator only (the delete-records capability is owner-level by default and the button does not render otherwise).
- Open the record via ⋯ → "View details" and scroll to the bottom.
- Click "Delete record".
- Read the confirmation "Delete this assignment?" — it names the course and employee, notes the completion date, and warns that a follow-up occurrence scheduled by this completion will be removed too, that this cannot be undone, and that an audit log entry will be recorded.
- Click "Delete".
- Success: toast "Assignment record deleted." (or "…also removed N follow-up occurrences it had scheduled.") and the panel closes.
Good to know:
- If a completed record spawned a recurring follow-up, deleting the parent removes that follow-up too, so compliance never counts a phantom obligation.
- For "this person shouldn't have this training requirement", use Waive (N/A) instead — it keeps the audit trail; delete is for records that should never have existed.
Schedule a training session
Put an instructor-led class on the calendar: a course on a date, from a start to an end time, at a location, with an optional instructor, seat limit and notes. Nothing is assigned by scheduling; the roster becomes records when attendance is recorded (see Record session attendance).
Where: Sidebar → Calendar → "Schedule session" (page title "Schedule session"); or a course's page → "Upcoming sessions" card → "Schedule session", which pre-selects the course · Before you start: Assign & schedule capability (Administrator, Manager, Training Coordinator). A location-scoped member must pick one of their own locations.
| Field | What it does |
|---|---|
| Course | Required; "Choose a course". Only current, active courses are offered. |
| Date · Start time · End time | Required; the date is today or later when scheduling; both times fall on that date and the end must be after the start ("End time must be after the start time."). Defaults: today, 09:00, 11:00. |
| Location | One of your active locations, or "No specific location" (not offered to location-scoped members). The helper under it names the zone the times are read in: "Times are in <zone> (the location's zone)" or "(your organization's zone)", then "Employees see the session in this zone too." |
| Instructor | Optional, up to 200 characters; pre-filled from the course's default instructor. |
| Capacity | 1 to 500, or tick "No limit" (the default). |
| Employees can book themselves | Ticked by default. Untick "for a closed session that only staff enrol (an academy week, a mandated group day)"; employees you add still see it in their portal. |
| Notes (shown to employees) | Optional, up to 2000 characters. |
- In the sidebar, click "Calendar", then "Schedule session".
- Choose the "Course"; set "Date", "Start time" and "End time".
- Choose the "Location" and read the zone line under it.
- Optionally set "Instructor", "Capacity" (or leave "No limit"), untick "Employees can book themselves" for a closed session, and add "Notes (shown to employees)".
- Click "Schedule session". Success: toast "Session scheduled." and the new session's page opens with the badge "Upcoming" and the roster line "0 booked".
Good to know:
- Times are stored and shown in the session location's time zone, else the organization's; never the browser's. Where the zone differs from the organization's it is named beside the time on every surface.
- A session is a single day, at most 24 hours; there are no recurring series and no draft sessions. Schedule each date separately.
- "Edit" on the session page reopens this form with the course fixed ("The course cannot change on an existing session; schedule a new one instead."). Changing the time or place emails every booked employee with an email address; the capacity cannot drop below the number already booked; a session cannot be moved into the past.
- Find sessions later with the Calendar's "Month" view or its "Next 90 days" / "Past 90 days" list, plus the "Course" and "Location" filters; the course filter matches every version of the course.
Book employees onto a session
Fill a session's roster from the staff side: add employees (including walk-ins on the day) or remove someone who cannot attend. Employees may also book their own seat from the portal when the session allows it.
Where: Sidebar → Calendar → open the session → "Add employees" button; "Remove" on a roster row · Before you start: Assign & schedule capability; the session must be open (not cancelled, attendance not yet recorded). Only active employees within your location scope are offered.
- Open the session and click "Add employees". The dialog "Add employees to this session" states "N seats left." (or "This session has no seat limit.") and that "Booked employees with an email address are notified."
- Type in "Search by name, number or department" and tick people; the footer counts "N selected" (maximum 500 per add). If you tick more than the seats left it warns "N more than the seats left: the extra will not be booked."
- Click "Add N employees". Success: a toast such as "Booked 12 · 2 already booked · 1 not booked: the session is full · 10 will be emailed"; the roster now lists them with Source "Added by staff" and Attendance "Not recorded".
- To take someone off, click "Remove" on their row and confirm "Remove this booking?" ("<name> loses their seat on this session. Their training records are not affected, and they can be added again while the session is open."). Success: toast "<name> removed from the session."
Good to know:
- The seat limit is enforced when the booking is saved, so two people adding at once cannot overbook; anyone who did not fit is reported as "not booked: the session is full".
- Booked employees with an email receive "Booked: <course> on <date>" with the time, place and instructor. Employees who have activated portal access are also told they can cancel from their portal Calendar and get a link to it; everyone else is told to contact their training coordinator to change or cancel the booking, and gets no link. The same rule applies to the "Changed:" and "Cancelled:" emails. A roster row marked "no email" gets nothing; tell them in person.
- Employees who book themselves appear with Source "Self-booked". They can cancel their own seat until the session starts; you can remove anyone until attendance is recorded. A removed employee sees the session under My bookings with the pill "Removed by your organization" and cannot book it again from the portal; add them back with "Add employees" if that changes.
- Location scope: you see only the booked employees at your locations; the roster line reads "N booked · N shown (others are outside your location scope)" when some are hidden, and the sign-in sheet carries the same notice.
- "Print sign-in sheet" (always available) prints the sign-in sheet layout with the course, session date, time and zone, location and instructor filled in, one signature row per booked employee and five blank rows for walk-ins. The sheet page carries the course sign-in sheet's toolbar: "Back" returns to the session, Portrait / Landscape sets the orientation (the `orient` URL parameter, portrait by default), "Attach signed sheet" (Manage courses; hidden for a session on a superseded course version) files the scan under the course's Materials & SOPs, and "Print sign-in sheet" prints.
Record session attendance
Turn the roster into completion records in one step. Ticked employees get a completed record for the course (their existing due assignment is completed if they have one, otherwise a completed record is created); unticked employees are marked absent and nothing is recorded for them. Once per session.
Where: Sidebar → Calendar → open the session → "Record attendance" button (enabled from the session date onward) · Before you start: Record completions capability; to record attendees who hold no assignment for the course (walk-ins), Assign & schedule as well. Every walk-in must already be on the roster ("Add employees"). The whole roster must be within your location scope.
| Field | What it does |
|---|---|
| Attended | Checklist of the roster, everyone ticked by default except archived employees, who are listed with an "Archived" tag and start unticked because no record can be written for them; the header counts "N of M". Untick the absent. |
| Completion date | Defaults to the session date; must fall between the session date and today. |
| Grade (optional) | 0 to 100, applied to every attendee; below the course's passing grade the records become Failed. |
| Training hours | Defaults to the scheduled length, in hours to two decimals; 0 to 24; stamped on every attendee's record. |
| Instructor | Pre-filled from the session; up to 200 characters. |
- Open the session on or after its date and click "Record attendance". Read the dialog text: "Ticked employees get a completed record for <course> (their existing due assignment is completed if they have one). Unticked employees are marked absent and nothing is recorded for them. Attendance is recorded once."
- Untick anyone who did not attend.
- Check "Completion date", optionally enter "Grade (optional)", adjust "Training hours" if the class ran shorter or longer, and check "Instructor".
- Click "Record N attended, N absent". Success: toast "N attended, N absent · N completion records written" (plus "N already recorded for this class" and "N walk-ins assigned" when they apply) with a "View the records" action; the session badge reads "Attendance recorded", the status line "Attendance recorded on <date>", the Details card gains "Attended", and each roster row reads "Attended" with a "View record" link, or "Absent".
Good to know:
- Per attendee: their earliest pending assignment for the course is completed whatever its due date; with none, a completed record is created (this needs Assign & schedule, otherwise the dialog refuses: "N attendee(s) have no assignment for this course and you cannot assign training. Ask a coordinator to assign the course, then record attendance."); a completion already recorded for the course between the session date and the completion date is this class's record and is kept, not duplicated.
- The records are written exactly as Mark complete writes them: a certificate issued once where the course requires it, Failed below the passing grade, the next occurrence of a recurring course scheduled, one audit entry per record. They are written against the course's current version.
- Attendance is recorded once. Afterwards Add employees, Edit and Cancel session disappear and a second attempt says "Attendance has already been recorded for this session. Correct individual records from Record Completion." An Administrator fixes who attended on the session with "Correct attendance" (see Correct attendance (Administrator)); a date, grade or hours are fixed on the record (Edit completion in Record Completion).
- Before the session date the button is disabled with "Attendance can be recorded from the session date onward."; a cancelled session cannot be recorded ("A cancelled session has no attendance to record.").
- "View the records" (also a button in the Details card afterwards) opens Record Completion on the Completed view for that course, newest completion first. It is not filtered by date: the records keep whatever due date they were assigned with, so a date range would hide most of the class.
Cancel a session
Take a scheduled session off the plan while keeping it visible as cancelled. Bookings stay as history, no training records are created or changed, and booked employees are told.
Where: Sidebar → Calendar → open the session → red "Cancel session" button · Before you start: Assign & schedule capability; the session must not have attendance recorded (then it is history and cannot be cancelled).
- Open the session and click "Cancel session".
- Read "Cancel this session?": "N booked employees will be emailed (those with an email address)." (or "Nobody is booked on this session.") and "The session stays on the calendar as cancelled; no training records are created or changed."
- Optionally type a "Reason (optional, shown to employees)" (up to 500 characters).
- Click "Cancel session" (or "Keep session" to back out). Success: toast "Session cancelled · N booked · N will be emailed"; the badge reads "Cancelled", the status line "Cancelled (<reason>)", and Add employees, Edit and Record attendance are gone.
Good to know:
- Booked employees with an email receive "Cancelled: <course> on <date>" with your reason; in the portal the session shows the pill "Cancelled by your organization" under My bookings for 30 days.
- A cancelled session cannot be edited, booked or recorded; schedule a new one instead. There is no delete button on the calendar; cancelled sessions remain in the list and in the Month view (struck through).
- Cancelling changes nothing on anyone's assignments or due dates.
Correct attendance (Administrator)
Change who was attended or absent on a session whose attendance has already been recorded, and let the records follow: a completion record is written for anyone now attended; for anyone now absent, the record this session wrote is reopened (or removed, for a walk-in the class added) and its scheduled next occurrence cancelled. A record another session or a kiosk scan wrote is left in place. Other corrections (a date, a grade, hours) stay on the individual record in Record Completion.
Where: Sidebar → Calendar → open a session that reads "Attendance recorded" → "Correct attendance" button · Before you start: Administrator only: no other role, built-in or custom, is offered the button, and the server refuses anyone else with "Only an Administrator can correct attendance." The whole roster must be within your location scope.
| Field | What it does |
|---|---|
| Attended | Checklist of the roster starting at the current marks, "Attended" or "Absent" beside each name; the header counts "N changes" and a changed row reads "now attended" or "now absent". An archived employee can be unticked but not ticked. |
| Completion date · Grade (optional) · Training hours · Instructor | Shown only when someone becomes attended, because only they get a record written. Pre-filled from the first record the session wrote (else the session date, the scheduled length and the session's instructor), with the same limits as Record attendance. |
- Open the recorded session and click "Correct attendance". Read the dialog text, which says what happens to each person you change.
- Tick anyone marked absent who did attend; untick anyone marked attended who did not.
- If anyone is now attended, check "Completion date", "Grade (optional)", "Training hours" and "Instructor".
- Click "Save N corrections". Success: toast "N corrected · N now attended (N records written) · N now absent (N records reopened, N walk-in records removed)" with a "View the records" action; each corrected roster row's badge flips, and the session still reads "Attendance recorded".
Good to know:
- A reopened record goes back to pending, loses its certificate, and the next occurrence its completion had scheduled is cancelled. A walk-in record (one this class created for someone who held no assignment) is removed instead, together with its follow-up.
- Records this session did not write are kept, and the toast says so: "kept for another class" when another session also counts the record (correct that class too and the second correction finishes the undo), and "kept: recorded elsewhere" when a kiosk scan or a completion recorded outside any class was only counted here.
- Some records cannot be undone from here and stop the whole save until they are resolved in Record Completion: one with a competency assessment, one whose next occurrence is already complete, one on a superseded course version, or one with attached files. The message names the person.
- If a colleague corrected the same session while the dialog was open, the save is refused: "The roster changed while this dialog was open. Reload the page and correct attendance again." Nothing is flipped back unseen.
- Every change is in the audit trail (Administration → Audit log): one "attendance_corrected" entry on the session listing every booking before and after, a "complete" entry on each record written and a "reopen" entry on each record reopened.
Functions: Competency & Qualification
This area covers TrainGrid's competency layer: proving that a trained employee can actually do the work, and deriving whether they are currently qualified to do it. Use it when a course needs a practical demonstration on top of attendance — forklift operation, line changeovers, HACCP duties — and when you need to answer an auditor's question "is this person qualified for this job, today?"
In this section: Understand the model: Training ≠ Competent ≠ Qualified · Require a competency assessment on a course · Record a competency assessment · The six outcomes and their effects · Track competency expiry and reassessments · Attach competency evidence · Declare required training for a position · Run the Workforce Competency report · Read the Competency Status report · Flag a change's competency impact when versioning · The Failed training status
Understand the model: Training ≠ Competent ≠ Qualified
TrainGrid keeps three separate states per record: Training (was the course completed?), Competency (did an assessor see the skill demonstrated?), and Qualification (is the person currently allowed to do the work?). Qualification is always derived from the other facts — it is never stored, so it can never go stale.
Where: Visible side by side on any record sheet: Sidebar → Record Completion → Completed → row ⋯ (Row actions) → View details → Competency section (Outcome and Qualification badges) · Before you start: None — the model applies automatically wherever a course requires competency.
- Open any completed record on a competency-required course (Sidebar → Record Completion → click Completed in the status button row → ⋯ → View details).
- Read the Competency section: the Outcome badge is what the assessor recorded; the Qualification badge is what the system derives from it right now.
- Note that a record can be Completed (Training) yet show "Assessment pending — training is complete, competency has not been demonstrated yet." — training alone never makes anyone qualified.
Good to know:
- Qualification is recomputed on every view from: training status, grade vs passing grade, certificate expiry, competency outcome, competency expiry, and any carried prior outcome. Nothing is written back.
- A completed course whose certificate has lapsed reads Not qualified — expired training cannot support a qualification.
- A completion with a grade below the course's passing grade reads Not qualified regardless of what the assessor recorded (see "The Failed training status").
- On courses that do not require competency, the Qualification column shows a dash ("—") rather than implying an assessment happened.
- A waived record shows "N/A (waived)" — excused, not failed; it is deliberately not painted red.
- Qualification states you will see: Qualified · Qualified (conditions) · Qualified (reassessment pending) · Not qualified · N/A (waived) · —.
- External certificates follow the same rule: external training completed + certificate uploaded still shows Assessment pending until your own assessor records the internal practical assessment.
Require a competency assessment on a course
Switches the competency layer on for one course. Competency is strictly per-course opt-in, so awareness-style training stays simple while safety-critical courses get the full assessment workflow.
Where: Sidebar → Courses → open the course → "Competency & topics" card · Before you start: Manage courses capability (Administrator/Manager/Coordinator by default).
Set up (one time):
- In the sidebar, click Courses and open the course.
- In the "Competency & topics" card, tick "Competency assessment required".
- Optionally fill "What must be demonstrated (optional)" — this text is shown to assessors at the top of the record's Competency section.
- Optionally set "Reassess every (days)" — each assessment then derives a competency expiry that many days out; blank means no expiry.
- Click "Save competency settings". Success: toast "Competency settings saved." and every completed record of this course now carries a Competency section.
| Option | What it does |
|---|---|
| Competency assessment required | The opt-in checkbox; off by default. Helper text: "Completion records 'trained'; an assessor must also record a demonstrated pass before the employee reads as competent." |
| What must be demonstrated (optional) | Free-text assessment description (e.g. "Startup, changeover, safety interlock verification, shutdown."); displayed to assessors on every record of the course. |
| Reassess every (days) | Derives a competency expiry from each assessment date; blank = no expiry (the field is labelled "(blank = no expiry)"). |
| Topics covered | Ordered topic list per course; doubles as the Areas-requiring-improvement checklist and appears in the Training Matrix column-header tooltip. |
- After saving, open a completed record of the course (Record Completion → Completed → ⋯ → View details): the Competency section is present, with your "What must be demonstrated" text at the top.
- Optionally add "Topics covered" lower in the same card (type into "Add a topic", click "Add") — a Needs-improvement assessment offers exactly these topics as its "Areas requiring improvement" tick-list.
Good to know:
- Courses without the checkbox show no Competency section on records, derive as not-required in the matrix Competency/Qualification lenses, and never appear in the Competency Status report — zero noise where competency doesn't matter.
- Passing criteria and the assessor are captured free-text at assessment time, deliberately not configured per course — there is no authorized-assessor roster.
Record a competency assessment
Captures the internal practical assessment on a completed training record — the audit artifact that turns "trained" into "competent" and drives the derived qualification.
Where: Sidebar → Record Completion → Completed (status button row) → row ⋯ (Row actions) → View details → Competency section → "Record assessment" · Before you start: The "Assess competency" capability (Permissions grid; default holders: Administrator, Manager, Coordinator, Supervisor; it requires "Record completions"). The course must require competency, and the record must be Completed — and not Failed (a below-passing grade hides the button; retraining comes first).
| Option | What it does |
|---|---|
| Outcome | Six-option select, defaults to Competent; drives which extra fields appear. |
| What do these mean? | Toggle beside Outcome that opens the legend (each outcome's meaning + suggested next action) inline in the form. |
| Date | Assessment date, required for assessed outcomes; capped at today in the organization's timezone. |
| Assessor | Free-text name of who assessed the demonstration; required for assessed outcomes. |
| Conditions / restrictions | Shown and required only for Competent with conditions — the restriction is the point of the outcome. |
| Reason (required) | Exempt only: why the requirement does not apply; save is blocked without it. |
| Approved by | Exempt only: who approved the exemption; required. |
| Exemption expires (optional) | Exempt only: date the exemption lapses; "Leave blank if the exemption is permanent." |
| Areas requiring improvement | Needs improvement only: checkboxes generated from the course's "Topics covered" list. |
| Suggested actions (optional) | Five checkboxes (Retraining, Coaching, Supervised practice, Reassessment, Qualification / authorization change); any combination with any outcome. |
| Reassessment due (optional) | Follow-up date, offered for every outcome except Competent; minimum today. |
| Comments (optional) | Free-text notes stored on the assessment. |
- In the sidebar, click Record Completion.
- In the status button row at the top, click Completed.
- Find the record (use "Search employee, number or course…"), click its ⋯ button (Row actions) and choose View details.
- In the Competency section, click "Record assessment".
- Pick an "Outcome" from the six options: Competent, Competent with conditions, Needs improvement, Not competent, Not assessed, Exempt. (Click "What do these mean?" beside the Outcome label to open the legend inline.)
- For any assessed outcome, set "Date" (cannot be in the future) and "Assessor" ("Who assessed the demonstration"). Both fields disappear for Not assessed and Exempt.
- Fill the outcome-specific fields — Competent with conditions: "Conditions / restrictions" (e.g. "Supervised operation only"); Exempt: "Reason (required)", "Approved by", "Exemption expires (optional)"; Needs improvement: tick "Areas requiring improvement" from the course's own topics.
- Optionally tick any of the five "Suggested actions (optional)" checkboxes: Retraining, Coaching, Supervised practice, Reassessment, Qualification / authorization change — these are deliberately independent of the outcome.
- For any outcome except Competent, optionally set "Reassessment due (optional)" (today or later).
- Optionally add "Comments (optional)".
- Click "Save assessment". Success: toast "Competency recorded: <Outcome>." and the panel now shows the Outcome and Qualification badges plus assessor, date and any conditions, areas to improve, actions and reassessment date.
Good to know:
- Save is disabled until: assessor + date for assessed outcomes, conditions for Competent with conditions, and reason + approver for Exempt. Every rule is re-validated server-side — the assessment is a tamper-resistant audit artifact.
- To change or update an existing assessment, click "Reassess" (the button relabels once an outcome exists). The form opens pre-filled with the current assessment so a reassessment edits rather than silently discards what is there.
- If the course has "Reassess every (days)" set, saving an assessment derives a "Competency expires" date shown on the record.
- Supporting files (photos, signed checklists) attach separately — see "Attach competency evidence".
The six outcomes and their effects
Reference for what each competency outcome means and exactly what it does to the derived qualification. Choose the outcome for what happened; use Suggested actions for what should happen next.
Where: The legend renders in two places: Reports → Competency Status → "What do these outcomes mean?" expander (with colour swatches), and inside the assessment form behind "What do these mean?" · Before you start: None — reading the legend requires no capability.
- Open Sidebar → Reports → Competency Status and click "What do these outcomes mean?" below the summary to expand the legend.
- Read each entry: colour swatch, outcome name, meaning, and the suggested next action in italics — the swatch matches the matrix Competency-lens cell colour exactly.
Good to know:
- Competent — "Employee demonstrated the required skill to the expected standard." Derives Qualified (until the competency expiry, if the course sets one). The only outcome with no Reassessment-due field.
- Competent with conditions — "Employee can perform the task but requires restrictions or additional supervision." Derives Qualified (conditions); the recorded conditions display on the record.
- Needs improvement — "Employee demonstrated some capability but did not fully meet the standard." Carry rule: if the previous assessment on this record was Competent or Competent with conditions and that prior outcome has not itself expired, the employee shows "Qualified (reassessment pending)" — the existing qualification is kept until the reassessment actually happens, instead of dropping them into the same bucket as Not competent. The carry lasts one generation only and ages out on the prior outcome's own expiry. With no unexpired prior qualifying outcome, Needs improvement derives Not qualified.
- Not competent — "Employee did not demonstrate the required competency." Derives Not qualified; suggested action: do not authorize independent work; assign retraining and reassessment.
- Not assessed — "Competency has not yet been evaluated." Resets the record to pending assessment; no assessor or date is captured. Derives Not qualified.
- Exempt — "The competency requirement does not apply to this employee." Counts as Qualified while in force. With "Exemption expires" set, the exemption stops excusing the requirement the day after that date — the badge flips to Expired and the qualification to Not qualified, so a temporary exemption (a secondment, a role change) cannot quietly become permanent. Blank = permanent.
- Display-only states you may also see: Expired (a Competent/Competent-with-conditions/Exempt outcome whose expiry date has passed), Not required (course has no competency requirement) and N/A (waived) — none of these is an assessable outcome.
- Suggested actions never auto-drive anything: ticking Retraining does not assign a course. They are the assessor's documented recommendation.
Track competency expiry and reassessments
Reassessments are derived tasks, not separate records: two date sources (the course's "Reassess every (days)" expiry and the per-assessment "Reassessment due" date) surface everywhere a follow-up is owed, with automatic reminder emails.
Where: Reports → Competency Status → lens "Reassessment scheduled"; Dashboard → Competency card; the record sheet's "Reassessment due" line; Administration → Alerts → "Competency reassessment reminders" · Before you start: Alert configuration requires admin access to Administration → Alerts. The report and dashboard need no setup.
| Option | What it does |
|---|---|
| Competency reassessment reminders (alert) | "Heads-up 90, 30 and 7 days before a competency assessment falls due (its expiry or a scheduled reassessment, whichever is first), plus the day after it lapses." On by default; audience configurable like every other alert. |
- In the sidebar, click Reports and open the "Competency Status" card.
- Set the first filter to "Reassessment scheduled" — every assessment carrying a reassessment date is listed with its due date.
- Cross-check one record: open it via Record Completion → ⋯ → View details; the "Reassessment due" line renders in red once the date is past, and "Competency expires" shows any derived expiry.
- On the Dashboard, read the Competency card (eyebrow "Workforce"): counters Competent, Awaiting assessment and Reassessment due, with quick links "Trained but not qualified" and "Reassessments" jumping straight into the report lenses.
- To manage the reminder emails, go to Administration → Alerts and find the "Competency reassessment reminders" card. Success: you can read its schedule in the card description and use "Send now" to deliver it once on demand.
Good to know:
- Whichever date comes first wins: a scheduled reassessment before the derived expiry drives the reminders, and vice versa.
- An expired competency recolours the Competency lens and reads Expired on the record — a lapsed assessment is never displayed as a current "Competent".
- A met position requirement whose reassessment date is today or earlier drops the employee to "Reassessment due" in the Workforce Competency report — same predicate as the dashboard counter.
- Version changes can also stamp reassessment dates in bulk — see "Flag a change's competency impact when versioning".
Attach competency evidence
Files the signed checklist, photo or assessment document against the exact training record the assessment sits on — provable at audit, entirely optional in daily use.
Where: Record Completion → Completed → row ⋯ (Row actions) → View details → "Attachments" section · Before you start: Record completions capability. Nothing about an assessment requires a file — evidence is optional by design.
| Option | What it does |
|---|---|
| Attachment type | Classifies the upload — Certificate, Competency evidence, Attendance sheet, Other — so an assessment sheet never masquerades as a certificate. Applies to the next upload. |
- Open the assessed record via Record Completion → Completed → ⋯ → View details.
- Scroll to the "Attachments" section.
- In the "Attachment type" dropdown, choose "Competency evidence" (other kinds: Certificate, Attendance sheet, Other).
- Click "Upload" and pick the file (PDF or photo).
- Success: the file lists under the record labelled Competency evidence and is downloadable; the assignments list shows a paperclip on rows that carry attachments.
Good to know:
- TrainGrid deliberately stops short of document management: evidence hangs off training records only.
Declare required training for a position
Maps job roles to their required courses so TrainGrid can automatically answer "is this employee competent for this job?" — the input the Workforce Competency report consumes.
Where: Sidebar → Administration → "Positions" (pill navigation) → the row's "Required training" column → "Add" · Before you start: Admin access to Administration → Positions. Employees must have the position set on their profile to be checked against it.
| Option | What it does |
|---|---|
| Choose a course | Course picker (entries read "CODE — Title"); each selection declares one required course for the position. |
- In the sidebar, click Administration, then click "Positions" in the pill navigation.
- Find the position's row; its "Required training" column lists the declared courses as course-code badges (competency-required courses carry a small "competency" tag).
- Click the row's "Add" button.
- Pick a course under "Choose a course" and click "Add".
- Success: the new course-code badge appears in the Required training column. Click the × on any badge to remove a requirement.
Good to know:
- Requirements are declared against the course family, so a version bump never breaks the mapping.
- Declaring a requirement assigns nothing by itself — it defines the standard the Workforce Competency report measures against.
Run the Workforce Competency report
Buckets every employee holding a position with declared requirements as ready or not for their job — training, competency and qualification checked together, with the specific gaps named per person.
Where: Sidebar → Reports → "Workforce Competency" card · Before you start: Position requirements declared (see "Declare required training for a position") and employees holding those positions. Export needs the Export CSV capability.
| Option | What it does |
|---|---|
| All positions | Filters to one position; default all. |
| All locations | Filters to one location; default all. |
- In the sidebar, click Reports and open the "Workforce Competency" card.
- Optionally narrow with the "All positions" and "All locations" filters (the "Clear filters" button, shown once a filter is set, clears both).
- Read each row: Employee (linked to their profile), Position, Department, "Requirements met" as n of N, and a Status badge — Competent for role, Reassessment due, or Not competent for role — with the gap courses named in small text under the badge for anyone short.
- Success: the summary chips at the top total each bucket; the footnote states the counting rules.
Good to know:
- Met = a current completion whose derived qualification is Qualified or Qualified (conditions) — certificate lapse, failed grades and the needs-improvement carry are all already inside that derivation.
- A waived required course counts as met — a documented waiver is a decision, not a gap (the report footnote states this).
- A met requirement whose reassessment date is today or earlier drops the person to "Reassessment due".
- Anything else — never assigned, still pending, or not qualified — is a named gap and makes the person "Not competent for role".
- Only the current record per employee × course family counts: the latest completion wins, else the latest outstanding due date.
Read the Competency Status report
Answers, per competency requirement, what the employee was trained on, whether competency was demonstrated, and whether they are qualified — with three lenses for the three questions managers actually ask.
Where: Sidebar → Reports → "Competency Status" card · Before you start: None to view; CSV export needs the Export CSV capability. Only competency-required courses appear at all.
| Option | What it does |
|---|---|
| All competency requirements | Lens filter; the two other lenses are "Trained but not qualified" and "Reassessment scheduled". Default: all. |
| All locations | Location filter; default all. |
- In the sidebar, click Reports and open the "Competency Status" card.
- Pick a lens in the first filter: "All competency requirements" (default), "Trained but not qualified" (completed training with no qualifying assessment — the gap external certificates create), or "Reassessment scheduled".
- Optionally filter by location.
- Read the columns: Employee, Course, Training, Competency, Qualification, Assessed, Reassessment due.
- Click "What do these outcomes mean?" below the summary to expand the legend with colour swatches.
- Success: the summary line counts records with a "not qualified" (or, on the reassessment lens, "due now") figure; Export CSV includes training, competency, qualification, assessor and both date columns.
Good to know:
- The report folds to the current record per employee × course family — historical rows never inflate it.
- The CSV's training column says what every other surface says: a below-passing completion exports as "failed", not "completed".
- Empty states are honest: with no competency-required course, the report says "No course is marked as requiring a competency assessment yet. Turn it on from a course's page."
Flag a change's competency impact when versioning
When a competency-required course gets a new version, TrainGrid asks whether the change affects competency or qualification. Answering yes schedules a reassessment for everyone trained on the old version — without revoking anyone's current qualification. (Course versioning itself is covered in the Courses & Versioning area.)
Where: Sidebar → Courses → open a competency-required course → "New version" (the same pair of fields also appears when activating a saved draft) · Before you start: Manage courses capability; the course must require a competency assessment (there is nothing to reassess otherwise).
| Option | What it does |
|---|---|
| This revision affects competency or qualification | Only shown on courses with a competency requirement; ticked, activation stamps the chosen reassessment-due date onto affected employees' current competency records. |
| Reassessment due date | The date stamped on every affected record; appears once the checkbox is ticked. |
- Open the competency-required course and click "New version".
- Fill the version details, then tick "This revision affects competency or qualification". The helper text shows the live count: "N trained employees will be marked for reassessment. Existing qualifications are KEPT until each person is reassessed…".
- Pick a "Reassessment due date".
- Click "Create & make current" (or activate the draft later — the same question and preview appear there).
- Success: the toast ends with "… N marked for competency reassessment."; those employees now appear under Reports → Competency Status → "Reassessment scheduled", and each record's Competency block shows "Reassessment due: <date>".
Good to know:
- This schedules, it does not revoke: existing qualifications stay in force until each person is actually reassessed.
- The fan-out respects location eligibility and skips archived employees.
- If a record already carries an earlier reassessment date, the earlier date is kept (earliest-wins semantics).
- The 90/30/7-day reminder alert covers these stamped dates like any other.
The Failed training status
A completion recorded with a grade below the course's passing grade is a distinct Failed status everywhere — never quietly counted as compliant, and never a basis for a certificate or a competency assessment.
Where: Sidebar → Record Completion → "Failed" in the status button row (Incomplete · Overdue · Due soon · Pending · Completed · Expired · Failed · All · N/A (waived)) · Before you start: The course must have a passing grade set; without one, no grade can fail.
- In the sidebar, click Record Completion.
- In the status button row at the top, click "Failed" — the list shows every completion recorded below its course's passing grade, each with a red Failed badge.
- To see the derivation on one record: in the Training Matrix, a failed record shows its own Failed colour when it is the CURRENT record for that course family — if a newer retraining assignment or a still-valid completion exists, that takes the cell instead (retraining first is the rule). Click a failed cell where one renders — the Grade line reads e.g. "72% (below 80% pass)", and the matrix legend has its own Failed entry.
- When entering a below-passing grade on any capture surface (Mark complete, the assign wizard's already-completed path, the matrix cell), a warning appears before you save: "Below the passing grade of N% — the completion will be recorded and flagged as failed."
- Success: the saved record reads Failed in the list, the matrix, reports and the transcript — and counts as non-compliant in every percentage.
Good to know:
- Failed is derived from grade vs passing grade, never stored — correcting either value re-derives the status.
- A failed completion issues no certificate.
- Retraining-first: on a competency course, a failed record's Competency section reads "Training was failed — retraining comes before a competency assessment." and the Record assessment button is hidden.
- Failed supports no qualification, whatever an assessor recorded — the derivation returns Not qualified.
- Missing Mandatory Training reports a failed record as the gap it is, and the Internal vs External report shows a separate "Failed records" row (excluded from the compliant rows).
- Training status (Failed/Expired/…) is fully separate from course version status (Draft/Active/Archived).
Functions: Matrix & Reports
The oversight surfaces of TrainGrid: the live Training Matrix (every employee × every course, viewable through three lenses — Training, Competency and Qualification — or week by week like a spreadsheet), and the Reports section with eleven audit-ready report cards. Use these pages to answer compliance questions on demand: who is trained, who is qualified, what is expiring, what is missing, and how many hours were delivered. Every report is filterable, exports to CSV, and prints with an audit header showing exactly how it was produced.
In this section: Read the Training Matrix (By course view) · Switch the matrix lens (Training | Competency | Qualification) · Open a matrix cell (the record panel) · Export or print the Training Matrix · Use the By week view · Run the Employee Transcript report · Run the Department Compliance report · Run the Competency Status report · Run the Expiring Certificates report · Run the Missing Mandatory Training report · Run the Workforce Competency report · Run the Training Hours report · Run the Internal vs External Training report · Run the Training Log report · Run the Assignments Report (Record Completion list as a report) · Build a custom report (Report Builder)
Read the Training Matrix (By course view)
See the live training status of every active employee against every active course in one grid — the primary at-a-glance compliance surface. Cells are coloured by derived status; each row ends with a completed/assigned tally.
Where: Sidebar → Training Matrix (opens in the "By course" tab) · Before you start: Any signed-in member. Members scoped to specific locations see only their locations' employees.
| Option | What it does |
|---|---|
| By course / By week | Mode tabs. "By course" (default) shows one column per course; "By week" shows week buckets. |
| Matrix view (Training | Competency | Qualification) | Lens tab strip, By-course mode only. Default is Training. See "Switch the matrix lens". |
| Search employees… | Filters rows by employee name (debounced as you type). |
| All locations | Location filter; only shown when the organization has more than one active location. Changing it also resets the department filter. |
| All departments | Department filter; the list narrows to departments compatible with the selected location. |
| All categories | Course-category filter — narrows the columns. |
| All task types | Task-type filter (how toolbox talks are modelled); available in both modes, default off. Only shown when task types exist. |
| Courses | Multi-select course picker popover with search and a "Clear selection" button; a count badge shows how many are selected. |
| Clear filters | Appears once any filter is active; resets everything. |
- In the sidebar, click "Training Matrix". The grid opens in "By course" mode with the "Training" lens active.
- Read the legend chips above the grid: Completed, Due soon, Overdue, Expired, Failed, Pending, N/A (waived), Not assigned (a dash).
- Narrow the grid with the toolbar: type in "Search employees…", or use the "All locations", "All departments", "All categories" and "All task types" dropdowns, or click the "Courses" button to multi-select specific courses (search box reads "Search courses…"; each entry shows the course code then title).
- Hover a vertical course-column header: a tooltip shows "CODE — Title" with the version (e.g. v2.0), a flags line (Mandatory · Certificate · Competency, whichever apply) and a "Topics" block listing that version's agenda.
- Read any row's right-hand tally: completed/assigned (e.g. 5/8), with an "N od" count in red when anything is overdue.
- Click "Clear filters" to return to the full grid. Success looks like: a coloured grid where every filled cell matches a legend chip, with mandatory/certificate courses ordered first.
Good to know:
- Statuses are derived live (overdue/due-soon/expired computed from today's date in the organization's timezone), never stored.
- Columns show the course family's ACTIVE version (version badge on the header); completions earned on older versions fold into the same column, so a version bump never blanks a column.
- The grid caps at 200 employee rows and 15 course columns; on-screen notes say "Showing the first 200 of N employees" and "Showing the top N courses · +N more" when capped — narrow with filters to see the rest.
- Only active employees appear. Waived cells are excluded from the assigned/completed tallies; overdue, expired and failed all count into the red "od" tally.
- Mandatory courses are marked with a dot before the title (screen readers hear "Mandatory:").
Switch the matrix lens (Training | Competency | Qualification)
Ask three different questions of the same grid: is the training done (Training), was competency demonstrated (Competency), and is the person currently allowed to do the work (Qualification — training + competency + certificate expiry combined). An employee can be green under Training and red under Competency.
Where: Sidebar → Training Matrix → "By course" tab → the "Matrix view" tab strip (Training | Competency | Qualification) · Before you start: At least one course with "Competency assessment required" turned on, otherwise the Competency lens shows "Not required" everywhere.
- Open the Training Matrix in "By course" mode (the lens strip only appears there).
- Click "Competency". Cells repaint to competency outcomes and the legend swaps to: Competent, Competent with conditions, Needs improvement, Not competent, Exempt, Not assessed, Competency expired.
- Click "Qualification". A third repaint; legend: Qualified, Qualified (conditions), Qualified (reassessment pending), Not qualified, Not required.
- Click "Training" to return to the default lens. Success looks like: the legend always describes exactly the colours on screen for the active lens.
Good to know:
- Courses without a competency requirement render "Not required" under the Competency and Qualification lenses — competency tracking is strictly per-course opt-in.
- Waived cells never render as "Not qualified"; they show "N/A (waived)" under every lens.
- A Failed training record renders "Not qualified" under the Qualification lens — failed training supports no qualification.
- "Qualified (reassessment pending)" (amber) means the prior qualification is kept until the scheduled reassessment happens — still qualified, but visibly outstanding.
- Export CSV and Print both carry the active lens: a Competency export prints competency labels, and the printed header states "View: Competency" so the sheet declares its own scope.
- The status glossary link only appears under the Training lens (it explains training statuses).
Open a matrix cell (the record panel)
Drill from a one-glyph cell into the full record card: version, dates, grade, instructor, training source, the competency block, and a one-click jump to the employee's full history. The grid stays simple; the detail lives one click away.
Where: Sidebar → Training Matrix → click any filled cell · Before you start: Any member can view; the panel's quick actions (e.g. Mark complete, Assign) additionally require the record-completions / assign-training capabilities.
- In the Training Matrix, click a filled cell. A side panel opens for that employee × course record.
- Read the badge row at the top: the training status, the record's version badge — e.g. "v1.0 · Superseded" when a newer version has since become current — and Mandatory/Certificate flags where they apply.
- Read the detail grid: "Due date", "Completed on", "Grade" (a failed record reads e.g. "72% (below 80% pass)"), "Certificate expires", "Instructor", "Location", "Source".
- On a competency-required course, read the "Competency" block: the outcome badge plus "Assessor:", "Assessed:" and — where scheduled — "Reassessment due:".
- Click "View training history" to land on that employee's page with the History tab already open, listing every version of every record. Success looks like: the panel shows the version the record was actually earned against, never silently rewritten to the current version.
Good to know:
- Completed records permanently keep the version they were completed against; the "Superseded" marker appears once a newer version is current.
- The "View training history" button deep-links to the employee's History tab rather than opening a second popup — one authoritative history surface.
- The same panel opens from By-week cells, so both modes share one record card.
Export or print the Training Matrix
Produce a CSV or a printed sheet of exactly what is on screen — for auditors, wall postings, or offline review. The export and the print both describe cells in the vocabulary of the active lens.
Where: Sidebar → Training Matrix → "Export CSV" and "Print" buttons in the bar above the grid (beside the legend) · Before you start: "Export CSV" requires the export-data capability; "Print" requires the Print capability (on for every role by default).
- Set the mode, lens and filters so the grid shows what you want to capture.
- Click "Export CSV". In By-course mode the file has one column per course (headers like "CODE Title (v2.0)") plus Employee, Department and Completed/Assigned/Overdue tallies; in By-week mode, one column per week bucket with completed-of-total counts.
- If the grid is truncated (row/column caps), a confirmation warns that "the CSV will only include what's on screen" and points to Reports → Assignments Report for the full dataset — choose whether to export the partial view.
- Click "Print". The print is landscape A4 with the app chrome hidden and a print-only header: your logo, "<Org name> — Training Matrix (By course/By week)", the applied filters (including "View: Competency/Qualification" when not on the Training lens) and the generated date. Success looks like: a paginated sheet whose header states exactly how it was produced.
Good to know:
- Any filtered or truncated export gets "-partial" appended to its filename, and a non-training lens appends "-competency" or "-qualification" — an export can never masquerade as the complete dataset.
- Cell values in the CSV are the same labels the screen shows under the active lens.
- The print header is an audit requirement: mode, filters, search terms and week window are all listed; with no filters it reads "All employees".
Use the By week view
See training week by week, like the old spreadsheet: how much came due each week and how much of it was completed — including upcoming scheduled weeks for planning toolbox talks and sessions.
Where: Sidebar → Training Matrix → "By week" tab · Before you start: Any signed-in member.
| Option | What it does |
|---|---|
| Window — weeks back | How many completed weeks to show before the current one: 4, 8 or 12 weeks back. Default 8. |
| Window — upcoming | How many future weeks to include: No upcoming (default), +2 upcoming, or +4 upcoming. |
- In the Training Matrix, click the "By week" tab.
- Set the window with the "Window" control: a weeks-back select (4/8/12 weeks back; default 8) and an upcoming select (No upcoming / +2 upcoming / +4 upcoming; default no upcoming).
- Read the columns — one per ISO week, labelled "Wk of <Mon date>" — and the legend: All completed, Partially completed, None completed (past), Due, not completed yet, Nothing due (a dash).
- Each filled cell shows completed/total (e.g. 2/3). Click a cell with one assignment to open the record panel directly; a cell with several opens a popover listing each course with its status badge — click one to open its record panel.
- Use the same search/location/department/category/task-type filters as By-course mode. Success looks like: past weeks read green/amber/red at a glance and upcoming weeks show what is scheduled.
Good to know:
- Weeks are anchored to the organization's calendar day and ISO weeks (Monday start).
- Only a truly Completed assignment counts as done in the weekly tally — an expired certificate reads as not-done, matching the by-course tally and the dashboard.
- Waived assignments are excluded from the week grid entirely.
- The lens strip (Training/Competency/Qualification) does not apply in By-week mode; the week CSV exports completed-of-total per bucket.
Run the Employee Transcript report
Generate the complete training history for one employee — the document handed to an auditor, with a signature block for sign-off. Includes archived employees.
Where: Sidebar → Reports → "Employee Transcript" card · Before you start: Any member with Reports access; "Export CSV" additionally requires the export-data capability.
| Option | What it does |
|---|---|
| Employee picker | The only filter: one employee per transcript, searchable by name or employee number; includes archived employees. |
- In the sidebar, click "Reports", then open the "Employee Transcript" card.
- Use the employee picker (search box "Search by name or employee #…") to select an employee — archived staff are included.
- Read the identity block: name, employee number, an "Archived" badge where applicable, and Department, Position, Location, Shift, Supervisor, Hire date.
- Read the summary: total training records with completed / pending counts (plus overdue, expired, failed, waived when non-zero).
- Read the table — columns: Course (with the version, e.g. "v1.0 (superseded)"), Category, Status, Due date, Completed on, Grade, Instructor, Recorded by, Cert. expires, Competency.
- Click "Export CSV" for the full data (adds Qualification, Assessor and Assessed on columns), or "Print" — the printed page ends with a signature footer for auditor sign-off. Success looks like: a version-by-version history where nothing was rewritten by later course versions.
Good to know:
- Every record shows the course version it was earned against, marked "(superseded)" once a newer version is current.
- The Competency column renders only for competency-required courses; others show a dash.
- The print carries the report header (org logo, filters, generated timestamp in the org's timezone) and a signature footer.
Run the Department Compliance report
Compare departments on training compliance: headcount, what is in scope, what is compliant, and what is overdue/expired/failed — with a compliance percentage per department and a grand total.
Where: Sidebar → Reports → "Department Compliance" card · Before you start: Any member with Reports access; "Export CSV" requires the export-data capability.
| Option | What it does |
|---|---|
| All locations | The only filter; scopes both headcount and records to one location. Default: all locations. |
- Open Reports → "Department Compliance".
- Optionally narrow with the "All locations" dropdown; click "Clear filters" to clear.
- Read the summary: N departments, active employees, in scope, compliant, non-compliant.
- Read the table — columns: Department, Headcount, In scope, Compliant, Overdue, Expired, Failed, Compliance — plus a "Grand total" footer row.
- Click "Export CSV" (the CSV appends the grand-total row) or "Print". Success looks like: percentages that match the dashboard's department chart exactly.
Good to know:
- Active employees only, and current standing only (the same numbers the Matrix and Dashboard show).
- The formula, stated on the page itself: Compliance = currently compliant ÷ (compliant + overdue + expired + failed) per employee & course. Expired certificates and failed training both count as non-compliant.
- The denominator ("In scope") counts only training that has come due and must be current — pending / due-soon (not yet due) and waived records are excluded.
- Percentages are rounded to one decimal exactly like the dashboard and the SQL, so the two surfaces can never disagree by 0.1%.
- Colour semantics: ≥90% green, ≥70% amber, below that red.
Run the Competency Status report
Show where every competency requirement stands — trained, competent, qualified are three different things — and surface the two lists managers act on: people trained but not yet qualified, and scheduled reassessments.
Where: Sidebar → Reports → "Competency Status" card · Before you start: At least one course with "Competency assessment required" on, else the report is empty. "Export CSV" requires the export-data capability.
| Option | What it does |
|---|---|
| View (All competency requirements / Trained but not qualified / Reassessment scheduled) | The report's three lenses. Default: All competency requirements. |
| All locations | Location filter. Default: all locations. |
- Open Reports → "Competency Status".
- Pick a view with the first dropdown: "All competency requirements" (default), "Trained but not qualified", or "Reassessment scheduled". Optionally narrow by "All locations".
- Read the summary (records count, plus "not qualified" — or "due now" on the reassessments view).
- Expand "What do these outcomes mean?" for the legend: each outcome with its colour swatch, meaning and suggested next action — the same colours the matrix Competency lens paints.
- Read the table — columns: Employee, Course (with version), Training, Competency, Qualification, Assessed, Reassessment due (past-due dates render red).
- Click "Export CSV" or "Print". Success looks like: completed external training alone never renders anyone qualified — the gap views name exactly who still needs an internal assessment.
Good to know:
- Only competency-required courses appear; a failed training record shows "failed" in the Training column.
- The Competency and Qualification columns are derived by the same rules as the matrix, transcript and Report Builder — one derivation, everywhere.
- A reassessment due date in the past renders in red.
- Empty states are honest per view: "No qualification gaps", "No reassessments scheduled", "No competency requirements".
Run the Expiring Certificates report
List current certificates expiring within a chosen window — plus anything already lapsed — sorted by urgency, so re-certification can be scheduled before compliance breaks.
Where: Sidebar → Reports → "Expiring Certificates" card (the report page itself is headed "Expiring Certifications") · Before you start: Courses that issue certificates. "Export CSV" requires the export-data capability.
| Option | What it does |
|---|---|
| Time window (30 / 60 / 90 days) | How far ahead to look. Default 30 days. |
| Include already expired | Toggle; on by default. Off hides certificates that have already lapsed. |
| All locations | Location filter; mirrors the dashboard KPI's scope. Default: all locations. |
- Open Reports → "Expiring Certificates".
- Pick the window with the "Time window" selector: 30 days (default), 60 days or 90 days.
- Leave "Include already expired" on (default) to also list lapsed certificates, or switch it off.
- Optionally narrow with "All locations"; "Clear filters" appears once anything differs from the defaults.
- Read the table — columns: Employee, Course, Completed on, Expires on, Days remaining (a colour-coded chip; negative = lapsed), Department — sorted most-urgent first.
- Click "Export CSV" or "Print". Success looks like: a re-certified employee's old lapsed certificate does NOT appear as a false positive.
Good to know:
- Active employees only, and only the CURRENT certificate per employee × course (the latest completion) — old superseded certificates are ignored.
- A failed completion's certificate is excluded — it is not a credential to renew.
- The summary splits "within N days" from "already lapsed".
Run the Missing Mandatory Training report
Answer "who is missing required training?": every active employee without a current completion for each active mandatory course — including people who were never assigned at all, the gap most systems can't see.
Where: Sidebar → Reports → "Missing Mandatory Training" card · Before you start: At least one course marked mandatory — otherwise the page shows "No mandatory courses configured" with a "Go to courses" button. "Export CSV" requires the export-data capability.
| Option | What it does |
|---|---|
| All departments | Department filter. Default: all departments. |
| All mandatory courses | Restrict to one mandatory course ("CODE — Title"). Default: all mandatory courses. |
- Open Reports → "Missing Mandatory Training".
- Optionally narrow with "All departments" and/or "All mandatory courses" (courses listed as "CODE — Title").
- Read the summary: total gaps, employees affected, and never assigned / overdue / expired certs / failed counts where non-zero.
- Read the table — columns: Employee, Department, Course, Status — where each gap is either a red "Never assigned" badge or a status badge (overdue/expired/failed/pending) with explanatory text.
- Click "Export CSV" or "Print". With zero gaps the page renders a green "Fully compliant" panel you can print as compliance evidence.
Good to know:
- Family-aware: a completion on an older version of a mandatory course still counts as current when the new version did not require retraining — a version bump never falsely reports the whole plant as "Never assigned".
- A failed completion is reported as the gap it is, not as compliance.
- Active employees and active mandatory courses only; a documented waiver counts as covered.
- Very large results render only the first rows on screen with a banner — "export the CSV for the full list"; the CSV always carries the complete set.
Run the Workforce Competency report
Answer "is each employee competent for their job?": checks every person against their position's declared course requirements — training, competency and qualification together — and buckets each person with their specific gaps named.
Where: Sidebar → Reports → "Workforce Competency" card · Before you start: Positions must declare required courses first (Sidebar → Administration → Positions → the "Required training" column → "Add"). Employees must hold those positions. "Export CSV" requires the export-data capability.
Set up (one time):
- In the sidebar, click "Administration", then "Positions".
- On a position's row, click "Add", pick a course under "Choose a course", and click "Add" — repeat per requirement (competency courses carry a small "competency" tag; the × on a badge removes one).
| Option | What it does |
|---|---|
| All positions | Restrict to one position. Default: all positions with declared requirements. |
| All locations | Location filter. Default: all locations. |
- Open Reports → "Workforce Competency".
- Optionally narrow with "All positions" and/or "All locations".
- Read the summary: employees in roles with requirements, split into competent for role / reassessment due / not competent for role.
- Read the table — columns: Employee (linked to their profile), Position, Department, Requirements met ("n of N"), Status — with the gap courses named under the badge for anyone short.
- Click "Export CSV" or "Print". Success looks like: every person in a role with requirements is bucketed, with nothing vague — each gap names its course.
Good to know:
- Active employees only; only positions with declared requirements produce rows.
- The footnote states the rules: Met = a current completion that is qualified (competency and certificate included); a waived requirement counts as met (a documented waiver is a decision, not a gap); failed or lapsed training, missing assessments and never-assigned courses are all gaps.
Run the Training Hours report
Answer "how many hours of training did each employee receive in a period?" — with drill-down to the records behind every number, and a department comparison for management.
Where: Sidebar → Reports → "Training Hours" card · Before you start: Hours are captured optionally when completions are recorded; records without hours count as 0 and are disclosed. "Export CSV" requires the export-data capability.
| Option | What it does |
|---|---|
| From / To | Completion-date range. Defaults to the current year (Jan 1 → today). |
| All departments | Department filter. Default: all. |
| All employees | Restrict to one employee. Default: all. |
| By employee / By department | The view selector. Default: By employee. |
- Open Reports → "Training Hours".
- Set the period with "From" and "To" (defaults: January 1 of the current year to today).
- Optionally narrow with "All departments" or "All employees", and switch the view between "By employee" (default) and "By department".
- Read the summary chips: total training hours recorded, employees, avg hours / employee, and internal / external / online hour splits where non-zero.
- By employee: columns Employee, Department, Records (with "(N w/o hrs)" noted), Training hours. Click an employee's name (a disclosure arrow) to expand the records behind the number — date · course · source · hours each.
- By department: columns Department, Employees, Training hours, Avg hours / employee, with a Total footer row.
- Click "Export CSV" or "Print" (expanded drill-downs print open). Success looks like: every headline number can be opened to the exact records that produced it.
Good to know:
- Only completed training contributes; cancelled, pending and waived records never appear. Active employees only.
- Records with no hours are counted as 0 and disclosed on-page: "N completed records in this period carry no hours … Add hours through the record's Edit completion form."
- Hours split by resolved training source (internal / external / online) in the summary.
Run the Internal vs External Training report
Show management how much training is delivered in-house versus purchased: employees trained, training records, competencies assessed and expiring certificates, each split Internal / External / Online with totals.
Where: Sidebar → Reports → "Internal vs External Training" card · Before you start: Training sources come from each record's own override or its course's classification. "Export CSV" requires the export-data capability.
| Option | What it does |
|---|---|
| From / To | Date range for completions and assessments. Defaults to the current year. |
| All locations | Location filter. Default: all locations. |
- Open Reports → "Internal vs External Training".
- Set "From" / "To" (defaults to the current year) and optionally "All locations".
- Read the summary: training records in range, with internal / external / online / failed chips.
- Read the table — columns: Metric, Internal, External, Online, Total; rows: Employees trained, Training records, Failed records (only when any exist), Competencies assessed, Certificates expiring (next 30 days).
- Click "Export CSV" or "Print". Success looks like: this table and the assignments list's source filter agree with each other.
Good to know:
- Row-specific notes are printed in the table itself: "Employees trained" counts distinct people (the Total is distinct overall, not the row sum); "Failed records" are completions below the passing grade, excluded from the rows above; "Certificates expiring (next 30 days)" counts from today regardless of the date range.
- Completions, assessments and certificate expiries are three independent event sets filtered by their own dates — a later assessment is never under-reported by the completion window.
- Source is the record's own override where one was set, else the course's classification — the same resolution every other surface uses (stated in the report's own footnote). Failed records' certificates are excluded from the expiring row.
Run the Training Log report
List every completion recorded in a date range — the audit answer to "show me everyone who completed training X."
Where: Sidebar → Reports → "Training Log" card · Before you start: Any member with Reports access; "Export CSV" requires the export-data capability.
| Option | What it does |
|---|---|
| From / To | Completion-date range. Defaults to the last 30 days. |
| All courses | Restrict to one course ("CODE — Title"); inactive courses included deliberately. Default: all. |
| All departments | Department filter. Default: all. |
- Open Reports → "Training Log".
- Set "From" / "To" (defaults to the last 30 days), and optionally narrow with "All courses" (listed as "CODE — Title", including inactive courses — historical completions still count) and "All departments".
- Read the table — columns: Completed, Employee, Course, Instructor, Grade, Department — newest first.
- Click "Export CSV" or "Print". Success looks like: a dated list you can hand an auditor for "who completed X between these dates".
Good to know:
- Completions only — status = completed within the range; sorted newest first.
- Unlike most reports, this one is not restricted to active employees — it is a log of what happened.
Run the Assignments Report (Record Completion list as a report)
The master filterable list of every assignment — the Reports card that opens the Record Completion page in its reporting role: status views, date range, grouping, saved views, column chooser, CSV export and a printable report.
Where: Sidebar → Reports → "Assignments Report" card (opens /assignments — the same page as Sidebar → Record Completion) · Before you start: Any member; "Export CSV" requires the export-data capability.
| Option | What it does |
|---|---|
| Status filter (Incomplete / Overdue / Due soon / Pending / Completed / Expired / Failed / All / N/A (waived)) | The complete/incomplete partition of the list. Failed is its own bucket, separate from Completed. |
| Due date from / Due date to | Date-range filter on the due date. |
| All courses / All locations / All departments | Standard entity filters; defaults show everything. |
| All sources | Training-source filter: All sources / Internal / External / Online. A record's own source overrides its course default. |
| Group by (No grouping / Group by employee / Group by course) | Sections the list; default no grouping. |
| Columns | Show/hide table columns. |
| Saved views | "Save current filters…" stores a named filter set; reapply or delete from the same menu. |
- Open Reports → "Assignments Report" (or click "Record Completion" in the sidebar).
- Pick a status view in the button row at the top (labelled "Status filter"): Incomplete · Overdue · Due soon · Pending · Completed · Expired · Failed · All · N/A (waived).
- Narrow further: the search box ("Search employee, number or course…"), "Due date from" / "Due date to", and the All courses / All locations / All departments / All sources (Internal / External / Online) dropdowns.
- Choose a grouping: No grouping, Group by employee, or Group by course.
- Use "Columns" to toggle visible columns (Employee, Employee #, Course, Department, Due date, Status, Completed on, Grade, Training hours, Instructor, Cert. expiry, Competency), and the views menu to "Save current filters…" as a named saved view for reuse.
- Click "Export CSV" or "Print report". Success looks like: a CSV whose columns include Version, Location, Qualification, Training source, Waive reason and Notes on top of everything on screen.
Good to know:
- The CSV export always carries the extended column set (Version, Location, Qualification, Training source, Waive reason, Notes) regardless of which columns are visible on screen.
- This is the recommended full-dataset export when the Training Matrix warns its own CSV is a partial view.
Build a custom report (Report Builder)
Build your own report across every training record: choose the columns (including the Competency group and Training hours), filter, group, then export, print — or save it by name to reuse.
Where: Sidebar → Reports → "Report Builder" card · Before you start: Any member with Reports access; "Export CSV" requires the export-data capability. Saving creates reports visible on this page; you can update/delete only reports you manage.
| Option | What it does |
|---|---|
| Saved reports | "Load a saved report…" dropdown of stored configurations. |
| Report name | Name used by Save as new / Update (placeholder: "e.g. Overdue mandatory by department"). |
| Update / Save as new / Delete / Reset | Update overwrites the loaded report (managers only); Save as new stores a copy; Delete removes it; Reset restores the defaults. |
| Columns | Pill toggles for the 26 available columns across Employee, Course, Record and Competency groups; at least one required. |
| Employees | Active only (default) / Archived only / All. |
| Department / Location / Category | Entity filters; default All. |
| Group by | No grouping (default), Department, Location, Course / topic, Category, Status, Competency, Qualification. |
| Date field + From / To | Which date the range filters: Due date (default) or Completed date. |
| Status chips | Completed / Due soon / Overdue / Expired / Failed / Pending / Waived; toggle any subset — none selected means all statuses. |
| Mandatory only | Chip restricting to mandatory courses; off by default. |
- Open Reports → "Report Builder". It loads with default columns (Employee, Employee #, Department, Course / topic, Status, Due date, Completed) and active employees.
- Under "Columns", click the pill for each column to include. Available: Employee group (Employee, Employee #, Department, Position, Location, Shift, Supervisor), Course group (Course code, Course / topic, Category, Mandatory), Record group (Status, Due date, Completed, Grade, Training hours, Instructor, Cert expiry, Recorded by), Competency group (Competency required, Competency, Qualification, Assessor, Assessed on, Competency expiry, Reassessment due).
- Set the filters: "Employees" (Active only / Archived only / All), "Department", "Location", "Category", "Date field" (Due date / Completed date) with "From" / "To", the Status chips (Completed, Due soon, Overdue, Expired, Failed, Pending, Waived — none selected = all), and the "Mandatory only" chip.
- Pick "Group by": No grouping, Department, Location, Course / topic, Category, Status, Competency, or Qualification — grouped sections show a count per group on screen (export/print stays flat).
- The record count updates live above the table. Click "Export CSV" or "Print" from the report shell.
- To reuse it: type a "Report name" and click "Save as new" (toast "Report saved."). Later, pick it from "Load a saved report…" under "Saved reports"; "Update" and "Delete" appear on reports you manage; "Reset" clears everything. Success looks like: the saved report reloads with the exact same columns, filters and grouping.
Good to know:
- Competency and Qualification columns are derived through the same rules as the matrix and reports, against the organization's today — the builder can never disagree with the screen a reader checks it against.
- Results cap at 10,000 rows with an explicit note ("first 10,000 — narrow the filters for more"); the six fixed reports are the ones that always export complete sets.
- With no columns selected the page asks you to "Pick at least one column above to build your report."
- The printed output carries the applied-filter chips and generation timestamp like every other report; exports and prints stay flat even when grouped on screen.
Functions: Notifications, Portal & Tools
Everything that surrounds day-to-day training records: the automated alert engine and each user's notification feed, the employee portal (each employee's own record plus the session Calendar), subscription and plan management, the REST API / webhook / HRIS integrations, and productivity tools such as the command palette and the built-in user guide. Use this area when you are deciding who gets told what (and when), giving employees self-service access to their own records, or wiring TrainGrid into the rest of your stack. A quick-reference section at the end collects the training status vocabulary, the competency colour legend and the roles at a glance.
In this section: Configure automated alerts & notifications · Send an alert immediately (Send now) · Read and manage your notifications · Schedule the compliance report for leadership · Invite an employee to the portal · Activate portal access (the employee's steps) · Use the employee portal · Book or cancel a seat in a session (portal) · Manage your plan & billing · Create and manage API keys · Add webhook endpoints · Sync your roster from BambooHR · Search & jump anywhere with the command palette (⌘K) · Open the in-app user guide & get help · Quick reference: statuses, colours & roles
Configure automated alerts & notifications
Choose which of the seven automated alerts your organization sends, how often each goes out, and which roles receive it. Alerts are generated once per day and delivered both in-app and by email.
Where: Sidebar → Administration → Alerts pill → the "Alerts & notifications" page · Before you start: Administrator or Manager (the manage-organization capability). Other roles can view the page but every control is disabled.
| Option | What it does |
|---|---|
| Due-soon reminders | Daily digest of assignments coming due within the organization's due-soon window, sent when new items enter it. Default: on, daily, to all four base roles. |
| Overdue reminders | Alerts the day after training becomes overdue, then a weekly follow-up until resolved. Default: on, daily, to all four base roles. |
| Certificate expiry reminders | Heads-up at 30, 14, 7 and 1 day before a certification expires. Default: on, daily, to all four base roles. |
| Expired certificate alerts | Alerts the day after a certification lapses, then a weekly follow-up while no renewal is scheduled. Default: on, daily, to all four base roles. |
| Weekly supervisor summary | Monday-morning overview to Supervisors and Training Coordinators of their team's overdue and upcoming training. Default: on, weekly. |
| Roster status digest | Lists WHICH employees are overdue, due soon, or holding an expired certificate — names, not just counts. Default: OFF (the only alert off by default), weekly, to Administrators, Managers and Supervisors. |
| Competency reassessment reminders | Heads-up 90, 30 and 7 days before a competency assessment falls due (its expiry or a scheduled reassessment, whichever is first), plus the day after it lapses. Default: on, daily, to all four base roles. |
| Master data changes | A daily email to Administrators listing every change made the previous day to employees, courses, the administration lists (departments, divisions, positions, locations, categories, tags, task types, training providers, employment types, custom fields, course groups), users, invitations, roles and permissions — what was added, changed, deleted, activated or deactivated, and by whom. Sent each morning only when something changed. Default: on. Its schedule and recipients are fixed (daily, every Administrator), so this card has only an on/off switch. |
| Schedule | Per-alert cadence: Daily, Weekly or Monthly. |
| Send to | Per-alert audience checkboxes — the four base roles plus every custom role. Custom-role targeting is additive to base roles. |
- In the sidebar, click Administration, then click the Alerts pill. The page "Alerts & notifications" opens with one card per alert.
- Find the alert you want to change. The seven cards are: "Due-soon reminders", "Overdue reminders", "Certificate expiry reminders", "Expired certificate alerts", "Weekly supervisor summary", "Roster status digest" and "Competency reassessment reminders". Each card's description states exactly what it sends and when. Below them sits an eighth card, "Master data changes", which has only an on/off switch.
- Use the switch at the top right of a card to turn that alert on or off.
- With the alert on, open the "Schedule" dropdown and pick Daily, Weekly or Monthly.
- Under "Send to", tick the roles that should receive it: Administrators, Managers, Training Coordinators, Supervisors — plus any custom roles your organization has created, which appear as extra checkboxes. Selecting a custom role targets its members in addition to any base roles ticked.
- Click "Save alert settings" at the bottom. An enabled alert with no recipients is refused with an error — pick at least one role or switch it off.
- Success: the toast "Alert settings saved." appears and the page reflects your configuration; while edits are pending you see "You have unsaved changes."
Good to know:
- Recipients scoped to specific locations only ever receive alerts about their own sites (stated on every card).
- Every alert is delivered in-app and by email; individual users can turn their own alert email off from their Notifications page, but in-app alerts always remain.
- An organization that never opens this screen keeps the built-in defaults — nothing changes until an Administrator opts in.
- In Administration → Settings, the alerts card also offers "Preview your digest" with a "Send me a preview" button, which sends you a sample of your own digest (or reports "Nothing to preview" when no training falls in any reminder category).
- The card layout is: title + description on the left, then "Send now" and the on/off switch on the right; Schedule and Send to only appear while the alert is enabled.
Send an alert immediately (Send now)
Deliver any alert on demand — in-app and by email — to its saved audience, using live data, without waiting for the daily schedule. Useful for testing an alert's content or pushing an urgent reminder.
Where: Sidebar → Administration → Alerts → "Send now" button on any alert card · Before you start: Administrator or Manager. The alert's saved audience must contain at least one active user for anything to be delivered.
- Open Administration → Alerts and find the alert card you want to send.
- Click "Send now" on that card. A confirmation dialog opens titled "Send “<alert title>” now?".
- Read the dialog: it names the saved recipients, warns that each press sends a fresh copy even if the alert already went out today, notes when the alert is switched off for the regular schedule ("Send now delivers it once anyway"), and warns if you have unsaved changes ("Send now uses the last saved settings").
- Click "Send now" in the dialog (or "Cancel" to back out). The button shows "Sending…" while in flight.
- Success: a toast such as "Sent to N recipients. N emails on their way; the rest are in-app only." — or "Delivered in-app (no email addresses on file for these recipients)."
Good to know:
- Honest empty results: "Nothing to send — no items currently match “<title>”." when no data falls in the alert's category, and "Nobody to send to — “<title>” has no active users in its saved audience." when the audience is empty. If delivery genuinely reached nobody, an error toast says so instead of reassuring you.
- Send now always sends to the SAVED audience — unsaved edits on the screen are ignored.
- Send now is unconditional: every recipient in the audience is reached even if they already received today's scheduled copy.
Read and manage your notifications
Every user's personal feed of alerts — reminders about overdue training, upcoming due dates and expiring certificates, plus confirmations of training you assign. Clicking a notification deep-links to the relevant filtered list or report.
Where: Bell icon in the top header (badge shows the unread count) → "View all notifications" → the Notifications page · Before you start: Any signed-in user. The feed shows only your own notifications.
| Option | What it does |
|---|---|
| Email me training reminders | Per-user switch controlling whether your alerts also arrive by email. Default: on. Turning it off never affects other users or in-app notifications. |
- Click the bell icon in the header (labelled "Notifications", with a red unread-count badge when anything is unread). A dropdown shows your most recent notifications.
- Click "View all notifications" at the bottom of the dropdown to open the full Notifications page (paginated, 25 per page, timestamps in your organization's timezone).
- Click any notification to jump to what it is about — for example a certificate-expiry alert opens the expiring-certificates report, and a competency reassessment reminder opens the Competency Status report's reassessment view.
- Use the "Mark as read" control on a row to clear one item, or "Mark all read" to clear everything unread at once.
- To stop receiving these alerts by email, switch off "Email me training reminders" at the top of the page. The note under it confirms: "In-app notifications always appear here. Turn this off to stop the matching reminder emails — this affects only you."
- Success: unread items lose their highlight, the bell badge count drops, and the email toggle confirms with "Email reminders turned off. You’ll still see them here." (or "turned on").
Good to know:
- Notification types you may see (each with its own icon and label): Due soon, Overdue, Certificate expiring, Certificate expired, Weekly summary, Roster status, Competency reassessment, Training assigned, System.
- A notification whose email delivery failed still shows as an unread in-app item, so you never silently miss an alert.
- This is a per-user preference; the organization-wide on/off for each alert lives in Administration → Alerts.
Schedule the compliance report for leadership
Email a recurring compliance summary for your organization — overall rate, overdue, due-soon and expiring certificates — to named people (a QA lead or CFO, for example) who may not even have TrainGrid logins.
Where: Sidebar → Administration → Settings → "Scheduled compliance report" card · Before you start: Administrator or Manager. Email must be configured for your deployment (the card says so).
| Option | What it does |
|---|---|
| Frequency | Off (default — no scheduled report is sent), Weekly (Monday mornings, org timezone) or Monthly (the 1st of each month, org timezone). |
| Recipients | Free email addresses (they need not be TrainGrid users). Invalid addresses are rejected; at most 10 recipients. |
- Open Administration → Settings and scroll to the card "Scheduled compliance report".
- Open the "Frequency" dropdown and choose Weekly ("Emailed every Monday morning in your organization's timezone.") or Monthly ("Emailed on the 1st of each month in your organization's timezone."). The default is Off.
- In "Recipients", type an email address into the name@company.com field and click "Add" (or press Enter). Repeat for each recipient — up to 10. Remove one with the × on its chip.
- Click "Save schedule".
- Success: the toast "Report schedule saved." appears, and the summary is emailed on the chosen cadence from then on.
Good to know:
- This is the recommended weekly/monthly roll-up for Administrators and Managers; the "Weekly supervisor summary" alert covers Supervisors and Training Coordinators (its own description points here).
- The same Settings card also holds the email-log retention setting (how long the organization's email delivery log is kept) directly below the report schedule.
Invite an employee to the portal
Give an employee self-service access to their own training record (compliance, due dates, printable transcript) and to the session Calendar, where they can book a seat, without a staff seat. The invitation produces an emailed link plus a copyable activation link.
Where: Sidebar → Employees → open the employee → "Invite to portal" button (top of the profile) · Before you start: Administrator, Manager or Training Coordinator (manage-employees). The employee must be active, have an email address on their profile, and not already be linked to the portal — the button only renders when all three hold.
- In the sidebar, click Employees and open the employee's profile.
- Check the employee has an Email on file (the "Email" field in the detail grid) — without one the button does not appear.
- Click "Invite to portal". If an invitation is already outstanding the button reads "Resend portal invite" instead.
- A dialog titled "Portal invitation sent" opens: if email is configured the employee has been emailed, and the dialog also shows the activation link with a copy button — share it directly if a spam filter might eat the email. Click "Done".
- Success: the profile's "Portal access" field changes from "None" to "Invited" (and later to "Active" once the employee activates). The toast reads "Portal invitation ready — share the link below."
Good to know:
- Portal invitations are valid for 14 days; expired ones can simply be re-sent.
- Administration → Users ends with an "Employee portal access" section — a roster of every employee invited to or registered on the portal, with columns Employee, Employee #, Email, Status and Invited, and status badges Active (with activation date), Invited (with expiry) and Expired.
- No password is ever assigned or stored in a viewable form: employees set their own password when they activate (the Users page states this in so many words).
- The activation link must be used with the exact email on the employee's profile — if that email is later changed, the old invitation becomes unusable and says so; send a fresh one.
Activate portal access (the employee's steps)
What the invited employee does with their activation link: create an account (choosing their own password), sign in, or use Continue with Microsoft where it is enabled, then activate access to their own training records.
Where: The emailed/shared activation link (a /portal-accept/… address) → the "Portal access" activation page · Before you start: A valid, unexpired portal invitation. The employee must use the exact email address the invitation was issued for.
- Open the activation link. The page "View your training" explains that your organization invited you to view your own training records and names the email to use.
- Click "Create account" if you are new (you choose your own password there — nothing is assigned to you), or "Sign in" if you already have a TrainGrid account with that email. Where Microsoft sign-in is enabled, a "Continue with Microsoft" button sits above those two with an "or use email" rule: choose it to sign in with the work Microsoft account that carries this same email address; no TrainGrid password is needed.
- You return to the activation page, now titled "Activate your access". Click "Activate my access".
- Success: you land in the portal at "My training" showing your own records. If you were signed in with a different email, the page instead says "Signed in with a different email" and offers "Sign out and continue".
Good to know:
- The link expires after 14 days ("This link has expired" — ask your training coordinator for a new one).
- A used link shows "Already activated" with a Sign in button; an invalid or superseded link shows "This link isn't valid".
- Activation enforces a three-way email match (your account email, the employee record's email, and the invitation's email). If the employee record's email changed after the invite went out, the page says "This invitation is out of date" — a fresh invitation is required.
- After a Microsoft sign-in the page must still be sure of your address. If it shows "Email address not verified", your organization's directory did not confirm the email to TrainGrid: ask your IT team to confirm your email domain is verified in Microsoft Entra, or activate with an email and password instead.
Use the employee portal
The employee's own view: a "My training" page with compliance summary and full assignment list, a printable transcript, and a "Calendar" of scheduled sessions. Your training record cannot be edited here; the one action available is booking or cancelling a seat on an upcoming session from Calendar.
Where: Portal users land at "My training" after signing in; "View printable transcript" (top right) opens the transcript · Before you start: An activated portal account (see the two invitation functions).
- Sign in with your portal account. The "My training" page opens with your name, position and department and, when you hold a booking, a "Next session:" line linking to Calendar.
- Read the four summary cards: "My compliance" (a percentage that matches the organization's own dashboard math), "Completed", "Upcoming" and "Overdue".
- Scroll the table below — columns Course, Status, Due date, Completed on, Certificate expires — covering every record with a colour-coded status badge.
- Click "View printable transcript" to open your "Employee Training Transcript" (columns: Course, Category, Status, Due date, Completed on, Grade, Instructor, Cert. expires, with a Generated timestamp).
- Click "Print transcript" to print or save it as PDF.
- Success: you have a complete, current, printable record of your own training. The footer reads: "Your training record is read-only here; contact your training coordinator to correct anything. You can book or cancel a seat on an upcoming session from Calendar."
Good to know:
- Failed parity: a completion recorded below the course's passing grade shows the same red "Failed" badge as staff surfaces, counts inside the "Overdue" summary card (together with overdue and expired items), and is excluded from the compliant side of "My compliance" — the portal never overstates an employee's standing.
- "My compliance" uses the exact same definition as the organization dashboard (one current-standing row per course; not-yet-due items excluded), so the two numbers can never disagree; when nothing is in scope yet it shows an em-dash.
- The portal shows only the signed-in employee's own records — no organization dashboards, no other employees, nothing writable except their own seat bookings. Its chrome is deliberately minimal: a two-tab nav ("My training", "Calendar") and "Sign out".
Book or cancel a seat in a session (portal)
The one thing an employee can do in the portal besides read and print: hold a seat on an upcoming instructor-led session their training coordinator has opened for self-booking, or give the seat back. Booking does not create or change any training record; the completion appears under My training only after the coordinator records attendance.
Where: Portal → "Calendar" tab (beside "My training"); the "Next session:" line on My training links there too · Before you start: An activated portal account and an active employee record. Sessions appear under "Open for booking" only when the coordinator left "Employees can book themselves" ticked, the session has not started or been cancelled, the course is current and available at your location, the session is held at your own location or at "No specific location" (with no location on your profile, only the latter), and you are not already booked.
- Open "Calendar". The page reads "Instructor-led sessions your training coordinator has scheduled. Times are shown in each session's local time zone." Under "My bookings" are your seats ("Upcoming", then "Recent" for 30 days after a session); under "Open for booking" are the sessions you may join. With nothing in either, the page says "No upcoming sessions".
- Read a card: the course title and code, the date and time in the session's zone (with "(your organization's time: …)" underneath when it differs), location, instructor, seats ("Seats: 3 of 8 left", "Full", or "No seat limit") and any notes from the coordinator.
- Click "Book a seat". Success: toast "Seat booked for "<course>"." and the card moves to "My bookings" with the pill "Booked"; if your profile has an email address you receive "Booked: <course> on <date>".
- To give the seat back — possible only on a session marked "Employees can book themselves" — click "Cancel my booking" on the card and confirm "Cancel your booking?" ("Your seat on "<course>" (<when>) will be released for someone else. You can book again while seats remain and the session has not started."). Success: toast "Your booking was cancelled."
- After the session, the pill changes when your coordinator records attendance: "Attended" or "Marked absent". A session your organization cancels shows "Cancelled by your organization"; a seat your organization took away while the session still goes ahead shows "Removed by your organization" under "Recent", and that session is not offered to you again.
Good to know:
- The exact states: "Book a seat" appears only on a session that is open for booking and not full; a "Full" session shows its seats in red with no button; "Cancel my booking" appears on your own booking on a self-booking session until the session starts (afterwards: "This session has already started; ask your training coordinator."); on a closed session the card prints "This session is enrolled by your training coordinator; ask them to remove you." where the button would be, and the same sentence comes back if the cancellation is attempted anyway. Trying to book a closed session says "This session is enrolled by your training coordinator."; a session that filled a moment ago says "This session is full."; one that has begun says "Booking closed: this session has already started."
- Read-only workspace: while your organization's workspace is read-only, the Calendar shows "Booking is paused for this workspace. Contact your training coordinator." and no booking buttons; an inactive employee record shows "Your employee record is not active." instead.
- The footer states the rule: "Booking a seat holds your place on the day. Your training coordinator records attendance after the session, and the completion then appears under My training."
- There is no waitlist and no reminder email. You are emailed when you book, when the coordinator books you, when the time or place changes and when a session is cancelled, provided your profile has an email address.
Manage your plan & billing
See your current plan and trial status, start a subscription, switch tiers or billing intervals, and reach the secure Stripe billing portal for payment methods, invoices and cancellation.
Where: Sidebar → Administration → Billing pill → the "Billing & plan" page · Before you start: Administrator only (the manage-billing capability — even Managers are redirected away).
| Option | What it does |
|---|---|
| Billing period | Monthly or annual pricing toggle; annual equals ten monthly payments (two months free). Defaults to your actual current interval when subscribed, otherwise annual. |
| Starter | 1 location, 3 staff logins, unlimited employees, all reports, 5 GB attachment storage. |
| Professional | 1 location, 10 staff logins, everything in Starter, 25 GB attachment storage, priority support. |
| Enterprise | Multiple locations & divisions, unlimited staff logins, location-scoped roles & reporting, unlimited attachment storage, guided onboarding & import. |
- Open Administration → Billing. The "Current plan" card shows your Plan with a status badge (Trial, Active, Cancellation scheduled or Cancelled), the relevant date ("Trial ends", "Renews on", or "Access until" once a cancellation is scheduled), and "Days remaining" on trial or "Status" when subscribed.
- Use the "Billing period" toggle to switch the displayed prices between monthly and annual (annual is marked "2 mo free").
- Compare the three plan cards — Starter, Professional and Enterprise (marked "Most popular") — each listing its limits and features; an "Attachment storage" bar above shows your current usage against your plan's allowance.
- Click the button on the plan you want. Its label tells you exactly what happens: "Choose plan" opens Stripe checkout (a first purchase), "Switch to this plan" or "Switch to annual/monthly billing" opens the billing portal for a prorated change, "Current plan" is disabled, and "Contact sales" appears when self-serve billing is not enabled on your deployment.
- Complete the flow in Stripe and you are returned to the page — success shows the toast "Subscription active — thank you! It may take a moment to reflect."; backing out shows "Checkout cancelled — no charge was made." If you have not added anyone yet, the page instead shows Plan active. Next: import your roster with an Import your roster button.
- For everything else — updating the payment method, downloading invoices, cancelling — click "Manage billing" to open the secure Stripe billing portal.
Good to know:
- The trial has no seat, location or storage caps — limits only apply once you are on a paid plan. Plans differ ONLY in those enforced quantities (locations, staff logins, storage); no product feature is gated by plan.
- The staff-login count shown (and enforced) includes outstanding pending invitations, since each reserves a seat; deactivated members do not consume one.
- Checkout bills immediately for the first period — there is no additional trial at checkout — and the page says so in plain words, with applicable sales tax added in Stripe. Prices are in USD.
- Plan and interval changes for an active subscriber always go through the billing portal, where Stripe prorates automatically — crediting unused time and charging only the difference.
- If a payment fails, a warning banner appears ("Your last payment didn't go through…") and the workspace keeps working; if the subscription lapses entirely into unpaid, the workspace becomes READ-ONLY — you can still view everything, run reports and export CSVs, but writes are blocked until billing is resolved.
- Cancelling takes effect at the period end: the badge flips to "Cancellation scheduled" and the date label to "Access until" — you keep full access until then.
Create and manage API keys
Issue bearer keys for TrainGrid's read-only REST API so other systems can pull employees, courses, assignments and compliance data. Keys are shown once and can be revoked at any time.
Where: Sidebar → Administration → Integrations pill → "API keys" card · Before you start: Administrator or Manager (manage-organization; others are redirected to the dashboard).
| Option | What it does |
|---|---|
| Name | A label identifying what uses the key; shown in the key list. |
- Open Administration → Integrations. The first card is "API keys" ("Authenticate requests to the REST API. A key is shown once at creation — store it somewhere safe.").
- Under "Create a key", type a "Name" describing the consumer (e.g. "Power BI") and click "Create key".
- The panel "Copy your API key now" appears exactly once — click the copy button and store the key in your password manager. It cannot be shown again.
- Use it as a bearer token against the base URL shown in the "Developer reference" card at the bottom of the page (endpoints GET /employees, /courses, /assignments, /compliance; paginated with ?limit= up to 100 and ?offset=).
- To retire a key, click "Revoke" on its row and confirm with "Revoke key" in the dialog. Revoked keys show a "Revoked" badge and immediately return 401.
- Success: the key row lists as "Active" with its prefix and last-used timestamp, and your API calls return your organization's data.
Good to know:
- The API is strictly read-only, and every key is scoped to your organization — it can only ever return your own data.
- On /assignments, status=pending|completed|waived filters the stored record status, while status=overdue|due_soon|expired|failed uses the app's derived current-standing vocabulary; "failed" is a completion below the course's passing grade, which the app does not count as compliant.
- A missing, unknown or revoked key returns HTTP 401.
Add webhook endpoints
Receive a signed HTTP POST — or a Slack message — the moment a key event happens in your workspace, so downstream systems and channels react in real time instead of polling.
Where: Sidebar → Administration → Integrations pill → "Webhooks" card · Before you start: Administrator or Manager. For Slack, an incoming-webhook URL from your Slack workspace.
| Option | What it does |
|---|---|
| Endpoint URL | Where deliveries are POSTed. Required. |
| Type | "Generic (JSON POST)" sends {"event": …, "data": …}; "Slack (incoming webhook)" sends a Slack {"text": …} message. Default: Generic. |
| Events | "Training completed" (assignment.completed) and "Employee added" (employee.created). At least one required; both preselected. |
- Open Administration → Integrations and scroll to the "Webhooks" card.
- Under "Add a webhook", paste the destination into "Endpoint URL".
- Set "Type": "Generic (JSON POST)" for your own systems, or "Slack (incoming webhook)" for a Slack channel.
- Under "Events", tick what to subscribe to: "Training completed" and/or "Employee added" (both on by default).
- Click "Add webhook".
- On the new row, click "Test" to fire a sample delivery — success toasts "Test delivered (HTTP 200)." — and note the "Signing secret", which you reveal/copy from the row to verify deliveries.
- Success: the row shows the endpoint with a Generic or Slack badge, its subscribed events, and last-delivery status; the toggle on the row activates/deactivates it, and the delete button (confirmed by "Delete this webhook?") removes it.
Good to know:
- Every delivery carries an X-TrainGrid-Signature header: sha256 HMAC of the raw body using the webhook's signing secret — verify it before trusting a delivery (the Developer reference card shows the exact formula).
- At most 5 webhook endpoints per organization.
- The assignment.completed payload includes grade, passing_grade and passed, so subscribers can distinguish passed from failed completions exactly as the app does.
Sync your roster from BambooHR
Keep the employee list current by pulling it from BambooHR on demand. Sync reuses the same de-duplication as CSV import, so it never creates duplicate people.
Where: Sidebar → Administration → Integrations pill → "HRIS sync" card · Before you start: Administrator or Manager, plus a BambooHR API key and your BambooHR company subdomain.
| Option | What it does |
|---|---|
| Company subdomain | Your BambooHR tenant subdomain. Required. |
| API key | Your BambooHR API key; stored server-side and never redisplayed (the field shows dots once connected — enter to replace). |
- Open Administration → Integrations and scroll to the "HRIS sync" card.
- Under "Connect BambooHR", enter your "Company subdomain" and paste your BambooHR "API key", then click "Connect BambooHR".
- Success toast: "BambooHR connected." The card now shows the connection with its last-sync status (initially "Not synced yet").
- Click "Sync now" whenever you want to pull the roster; the row then shows the last sync time (in your organization's timezone) and its outcome summary.
- To rotate credentials, use "Update BambooHR credentials" → "Update connection"; to stop syncing, click the disconnect (trash) button — confirmed before it takes effect, toasting "BambooHR disconnected."
Good to know:
- The stored BambooHR key is never sent back to the browser.
- Sync applies the CSV importer's de-duplication rules, so re-running it is safe.
Search & jump anywhere with the command palette (⌘K)
One keyboard-driven box that searches employees and courses and jumps to any page or common action — the fastest way around TrainGrid once you know it exists.
Where: The "Search or jump to…" button in the top header (shows the ⌘K hint), or press ⌘K (Mac) / Ctrl+K (Windows) anywhere in the app · Before you start: Any signed-in staff user. Entries are filtered to what YOUR role may actually open — a Viewer never sees admin destinations.
- Press ⌘K / Ctrl+K, or click "Search or jump to…" in the header. A dialog opens with the placeholder "Search employees, courses, pages…".
- Start typing. Results group under: "Actions" (e.g. "Assign training…", "Import employees from CSV…", "New course…", "Print sign-in sheet…", "Invite a user…", "Organization settings"), "Go to" (main pages), "Reports", "Administration", "Employees" (live name search), "Courses" (searches code and title) and "Workspace".
- Use the arrow keys and press Enter (or click) to open the highlighted entry.
- Success: you land on the chosen page or record; the palette closes and clears its query so the next ⌘K opens clean.
Good to know:
- Role-gated and fail-closed: every action and destination is included only when your role holds the matching capability, so the palette never offers a page that would refuse you.
- Employee search covers active employees only; course results render as code + title.
- Pressing ⌘K again while open closes it.
Open the in-app user guide & get help
Reach the full hosted user guide, keyboard shortcuts, support email and the legal/security pages — all from the avatar menu in the header.
Where: Avatar (your initials) at the top right of the header → the account dropdown menu · Before you start: Any signed-in staff user.
- Click your avatar at the top right. The menu header shows your name, email and role.
- Click "Help — user guide" to open the hosted user guide in a new tab — a multi-part, sectioned reference for every feature, including a step-by-step How To part with diagrams.
- Click "Keyboard shortcuts" to see the shortcut overlay, or "Contact Support" to start a pre-addressed support email.
- Under the "Settings" group in the same menu, "About", "Terms of Service", "Security" and the data-protection page open in new tabs; a reset-password entry is also available.
- Success: the guide (or chosen page) opens in a new browser tab; the app keeps your place.
Good to know:
- The user guide is also linked publicly (site footer "User guide"), so auditors or evaluators can read it without a login.
- The menu's second line (email) only renders when it differs from the display name.
Quick reference: statuses, colours & roles
The three vocabularies you will meet everywhere in TrainGrid on one page: the training status list, the competency outcome colour legend, and the built-in roles at a glance.
Where: Statuses: the button row on Record Completion and every badge/matrix cell. Competency legend: Reports → Competency Status (below the summary) and "What do these mean?" in the assessment form. Roles: Administration → Roles & Permissions grid. · Before you start: None — this is reference material.
- Training statuses (the Record Completion status button row reads: Incomplete · Overdue · Due soon · Pending · Completed · Expired · Failed · All · N/A (waived)): Completed = current, compliant training (green). Pending = assigned, not yet inside the due-soon window (slate). Due soon = due within the organization's due-soon window (amber). Overdue = past its due date and not completed (red). Expired = completed but its certificate has lapsed (dark red). Failed = a completion recorded below the course's passing grade — stored, visible, and counted as NON-compliant everywhere; no certificate is issued (darkest red, X glyph). N/A (waived) = formally waived, excluded from compliance (grey). "Incomplete" and "All" are list views (combinations), not statuses. All of these are derived live from dates — never stored — so they update as the calendar moves.
- Competency outcome colours (identical on the matrix Competency lens, reports and record badges): Competent = green ("demonstrated the required skill to the expected standard"). Competent with conditions = yellow ("can perform the task but requires restrictions or additional supervision"). Needs improvement = orange ("did not fully meet the standard" — assign remedial training and reassess). Not competent = red ("did not demonstrate the required competency" — do not authorize independent work). Not assessed = light neutral ("not yet evaluated"). Exempt = blue ("the requirement does not apply"). On the Qualification lens, an amber cell means the previous qualification is CARRIED while a reassessment is outstanding — still qualified, visibly pending.
- Roles at a glance (Administration → Roles & Permissions shows the full capability grid): Administrator — full control, including billing and organization ownership; the ONLY role that can permanently delete courses, employees or records. Manager — manages the whole workspace, everything except billing. Training Coordinator — manages employees, courses, assignments, completions and reports. Supervisor — views and records training completions for their assigned location(s). Viewer (auditor) — read-only access for audits and inspections. The Permissions grid lets an Administrator toggle individual capabilities for Manager, Training Coordinator, Supervisor and Viewer; the Administrator row itself is always full and never editable. Custom roles can also be created and targeted by alerts.
- Success: you can decode any badge, cell colour or permission question without leaving the page you are on — and the same legends are rendered in-app exactly where readers need them (matrix legend, Competency Status report, permissions grid).
Good to know:
- Statuses are computed, never stored (a design rule) — correcting a date recomputes the status instantly.
- Training, competency and qualification are three separate states: an employee can be green under the Training lens and red under Competency (trained but not assessed or not competent).
- Location-scoped members see and receive only their own sites, across lists, reports and alerts alike.